
Related Manuals for Lightspeed LES 750iR


Summary of Contents for Lightspeed LES 750iR
- Page 1 LightSPEED LightSPEED LES 750iR INFRARED CLASSROOM AMPLIFICATION SYSTEM U S E R ’ S M A N U A L...
-
Page 2: Table Of Contents
Table of Contents LES 750iR Infrared Classroom Amplification System: Overview LES 750iR System Components System Installation: 1. Unpacking 2. Location 3. Speaker(s) 4. Receiver/Amplifier 5. IR Sensor Placement a. Suspended Ceiling Mount b. Wall or Solid Ceiling Mount 6. LightMic Microphone/Transmitter 7. -
Page 3: Les 750Ir Infrared Classroom Amplification System: Overview
SR-70 Infrared Sensor (The system also includes your choice of speaker package.) Congratulations on your purchase of the The LES 750iR is a two-channel receiver LES 750iR Infrared Classroom Amplification amplifier that allows the use of up to two System! This simple, yet powerful technol-... -
Page 4: Les 750Ir System Components
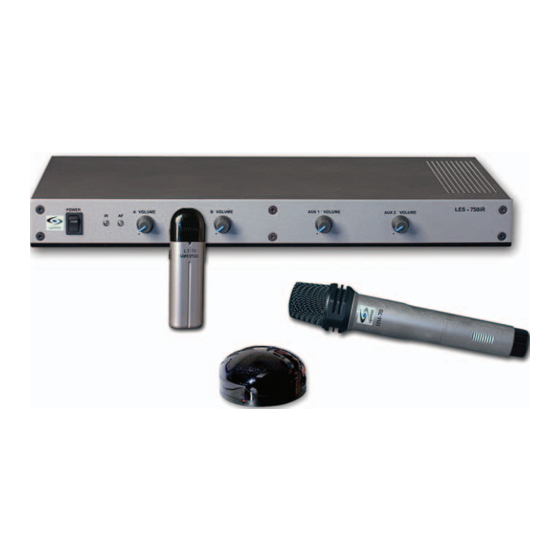
LES 750iR Classroom Amplification System Components: LES 750iR Receiver/Amplifier LES - 750IR POWER B VOLUME AUX 1 VOLUME AUX 2 VOLUME A VOLUME Power Supply LT-70 LightMic ™ Microphone/ Transmitter SR-70 Infrared Sensor Cable Speaker(s) SR-70 Infrared Sensor Various speakers are available... -
Page 5: System Installation
If the system must be returned, it will be quick, convenient 4. Receiver/Amplifier and undamaged. • Place the LES 750iR on a flat surface 2. Location like a bookcase or countertop. Before installing the system, take • Ensure that the A VOLUME... -
Page 6: Ir Sensor Placement
LES 750iR cable into either of the sensor inputs Classroom Amplification System. on the back of the LES 750iR. • BEST: On the ceiling at or near the • Complete Step 7 (testing) to confirm middle of the classroom. -
Page 7: Lightmic Microphone/Transmitter
6. LightMic Microphone/Transmitter For testing purposes, basic instructions for wearing and operating the LightMic are provided below. For more detailed instructions, refer to page 11. • Clip the LightMic to the lavaliere cord. • Place the LightMic and lavaliere cord around your neck and adjust cord length so the top of the LightMic sits just below your collar bone. -
Page 8: Lightmic Microphone/Transmitter: Controls And Connections
Channel A or B. If you 5. Charger Connector (CHARGER): are using a single microphone/ Use the jack labeled CHARGER to transmitter for your system, we connect the charging cable from the recommend using Channel A. LES 750iR to the LightMic for daily battery recharging. -
Page 9: System Operation
IN 1 IN 2 SENSOR INPUTS EQUALIZER Check that the LES 750iR is connected to a power source. Connect the power supply into a standard AC outlet, and then plug the other end to the DC To AC outlet POWER jack on the back panel. -
Page 10: Step Two: Charging The Lightmic
Charging the LightMic 1. Ensure the LightMic is turned OFF. However, do not leave the LightMic plugged The LES 750iR must be connected into the charger for more than 10 days, as it to AC power in order to charge will significantly shorten battery life. -
Page 11: Step Three: Operating The Lightmic
CH A 5. The IR indicator to the left of the A VOLUME control will light indicating that the LES 750iR is receiving a signal from the LightMic. 6. To turn the LightMic off, slide the switch to the OFF position. -
Page 12: Step Four: Adjusting The Volume
Adjusting the Volume POWER A VOLUME B VOLUME Volume is set by adjusting the 1. Make sure: volume control on the LES 750iR. SENSOR a. 750iR is switched ON. SHORT b. LightMic is switched on and the triangle-shaped is glowing red. -
Page 13: Step Five: Operating An Optional Second Microphone Simultaneously 1
Operating an Optional Second Step 5: Microphone Simultaneously The LES 750iR has two independent receivers: Channel A and B. This makes it possible to operate two microphones simultaneously. Follow the instructions below when using a second microphone: 1. If you have two LightMics: a. -
Page 14: Optional Hm-70 Handheld Microphone Transmitter: Overview
Optional HM-70 Handheld Microphone/Transmitter: Overview The HM-70 handheld microphone is an optional component that can be ordered with the LES 750iR system. Power/Charge LED Indicator This microphone is typically passed around among students, so that when they are asking a question or mute off... -
Page 15: Charging The
Charging the HM-70: 1. Ensure the HM-70 Handheld Microphone is turned OFF (ON/OFF switch on the side of the unit). The LES 750iR can be left on, but must be connected to AC power in order to charge the microphone. -
Page 16: Operating The
Operating the HM-70 POWER B VOLUME A VOLUME The Channel A/B switch is located inside the 4. When holding the HM-70, grip the battery compartment. The switch is set to barrel in the center section just below Channel B at the factory. the power switch. -
Page 17: Input From External Audio Equipment
(Part # AC-STM-ADPT). LES - 750IR B VOLUME AUX 1 VOLUME AUX 2 VOLUME 3. With the LES 750iR power on, adjust the corresponding AUX (1 or 2) VOLUME knob on the front to a desired level. [15]... -
Page 18: Output To Personal Fm Transmitter
The LightSPEED LES-370 Personal FM System requires the CA-MMC3535 cable. 3. With the LES 750iR turned on, turn the corresponding ADJ volume control Audio Equalizer to a desired level. When used with a The LES 750iR has a built-in 8-band personal FM transmitter, typically this equalizer. -
Page 19: Front Panel Controls
Channel B. Rotating the microphone is turned on. This light knob clockwise increases output level. confirms the LES 750iR is receiving 6. AUX VOLUME: These knobs (AUX 1 the infrared signal. and AUX 2) control the volume of 3. -
Page 20: Rear Panel Controls
IR sensor connects to either of these two inputs. Up to two IR sensors can be 5. MIXED AUDIO OUT: These output connected to the LES 750iR to cover jacks send the processed audio signal larger or odd shaped classrooms. -
Page 21: Tips On Using Classroom Amplification
Five-Year Limited Warranty Amplification to Original Purchaser These helpful suggestions are provided The LightSPEED LES 750iR Infrared Class- to maximize the successful use of your room Amplification System is warranteed new LES 750iR Infrared Classroom against malfunction due to defects in materials and workmanship for a period Amplification System. -
Page 22: Troubleshooting Guide
• Turn the 750iR on. Confirm that channel for one of the LightMics. the POWER light located on the • Keep the LES 750iR at least 6 feet front panel switch is on. away from computers. • Turn the LightMic on and confirm... -
Page 23: Individual Components And Optional Accessories 2
6’ dual RCA audio cable CA-RCA24: 24’ dual RCA audio cable CA-MMC3535: 3.5 mm mono to 3.5 mm mono audio cable CA-MMC2535: Audio patch cable (2.5 mm mono to 3.5 mm mono) SPEAKERS: Contact LightSPEED at 800.732.8999 for loudspeaker information [21]... -
Page 24: Overall System Specifications
Overall System Specifications: Carrier Frequencies (IR) 2.06/2.54 MHz Frequency Stability +/– 3% Maximum Deviation +/– 50 kHz Dynamic Range > 73 dB Signal-to-Noise Ratio > 73 dB Frequency Response 40 Hz - 20 kHz (– 3 dB) Receiver Specifications: Receiver Type Superheterodyne Receiver Sensitivity 6 µV for 60 dB S/N ( >... -
Page 25: User Notes
User Notes Record your system serial numbers and purchase information. This is helpful when ordering additional components, accessories, and/or warranty service. standard serial number components LES 750iR LT-70 LightMic SR-70 IR Sensor Speakers Power Supply optional serial number component HM-70 Handheld... - Page 26 L I G H T S P E E D T E C H N O L O G I E S , I N C . 1 1 5 0 9 S W H E R M A N R D T U A L A T I N , O R 9 7 0 6 2 8 0 0 .
Need help?
Do you have a question about the LES 750iR and is the answer not in the manual?
Questions and answers