Table of Contents
Advertisement
Quick Links
Download this manual
See also:
User Manual
Advertisement
Table of Contents

Related Manuals for ZENEC Z-R1030


Summary of Contents for ZENEC Z-R1030
- Page 1 Z - R1030 10,2"/25.9 cm LCD STROPNÍ MONITOR S INTEGROVANÝM DVD-PŘEHRÁVAČEM UŽIVATELSKÝ NÁVOD...
- Page 2 Thank you for your purchase of this ZENEC product! With the Z-R1030 monitor, you have chosen a technically mature high quality product that will give you a long service life and very high reliability, since this product has been manu- factured using only high quality parts.
-
Page 3: Table Of Contents
Z-R1030 LIEFERUMFANG Parts Name Quantity Monitor IR remote control with battery A/V cable ST4.2 x 16 mm screws PM4 x 12 mm screws Metal mounting plate User’s manual Rubber gasket CAUTION: Use only the contents of this package to install and use the DVD player. Use of any accessories not provided with this player may result in damage to the player. -
Page 4: Safety Information
6. Do not disassemble or alter the unit in any way, because it will void your warranty. Do not attempt to repair or to service the unit yourself, but contact an authorized ZENEC dealer instead. -
Page 5: Ir Remote Control
13 SD Schacht Lesegerät für SD Karten 14 USB Port Zum Anschluß von USB Sticks Z-R1030 15 AV Eingang 3,5mm Eingansbuchse für Audio/Video Aus IR REMOTE CONTROL Beschreibung Funkti 1 Ein/Aus (POWER) Schalt 2 Einstellungen (SETUP) Drücke 3 Stumm (MUTE) - Page 6 10. [ FAST REVERSE] button Press the [FAST REVERSE] button to fast reverse playback at 2x, 4x, 8x, 16x and 32x speeds. 11. [RANDOM] button Press the [RANDOM] button to play chapters or tracks in random order. 12. [A-B] button Press the [A-B] button to repeat playback from point A to point B.
-
Page 7: Ir Remote Control
Z-R1030 1. Pull out the battery holder. Follow the arrow 1 slide it to the right toward the battery while at the same time pull the battery holder away from the remote control. 2. Place the battery. Place the new lithium battery (CRD2025) with the (+) side up. -
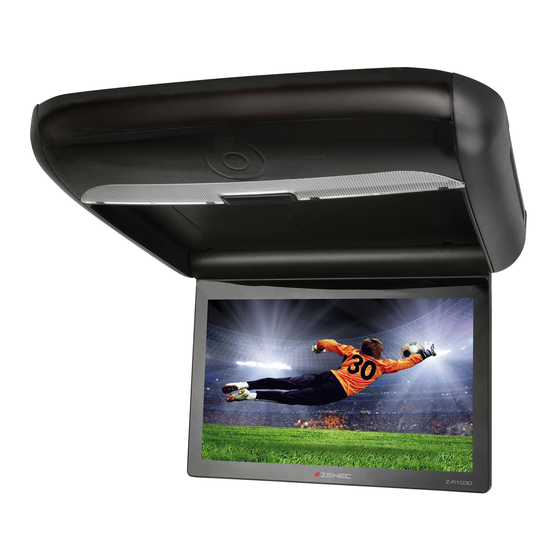
Page 8: Roof Mount Monitor
ROOF MOUNT MONITOR HARD KEYS AND SENSOR BUTTONS 19 18 Function or control Description 1 MENU Touch and hold to display the OSD menu, touch again to close the OSD menu 2 12 Play / pause 7 / a Previous chapter / navigation left; press and hold to fast reverse at 2x, 4x, 8x, 16x, 32x normal speed Navigation up 8 / d Next chapter or track / navigation right;... - Page 9 Z-R1030 1. [MENU] sensor button Press the [MENU] sensor button to enter the main menu. Press the button again to select a menu item. 2. [PLAY/PAUSE] sensor button 3. [PREVIOUS] cursor-left sensor button 4. [CURSOR-UP] sensor button 5. [NEXT] cursor-right sensor button 6.
- Page 10 ROOF MOUNT MONITOR DISPLAY OPERATION TO OPEN THE DISPLAY 1. Press the OPEN button to unlock the LCD panel. 2. Swing the LCD panel downward to the desired angle. OPEN BUTTON CAUTION: The LCD display open to a maximum angle of 120° degrees. Do not attempt to open it further.
-
Page 11: Basic Operation
Z-R1030 BASIC OPERATION TURNING ON THE PLAYER Press the button on the remote control or on the front panel. The player turns on, and the input source and format are displayed on the screen: Noti cation NO DISC Input source... - Page 12 PLAYING A DISC 1. If the input source isn t already set to DVD, press SRC button on the remote control or the device to change the input source to DVD. 2. Insert a disc to DVD into the disc slot on the right side of the player. After several seconds, the screen displays the message loading .
- Page 13 Z-R1030 Selecting subtitles during DVD playback 1. Press the SUBTITLE button to change the subtitle language you want during DVD playback. The current language number, the total number of the subtitle languages and current language are displayed. 2. If there are multiple languages available, press the SUBTITLE button again to cycle through the available languages.
- Page 14 PLAYING AUDIO CD’S To display playing time and the current track: During CD playback, press the DISPLAY button to display the disc type, the current time, the current track number and the total number of the tracks are displayed on the screen. REPEAT PART OR THE ENTIRE CD During playback, press the REPEAT button repeatedly to cycle through the available settings:...
- Page 15 Z-R1030 PLAYING MP3 CD’S When a MP3 disc is inserted into the player, the menu screen appears automatically. You can use the menu screen to select the folders and tracks you want, or the player plays the tracks in the order they were burned onto the disc.
-
Page 16: Main Menu
MAIN MENU Access the Menu To adjust the picture, use the MENU button to select the features you would like to adjust. Adjustment selections are as follows: 1. Press and hold the MENU button on the remote control for more than one second, or ] on the unit. -
Page 17: System Setup
Z-R1030 SYSTEM SETUP Access System Setup 1. Press the SETUP button on the remote control, to bring up the system setup of the device. Menu settings Description Activate or deactivate the Angle Mark function. Function ANGLE depends on DVD content, e.g. if identical scenes are shot MARK in a different camera angle. - Page 18 CUSTOMIZING DVD SETTINGS To set the general setup page: 1. Press the SETUP button on the remote control. The DVD setup menu opens. 2. Press the [] / [] buttons to select General setup page, then the list opens. 3. Press the [] / [] buttons to select the desired setting item. The items include TV DISPLAY, ANGLE MARK, OSD LANG, CAPTIONS and SCREEN SAVER.
-
Page 19: Connections And Wiring
Z-R1030 CONNECTIONS AND WIRING Connecting diagram 1. GND (Black) 2. Door contact (Green) 3. 12V B+ (Yellow) 4. ACC (Red) 5. A/V IN 2 (Red) (White) (Yellow) 6. A/V OUT (Red) (White) (Yellow) Inverter switch 8. A/V IN 1 Socket 11. - Page 20 1. GND wire (black) Connect this wire to a suitable vehicle chassis ground point. 2. Door contact wire (green) Connect this wire to the automatic interior illumination system of your vehicle. 3. Battery +12V wire Connect this wire to a permanent +12V power supply in your vehicle, or to the positive pole of the battery.
-
Page 21: Mounting
Z-R1030 MOUNTING NOTE: Installation or servicing of the player shall be attempted by persons with experience in electronic equipment and automotive accessories. 1. Attach the metal mounting plate to Vehicle roof the roof using the ST4.2 x 16 mm screws. - Page 22 5. Connect A/V input and output cables. 6. Connect the wire harness in the following order: ground wire, battery wire, ACC to the counterparts in the vehicle. 7. Connect the wire to the door illumination of your vehicle. 8. Fix the monitor to the metal mounting plate using the PM4 x 12 mm screws. 4 Screws PM4 x 12 mm 9.
-
Page 23: Troubleshooting
Z-R1030 TROUBLESHOOTING Problem Cause Solution Reinsert the disc with the label Disc inserted incorrectly. side up (facing the ceiling). Player does not play disc. Disc format is not supported. Check the disc format. Disc is dirty or scratched. Clean or replace the disc. -
Page 24: Specifications
SPECIFICATIONS Power Source Vehicle battery (+10.5V ~ +14V (DC)) Mechanism Manual Open/Close Display Angle > 120° Operating current <2000mA (Typical VDD=14V) Dome Light 2 W (LED) Operation Temperature -10 °C to +50 °C Size (HxWxD) 290 x 320 x 60 mm Weight (g) 2550 This item incorporates copy protection technology that is protected by U.S. -
Page 25: Maintenance
Z-R1030 MAINTENANCE Handling discs To keep a disc clean, do not touch the play side (non-label side) of the disc. Do not attach paper or tape to the disc. Keep the disc away from direct sunlight or heat source. Store the disc in a disc case after playback. -
Page 26: Warranty
WARRANTY 2 YEARS Dear customer, Thank you for purchasing this ZENEC product. It is advisable to keep the original packaging material for any future transporting of the product. Should your ZENEC product require warranty service, please return it to the retailer from whom it was purchased or the distributor in your country. - Page 27 Z-R1030 ZENEC MODEL: Z-R1030 Serial number: ..........................Date of purchase: ..........................Your name: ............................Your address: ..........................City: ..............................State: ........ZIP or postal code: ................Country: ............................Dealer’s address & stamp If at any time in the future you should need to dispose this product, please note that waste electrical products are not be disposed with the household waste.
- Page 28 ZENEC by ACR AG · Bohrturmweg 1 · Bad Zurzach · Switzerland www.zenec.com Rev. A...
Need help?
Do you have a question about the Z-R1030 and is the answer not in the manual?
Questions and answers