Table of Contents
Advertisement
Advertisement
Table of Contents

Subscribe to Our Youtube Channel
Related Manuals for Hoggi Bingo OT


Summary of Contents for Hoggi Bingo OT
-
Page 1: User Manual
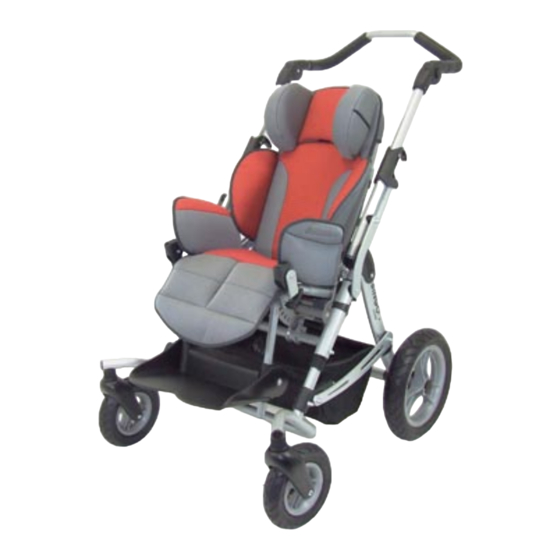
BINGO OT BINGO Rehab Pushchair user manual Partnering together to mobilise kids... -
Page 2: Table Of Contents
Accessories bag size 2 (model 2009, max. 8 kg) ____________________________________________ 20+21 Headrest pads __________________________________________________________________________ 21 Head rest with occiput upholstery, mounting in connection with universal headrest bracket, only 21+22 (BINGO OT) Thorax pads _________________________________________________________________________ 22+23 Pelvic stirrup ___________________________________________________________________________ 23 Lap belt ____________________________________________________________________________ 23+24 4-point lap belt __________________________________________________________________________ 24 5.10... -
Page 3: Common Information
1.5 Service and Repairs Service and repairs on the BINGO should only be carried out by authorized HOGGI dealers. Should any problems arise, please contact the dealer who supplied your BINGO. Authorized dealers only fit original HOGGI spare parts. -
Page 4: Safety Instructions
Strap your child at all times, when they are in the wheelchair. HOGGI points out, that any use beside the typical use can be dangerous. The pushchair is not suitable for jogging, running, skating or similar activities. Swivelling front wheels tend to wobble at higher speed, which can cause a sudden stop and tip over of the pushchair. - Page 5 Pay particular attention when on slopes and inclines to prevent - the child from falling out of the pushchair; - the pushchair from tipping over; - the pushchair from rolling away. If you have to park on a slope, face the pushchair uphill with the brakes engaged and ensure that the seat is in the upright position.
- Page 6 The pushchair is only intended to carry one child at a time. The maximum load for the BINGO street frame is 50 kg. The maximum load for the BINGO seat unit is 35 kg. Accessories and add-ons reduce the maximum load proportionately. Attention! We recommend that, wherever and whenever possible, users transfer to the seats installed in the motor vehicle and use the corresponding vehicle restraint systems, because this is...
-
Page 7: Delivery And Preparing For Use
3 Delivery and Preparing for Use The original package contains the following components: • outdoor mobility base, folded; • seating unit, folded; • back insert • seat, back, hip and lateral padding; • instructions for use and list of tools required; •... - Page 8 • After setting the backrest to the desired position clamp it firmly with the clamping lever. By pulling the handle of the clamping lever backwards you can rotate it freely and find a optimal position to operate it. • To overcome the child protection pull the trigger outside first. •...
- Page 9 • The Allen wrench (size 4 mm) for this and for most other adjustments you can find mounted in the joint slider of the backrest • In addition to the clamping bolts, the back insert is fixed and secured by two carriage bolts with knurled nuts, which also limit the maximum back height.
- Page 10 • Put the lateral upholsteries on the lateral brackets and connect the corresponding hook & loop straps. • Pull the back upholstery with the cap onto the back insert. • Connect the corresponding hook & loop straps to the back insert so that the shoulder belt slots line up with the upper edge (shoulder) of the back upholstery.
- Page 11 • Plug the backrest upholstery between backrest and seat unit and fix the backrest upholstery onto the back edge of the seat. For transportation the armrests of the BINGO OT has been detached. • Loose the fasteners of the premounted armrests.
- Page 12 • Plug the backrest upholstery between backrest and seat unit and fix the backrest upholstery onto the back edge of the seat. For transportation the armrests of the BINGO OT has been detached. • Loose the fasteners of the premounted armrests.
- Page 13 • Plug the hip support including the screws from the inside through the boreholes. • Loose the wing nut. • The hip supports can be adjusted (concerning the depth) as long as the wing nuts aren´t firmly tightened. Whenever you change any settings on the BINGO rehab pushchair, make sure that you firmly tighten any screws that have been loosened.
-
Page 14: Adjusting And Adaptation Possibilities
4 Adjusting and adaptation possibilities 4.1 Wheel lock To put the wheel lock on push the wheel lock lever downwards and roll the pushchair slightly back or forward, so that the lock pins can engage in the brake disc. Never use force! This could damage the quick release mechanisms and the wheels could fall off and cause injuries. -
Page 15: Hip Pads
Whenever you change any settings on the BINGO rehab pushchair, make sure that you firmly tighten any screws that have been loosened. 4.5 Armrests with hip pads (BINGO OT) After loosening the wing nuts the hip pads can be adjusted in the depth. -
Page 16: Recline
4.7 Recline • Stand behind the seat first and put the wheel lock on. Secure the back with one hand before you operate the clamping lever with the other hand. • Adjust the back to the desired position and tighten the clamping lever firmly again. -
Page 17: Footrest Lock (Optional)
4.11 Footrest lock (optional) • By pulling the release strap the footrest lock is disengaged and the footrest can be folded for better storage. If you swing the footrest down again, it will lock automatically. 4.12 Detaching and attaching the seat unit For easier transport handling you can dismantle your BINGO in two parts by detaching the seat unit easily from the streetframe. -
Page 18: Tilt In Space
Before use in the reverse riding direction the base adapter must be rotated 180°. • Remove all four bolts and rotate the base adapter. • Tighten the bolts firmly again. 4.14 Tilt in space The BINGO seat unit can be tilted up to 45° in driving direction and 40°... -
Page 19: Detaching Wheels With Quickrelease
4.15 Detaching wheels with quickrelease In order to achieve a most compact folding package the rear wheels of all models and the front wheels of the models with rigid front wheels are detachable by quick release hubs. • To detach press the quick release spring towards the middle of the wheel and pull the wheel from the axle. -
Page 20: Accessories
5 Accessories All accessories not installed by the manufacturer must be installed by trained technicians. The following notes on installation are for your information but should be performed by trained technicians. Straps on accessories are usually extra long to accommodate every option. Excess strap ends on accessories may be trapped between the two parts of the seat mounting interface and prevent a full engagement of the lock pin. - Page 21 • Fix the Velcro fasteners on the front frame as shown. • Proceed in the same way on the other side. • Fix the Velcro fasteners below the folding lever on the rear frame as shown. • Proceed in the same way on the other side of the rear frame. The storage bag “model soft”...
-
Page 22: Headrest Pads
The storage bag “model 2009” is fixed with a foldable bracket which is constantly bolted on the frame. The storage bag “model 2009” can be used only if the seat unit is mounted in driving direction. Caution! Please look after that the storage bag “model soft” is empty before folding! 5.4 Headrest pads The headrest pads are mounted with carriage bolts and knurled nuts... -
Page 23: Head Rest With Occiput Upholstery, Mounting In Connection With Universal Headrest Bracket, Only (Bingo
The height adjustment is realized by adjustment of the back insert. 5.5 Head rest with occiput upholstery, mounting in connection with universal headrest bracket, only (BINGO OT) The universal headrest bracket gets mounted on the backrest plate. After loosening the adjusting lever it is possible to adjust a inserted headrest in the height. -
Page 24: Pelvic Stirrup
The triangular pad guiding gets plugged from the back side The stamping in the pad guiding must be positioned into the long hole. At least 2 washer get plugged and the wing nut gets firmly tightened. After loosening the wing nut it is possible to adjust the trunk pad steplessly concerning the height. -
Page 25: Lap Belt
5.8 Lap belt On each end of the lap belt you can find pre mounted triglides, which are passed by the belt only once. The length of the free belt ends determine the length of the complete lap belt. • Pass the free belt ends through the designated slots in the lower part of the back base. -
Page 26: Five-Point Harness
5.10 Five point harness The five point harness should be installed by authorized dealers or trained technicians. Take the seat upholstery off first. Loosen all the carriage bolts of the hip pads. Pull out the seat plate completely to get easy access to the set of rectangular slots in the seat plate underneath the hook strap. -
Page 27: Foot Straps
Mount the lap strap ends of the five point harness as decribed in 5.8. lap belt and preadjust them roughly. To take the five point harness off proceed as follows: • Press the red key on the buckle • Press the keys of the length adjusters and pull the strap out so that approx 5 cm (2 inches) of the strap end remains. -
Page 28: Ankle Hugger
5.12 Ankle hugger Ankle hugers allow a comfortable fixation of the foot joints. They are fixed to anchors on the foot plate. The heel should be placed against the heel plate of the footrest. The belts are opened/closed and adjusted with velcro straps. 5.13 Frame padding Fit the frame padding around the pushbar and close the hook &... -
Page 29: Fixation Jacket
Thread the attachment straps of the groin strap between seat and back padding, wrap them around the back of the seat edge and attach with carriage bolts and knurled nuts of the hip pads. The set of holes allow a length adjustment. To put on the groin strap proceed as follows: •... -
Page 30: Chest-Shoulder Harness
Closing the fixation jacket: • Place your child into the seat. • Close the zipper. • Hold the vest against the child’s chest and close the open quickrelease buckles. If required, re-tighten the individual fixation vest straps in the cam-lock buckles. •... -
Page 31: Abduction Block
• Make sure that the chest and shoulder pad is positioned symmetrically on the pelvis and close the buckles on the lower straps. • Set the upper body of your child upright against the back. • Finally, tighten the upper straps behind the seat and close the buckles on the upper straps. -
Page 32: Therapy Tray
To remove the grab rail please position edgewise to the wheelchair: • Take off the grab rail by pressing both of the snap buttons and pull the rail upwards as shown in the illustration. The cover is easy to remove by opening the zipper. 5.19 Therapy tray Insert the tray with the vertical round tubes into the accessory brackets on the seating unit. -
Page 33: Sheep Skin Insert
Lower straps to the lower area of the back base. 5.21 Sheep skin insert After removing the upper side of the winter warmer the sheep skin insert gets inserted into the winter warmer. 5.22 Rain cape With the zip-fastener open pull the rain cape over the child’s head, then unfold the upper end over the backrest and the lower end around the footrest. -
Page 34: Attendant Brake
Adjustable ratchet joints are used to set the angle of the canopy. Spread the canopy and wrap over the backrest of the seat. Canopy with rain cover: Take the rain cover out of the bag attached to the wrap, unfold the rain cover, pull it over the unfolded canopy and put it over the footrest assembly. -
Page 35: Dynamic Kit
5.25 Dynamic kit The dynamic kit of the BINGO seat unit allows the kids the possibility to stretch hip and knee joint at comporatively little fixing So the child hasn´t to antagonise vs a rigid opposition. Backrest, seat and footrest follows that stretching move while the child remains well positioned. -
Page 36: Sunshade
The adapter for the kiddy-board must be mounted on the rear axle as show in the illustration. Buggy- and kiddy board are applicable for children at the age of 2 years and resilient up to 20 kg. 5.28 Sunshade BINGO can be supplied with a sunshade. For this purpose the adapter gets screwed above the folding mechanism optional on the left or the right side. -
Page 37: Transportation
6 Transportation 6.1 In the Trunk of a Car Basically you can store your rehab pushchair in the trunk of your car as well with or without seat unit on as well as with or without wheels on. The most compact size is achieved by removing the seat unit and wheels by quick release mechanisms and placing them as shown in the mobility base. -
Page 38: Maintenance
Visual inspection of wearing parts such as wheels and bearings Contamination on bearings Should any defects become obvious, please contact your authorized HOGGI dealer to eliminate them. We also recommend that you have your BINGO serviced by your authorized dealer every twelve months. -
Page 39: Technical Data
8 Technical data Dimensions cm (inches) and weight kg (lb) Size 1 Size 2 Mobility base 3201-1000 rigid fr. wheels 3203-1000 rigid fr. wheels 3202-1000 sw. fr. wheels 3204-1000 sw. fr. wheels Height push handle 77 -112 (30-44) 77 - 112 (30-44) Overall width 63 (25) 68 (26.5) - Page 41 Hersteller/Manufacturer: Hoggi GmbH Taunusstrasse 17 D - 56235 Ransbach-Baumbach Fon: (+49) 26 23 / 92 499-0 · Fax: (+49) 26 23 / 92 499-99 e-mail: info@hoggi.de · Internet: http://www.hoggi.de...
Need help?
Do you have a question about the Bingo OT and is the answer not in the manual?
Questions and answers