Table of Contents
Advertisement
Quick Links
Advertisement
Table of Contents

Subscribe to Our Youtube Channel
Related Manuals for Hyundai H-MS2303


Summary of Contents for Hyundai H-MS2303
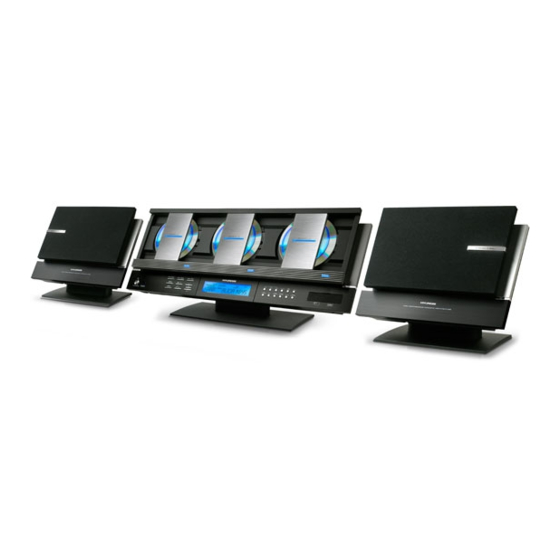
- Page 1 H-MS2303 CD/MP3 MICRO SYSTEM Instruction manual CD/MP3...
-
Page 2: Table Of Contents
Thank you for purchasing this CD/MP3 micro system. In order to use the capabilities of this system in a full measure, please read this instruction manual carefully before use. Table of Contents Table of Contents..........................2 Important safeguards........................3 Control elements ..........................5 Front panel............................5 Remote control (RC) ........................6 System installation ...........................7... -
Page 3: Important Safeguards
Important safeguards For your safety CAUTION RISK OF ELECTRIC SHOCK! DO NOT OPEN! This symbol indicates that dangerous voltage constituting a risk of electric shock is present within this unit This symbol indicates that there are important operating and maintenance instructions in the literature accompanying this unit. - Page 4 Precautions Before operating this system, check the voltage of this system to see if it is identical with the voltage of your local power supply. Unplug the system from the wall outlet if it is not used for a long time. To disconnect the cord, pull it out by grasping the plug To avoid electric shock, do not open the cabinet by unqualified personnel.
-
Page 5: Control Elements
Control elements Front panel 1. Fm-antenna wire 23. DISC 1 SELECT button 2. Back up battery compartment (on rear panel) 24. 3-DISC PLAY MODE (3 CD p-mode) button 3. Cd door (disc 1) 25. EQUALIZER (EQ) button 4. CD 1 OPEN/ CLOSE button 26. -
Page 6: Remote Control (Rc)
Remote control (RC) 1. ON/STANDBY button 2. SNOOZE button 3. TIMER button 4. ID3/FM MODE button 5. EQ button 6. 3CD PLAY MODE button 7. USB/CARD button 8. RANDOM/MEMORY- button 9. STOP button 10. BACK/TUNE DN button 11. MUTE button 12. -
Page 7: System Installation
System installation Installation for tabletop use 1. Place the stand under the 2. Slide the stand upward. 3 Stop when the indicator mark on the main unit or a speaker. stand is aligned with the lock symbol on the rear panel. The stand is now locked to main unit or speakers. -
Page 8: Connection
Installation of batteries In the remote control Remove the battery compartment cover. 2. Insert 1 CR2032 button cell correctly, so that the + and - polarities match the polarity diagrams in the battery compartment. Note: When the battery is exhausted, the remote control can no longer operate the system. Replace the battery with a new one. -
Page 9: Radio Operations
Radio operations General operations Press TUNER button to select the radio function. Press BAND/FOLDER button to select the desired radio band FM or AM (MW). The AM signal is picked up through the built-in antenna. The set should be placed to a proper position for the best reception. - Page 10 This function searches for radio stations of any desired program type (which is the category of radio station, based on its type of programs). To search for a specific program type: Switch on the radio (tuner), make sure band is FM. Press SEARCH MP3/RDS button repeatedly to select the desired category of radio station from the built-in list.
-
Page 11: Compact Disc (Cd) Operations
Compact disc (CD) operations Inserting and removing discs Press any of the DISC SELECT buttons to switch to the CD mode. Press any of the CD OPEN/CLOSE buttons to open the desired CD-door. Carefully place a compact disc (CD or MP3) onto the center spindle with the label side facing outwards. -
Page 12: Notes On Mp3
Notes on MP3 MP3 is short for MPEG Audio Layer 3 and refers to an audio compression technology standard. If you play a non- MP3 file that has the “.mp3” extension, you may hear some noise. Maximum number of directory level is 8, including the root directory. Maximum number of files and folders per disc is 256. -
Page 13: 3-Cd Playback Mode
Repeat folder (for mp3 files only): press REPEAT button repeatedly until REPEAT FOLDER appears in the display. Now the unit will repeatedly playback all songs in the currently selected folder. Please note that if no folder is selected, the “root” folder will be played repeatedly by default. To select a specific folder, use FOLDER button. -
Page 14: Usb And Sd-Card Mp3 Playback
USB and SD-card MP3 playback This unit is equipped with a USB socket which can accept and play MP3 files stored on standard USB flash drives (also known as “pen drives”) which are for memory storage (compatible with USB version 1.1 and 2.0). The unit also has a built-in SD-card socket, which accepts and plays MP3 files stored on standard SD type flash memory cards (of maximum capacity 4 Gb). -
Page 15: General Operations
General operations Power ON/OFF Press ON/STANDBY button to switch on the unit. Press this button to switch the unit off. Digital clock function The set has a built-in digital clock, which is displayed when the unit is in standby mode or when you press and hold PROG/CLOCK ADJ button for 2 seconds during CD or radio operation. -
Page 16: Automatic Power Off (Sleep) Function
Automatic power off (sleep) function This unit has a special sleep timer function, which can automatically switch off the unit. This is useful for sleeping to music at night. At any time while the unit is operating (CD or radio modes), press SLEEP button repeatedly to choose the automatic power off time. -
Page 17: Connecting An External Powered Subwoofer
Connecting an external powered subwoofer This unit has a built in subwoofer connection which can be connected to any standard powered subwoofer (not included). By connecting to a powered subwoofer, the low frequency (bass sound) can be strongly enhanced to provide a much richer and deeper sound to your music. -
Page 18: Protect The Disc
Protect the disc To keep the disc clean, please don't touch the disc surface when you are holding it. You should hold the edge. If the disc is dirty, it will affect the sound quality. Please use the clean and soft cloth to wipe the disc from inside to outside. - Page 19 CD/MP3 ..........................19 ........................20 ........................22 ...........................22 ) .................23 ........................24 ..........................25 .........................26 ..........................26 ) ..............26 ) ..............26 .....................26 RDS ( ) ..................26 ........................28 ....................28 ......................28 ......................28 3........................29 )..........29 ) ............29 , USB ) ......29 ..................30 ..................30 ..........31 ..........................32 ....................32 ......................32 ..............32 ..............33 «Sleep») ............33 ............................33 ......................33...
- Page 20 , – - 20 -...
- Page 21 – - 21 -...
- Page 22 1. FM DISC 1 SELECT 3-DISC PLAY MODE (3 CD p-mode) EQUALIZER (EQ) CD 1 OPEN/CLOSE DISC 2 SELECT ID3/ FM MODE CD 2 OPEN/CLOSE DISC 3 SELECT BAND/FOLDER CD 3 OPEN/CLOSE TUNER TIMER ON/STANDBY PROG/CLOCK ADJUST CD PLAY/PAUSE SD/USB CD BACK/TUNE - MEMORY +/REPEAT 36.
- Page 23 ON/STANDBY SNOOZE TIMER ID3/FM MODE 3CD PLAY MODE USB/CARD RANDOM/MEMORY- STOP BACK/TUNE DN MUTE SLEEP BAND/FOLDER UP FOLDER DOWN MP3/RDS SEARCH CD OPEN/CLOSE / DISC SELECT RADIO TUNER AUX INPUT REPEAT/MEMORY+ PROG/CLOCK ADJUST PLAY/PAUSE NEXT/TUNE UP VOLUME+/- - 23 -...
- Page 24 - 24 -...
- Page 25 CR2032 (« »). « » “L” ( “L” ( “R”. ON/STANDBY, ON/STANDBY ( - 25 -...
- Page 26 TUNER BAND/FOLDER, AM (MW)). ID3/FM MODE, NEXT BACK ( . . « »). NEXT BACK, ( . . « »). PROG/CLOCK ADJ. MEM+/REPEAT MEM-/RANDOM, FM). PROG/CLOCK ADJ, MEM+/REPEAT MEM/RANDOM. RDS ( RDS, RDS, STOP/RDS MODE: - 26 -...
- Page 27 SEARCH MP3/RDS NEXT/TUNE+; RDS; RDS, - 27 -...
- Page 28 DISC SELECT, CD OPEN/CLOSE, MP3) CD OPEN/CLOSE, CD OPEN/CLOSE. PLAY/PAUSE, PLAY/PAUSE, STOP, PLAY/PAUSE, NEXT BACK, NEXT BACK, STOP. PROG/CLOCK ADJ; MEMORY, NEXT BACK, PROG/CLOCK ADJ, PROG/CLOCK ADJ; MEMORY, PLAY/PAUSE; STOP, MP3: NEXT BACK, PROG/CLOCK ADJ, NEXT BACK, PROG/CLOCK ADJ, PROG/CLOCK ADJ, MEMORY, - 28 -...
- Page 29 PLAY/PAUSE, STOP. PROG/CLOCK ADJ. MPEG3 “.mp3”, 256. VBR, . VBR: (ID3 MP3, ID3- ID3/FM MODE; ID3/FM MODE. SEARCH MP3/RDS NEXT BACK, NEXT BACK, SEARCH ALPHABET SEARCH ALPHABET NEXT, PLAY/PAUSE, , USB FIND USB/SD) CD-PM3). FOLDER NEXT BACK, NEXT, FOLDER NEXT PLAY/PAUSE.
- Page 30 : « » REPEAT. REPEAT ( STOP. REPEAT, REPEAT A. REPEAT A-B. STOP. REPEAT REPEAT ALL. STOP. REPEAT REPEAT FOLDER. FOLDER. “1” STOP. STOP. - 30 -...
- Page 31 USB, « »), 2.0. SD ( USB/SD ( USB/SD USB-CARD. 30-60 FOLDER, NEXT BACK, PLAY/PAUSE, 2.0, USB 1.1/2.0. - 31 -...
- Page 32 ON/STANDBY, PROG/CLOCK ADJ. PROG/CLOCK ADJ. : 12 NEXT BACK, PROG/CLOCK ADJ, NEXT BACK, PROG/CLOCK ADJ, NEXT BACK, PROG/CLOCK ADJ, TIMER. ON TIME. NEXT BACK, TIMER NEXT BACK, TIMER OFF TIME. NEXT BACK, TIMER NEXT BACK, TIMER (CD/ /USB/SD). NEXT, TIMER NEXT BACK, TIMER...
- Page 33 «wake to cd» ( DISC SELECT . CD3). TIMER. «Sleep») Sleep, SLEEP, (*00 “EQ OFF” ( VOLUME UP VOLUME DOWN ESP) - 33 -...
- Page 34 (DVD/AUX) RCA ( AUX in AUX, AUX. (CD, AUX). - 34 -...
- Page 35 – , – ~220 /50 2 10 AM = 522 – 1620 FM = 88 – 108 735 ( ) x 304 ( ) x 262 ( ) ( ) ( ) ( ): = 567 x 170 x 267 = 279 x 160 x 267 - 35 -...
Need help?
Do you have a question about the H-MS2303 and is the answer not in the manual?
Questions and answers