Table of Contents
Advertisement
English
English
7 8 0 e
7 8 0 e
P/N : CL-W0169
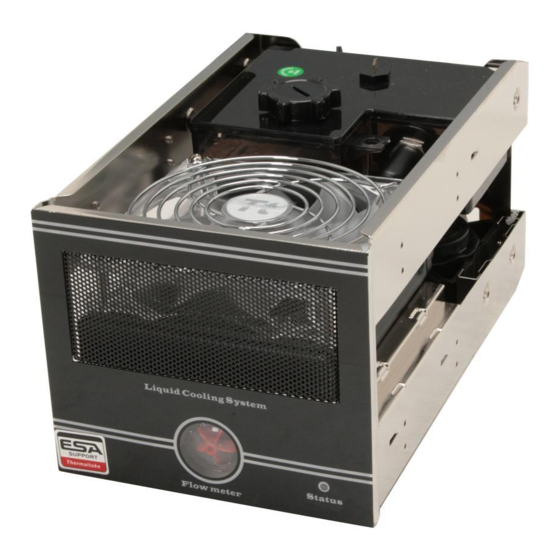
3U Bay Drives Liquid Cooling System
2008 Thermaltake Technology Co., Ltd. All Rights Reserved. 2008.01 O4655
C
All other registered trademarks belong to their respective companies.
www.thermaltake.com
Tested To Comply
Bigwater 780e
With FCC Standards
FOR HOME OR OFFICE USE
CL-W0169
Advertisement
Table of Contents

Related Manuals for Thermaltake Bigwater 780e CL-W0169


Summary of Contents for Thermaltake Bigwater 780e CL-W0169
- Page 1 7 8 0 e 7 8 0 e P/N : CL-W0169 3U Bay Drives Liquid Cooling System 2008 Thermaltake Technology Co., Ltd. All Rights Reserved. 2008.01 O4655 All other registered trademarks belong to their respective companies. www.thermaltake.com Tested To Comply...
- Page 2 Improper installation may cause serious Extent of limited warranty, Thermaltake does not warrant that your product will damage to the system as well as to the water be free from design defects or errors known as "ERRATA". Current characterized errata are available upon request.
-
Page 3: Table Of Contents
Tube Design Radiator Aluminum, Dimple Fin Design Aluminum, Louvered Tubing & Hoes Clip For 9.5mm ID (3/8") tubing Chapter 3. Thermaltake ESA Watercooling 120(L) x 120(w) x 25(H) mm Fan Dimension Software User Guide Fan Speed 800~2500 RPM(PWM) Rated Voltage... -
Page 4: Components Check
English English 1.2 Components check Chapter2 Liquid Cooling Installation 2.1 Liquid Cooling Installation steps main unit We strongly suggest the following installation procedures. Failure to comply may result in leaks and damaged components. All copper water block Components check STEP1 Install Waterblock UV sensitive 1000 cc Coolant x 1... -
Page 5: Install Waterblock
English English STEP1 >> Install waterblock 2.1 Intel LGA 775 - Secure Waterblock onto CPU 2.1.2 Install Waterblock on Motherboard Exploded View Completed View 2.1.1 Install the Clip on Motherboard Components for LGA 775: A-Metal H-type clip B-Cushion Intel LGA 775 C-Insulator Motherboard D-50mm screws... -
Page 6: Intel P4 478
English English 2.2 Intel P4 Socket 478 - Secure Waterblock onto CPU 2.2.2 Install Waterblock on Motherboard Exploded View Completed View 2.2.1 Install the Clip on Motherboard Components for P4 478 : A-Metal H-type clip B-Cushion C-Insulator Intel P4 478 D-50mm screws Motherboard E-Thumb nuts... -
Page 7: Amd K8
English English AMD K8 Socket 754 / 939 / 940 - Secure Waterblock onto CPU 2.3.2 Install waterblock by clips included in package 2.3.2.1 Install the Clip on Motherboard 2.3.1 Standard installation - Install waterblock by motherboard back plate Components for AMD K8 Motherboard AMD K8: 2.3.1.1 Check The Back Plate... -
Page 8: Amd Am2/Am2
English English Secure Waterblock onto CPU (AMD Socket AM2 / AM2+) Combine the insulator(C) and the 2.4.1 Standard installation - Install waterblock by cushion (B) using the adhesive. motherboard back plate Stick the metal H-type clip(A) with the insulators (BC). Tear off the protective 2.4.1.1 Check The Back Plate layer to adhere it onto the motherboard. - Page 9 English English 2.4.2 Install waterblock by clips included in package Combine the insulator(C) and the cushion (B) using the adhesive. Stick the metal H-type clip(A) with the 2.4.2.1 Install the Clip on Motherboard insulators (BC). Tear off the protective AMD AM2 Motherboard layer to adhere it onto the motherboard.
-
Page 10: Install Water Tube
English English 2.5 Install Water tube Install Quickconn Connecter 3U bay liquid cooling system Insert the hose clips and male quick connector CPU Waterblock through the tube. Remove black rubber caps from the waterblock. Use pliers to tighten the hose clips. Repeat the steps for the other side. -
Page 11: Install The Main Unit
Case LED :Connect to ESA Watercooling LED connector marked in Figure 1(P19). 5.25" device installation. It is not necessary to connect to chassis if you are not using Thermaltake ESA-compliant You can also sesure the Bigwater 780e by screws(M). -
Page 12: Esa Pcb Installation
Tt ESA power supply. Please connect the ESA Watercooling status LED cable to the correct connector for ESA Bigwater 780e. For more detail information, please refer to your Thermaltake ESA Step 2: Connect to USB connector on the motherboard. -
Page 13: Connect The Quickconn Connector
Open the cap of liquid tank. smoothly within the tube. Fill the tank up with coolant. (The following duagrams are the Thermaltake Armor plus case.) Close the cap of liquid tank. Note: If you use other chassis, the coolant should be refilled from the side panel. -
Page 14: Power On The System
English English STEP5 >> Power on the system Turn off the PC power switch. Turn on the PC power switch. Close the cover of chassis. Adjust the fan speed. (800~2500 RPM) Installation complete. Note: 1. If bubbles are forming within the tubing, you may tap the tubing gently to remove them until all are gone. -
Page 15: Chapter 3. Thermaltake Esa Watercooling
Windows system. Note: The latest ESA software can be downloading on nvidia.com and will be shipped with motherboards. ESA devices provides real-time monitor and control of Thermaltake PC Chassis, Thermaltake Power Supply and Thermaltake Water-cooling devices. System Requirement: Supported Operating Systems Microsoft Windows XP (32-bit &... -
Page 16: System Update
3.1 System Update Caution!! All the latest ESA firmware posted at Thermaltake Website is for products sold and packaged by Thermaltake. Updating the ESA firmware only if you have problems and you are sure that the new firmware revision will solve your problems.Careless updating may... - Page 17 English English Step 2: You need to browse the folder where you put the ESA Watercooling firmware (for example) file and then open it. Bigwater 780e CL-W0169...
- Page 18 English English Step 3: Click the load FW button to load firmware. 3.2 NVIDIA nTune Performance Application After selecting the performance icon, the user must select“Accept End User License Agreement” link and agree to begin using nTune. Step 4: After finished the firmware update, please click the OK bottom. Bigwater 780e CL-W0169...
- Page 19 Once you implement the NVIDIA Monitor software, you are able to select which components that you want to check its status. For the Thermaltake ESA watercooling, you will see seven icons with different function. Users are able to monitor Water Level, Water Temperature in / In the NVIDIA Control Panel under performance item, you can use Device Temperature out.
-
Page 20: Water Cooling Led Indication
English Caution!! 3.4 Switch between NVIDIA Monitor & NVIDIA All the latest ESA firmware posted at Thermaltake Website is for products Performance software sold and packaged by Thermaltake. Updating the ESA firmware only if you While you are using NVIDIA Monitor software, you may click the have problems and you are sure that the new firmware revision will solve arrow to shrink it and adjust any value in NVIDIA Performance as you wish. -
Page 21: Toughpower Esa Power Supply Series (Optional)
Vh6001 Series 5.Modularized Cable Management: To eliminate clutter and improve airflow inside the case. The functions can assure all Thermaltake ESA Power Supply meets the balance in noise control and heat exhausted. All power supply provides complete protection function as follow: 1. -
Page 22: Schedule Maintenance
A : Yes, there are numerous upgrades available for all different components in PC. Please visit www.thermaltake.com for more information. Check for water level within the water tank. If the liquid level is below the low level, please follow the installation steps on manual to refill the coolant. - Page 23 English English Tubing Tubing within the system must not be bent. Replace tubing if necessary. Tubing Connections Make sure each connection is tightly secured and that there are no sign of leakage. Bigwater 780e CL-W0169...
Need help?
Do you have a question about the Bigwater 780e CL-W0169 and is the answer not in the manual?
Questions and answers