Table of Contents
Advertisement
Quick Links
AX5505(EFDIS)cover_cover.qxp 2010-02-23 오후 2:03 페이지 1
OPERATING INSTRUCTIONS
MANUEL D'UTILISATION
BEDIENUNGSANLEITUNG
ISTRUZIONI PER L'USO
MANUAL DE INSTRUCCIONES
AX - 5505
Stereo Integrated Amplifier
Amplificateur intégré stéréophonique
Stereo-Vollverstärker
Amplificatore lntegrato Stereo
Amplificador Integrado Estéreo
Advertisement
Table of Contents

Related Manuals for Sherwood AX-5505


Summary of Contents for Sherwood AX-5505
- Page 1 AX5505(EFDIS)cover_cover.qxp 2010-02-23 오후 2:03 페이지 1 OPERATING INSTRUCTIONS MANUEL D'UTILISATION BEDIENUNGSANLEITUNG ISTRUZIONI PER L’USO MANUAL DE INSTRUCCIONES AX - 5505 Stereo Integrated Amplifier Amplificateur intégré stéréophonique Stereo-Vollverstärker Amplificatore lntegrato Stereo Amplificador Integrado Estéreo...
-
Page 2: Read This Before Operating Your Unit
AX5505(G-Eng)100204_AX5505(Eng).qxp 2010-02-23 오후 2:04 페이지 2 ntroduction READ THIS BEFORE OPERATING YOUR UNIT This symbol is intended to alert the user to the presence of uninsulated "dangerous voltage" within the product's enclosure that may be of sufficient magnitude to constitute a risk of electric shock to persons. -
Page 3: Table Of Contents
AX5505(G-Eng)100204_AX5505(Eng).qxp 2010-02-23 오후 2:04 페이지 3 CONTENTS Introduction • READ THIS BEFORE OPERATING YOUR UNIT System Connections Front Panel Controls DIGI LINK III System Remote Controls • REMOTE CONTROL OPERATION RANGE • LOADING BATTERIES Operations • LISTENING TO A PROGRAM SOURCE •... -
Page 4: System Connections
■CONNECTING SYSTEM CONTROL • Connect this jack to the DIGI LINK jack of the external Sherwood component that uses the DIGI LINK II or III remote control system. • The TAPE1/MD IN/OUT jacks may also be connected to the LINE OUT/IN jacks of an additional MD recorder. - Page 5 AX5505(G-Eng)100204_AX5505(Eng).qxp 2010-02-23 오후 2:04 페이지 5 ■AC INPUT CORD Plug this cord into a wall AC outlet ■SWITCHED AC OUTLET • This outlet is switched on (power on mode) and off (standby mode) according to power control as follows; (Maximum total capacity is 100 W (0.43A)) ■CONNECTING SPEAKERS Standby mode - switched AC outlet off...
-
Page 6: Front Panel Controls
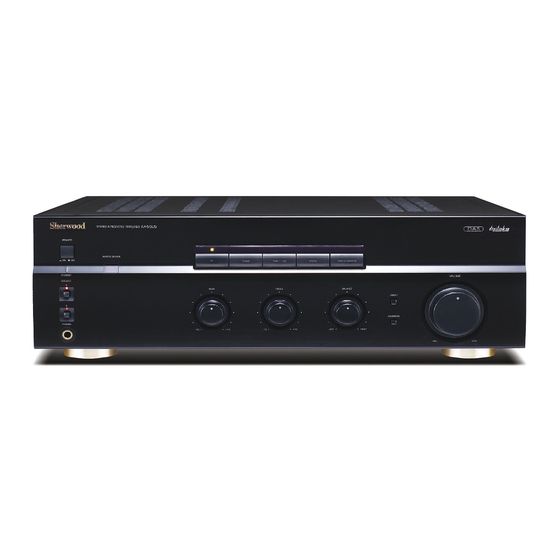
AX5505(G-Eng)100204_AX5505(Eng).qxp 2010-02-23 오후 2:04 페이지 6 Front Panel Controls 1. POWER SWITCH 8. BALANCE CONTROL KNOB Press this switch to enter the power off or the standby Adjust the stereo balance between left and right mode. speakers. • The center position is the normal condition. 2. -
Page 7: Digi Link Iii System Remote Controls
AX5505(G-Eng)100204_AX5505(Eng).qxp 2010-02-23 오후 2:04 페이지 7 DIGI LINK III System Remote Controls • You can remotely control not only this amplifier but also Sherwood compatible components bearing the DIGI LINK II or III logo. • For system remote control operation, first make the DIGI LINK connections. -
Page 8: Remote Control Operation Range
AX5505(G-Eng)100204_AX5505(Eng).qxp 2010-02-23 오후 2:04 페이지 8 REMOTE CONTROL OPERATION RANGE • Use the remote control unit within a range of about 7 meters (23 feet) and angles of up to 30 degrees aiming at the remote sensor. LOADING BATTERIES Remove the cover. Load two batteries matching the polarity. -
Page 9: Operations
To listen to an input source other than TAPE 2 MONITOR, ■SYSTEM POWER ON/OFF be sure to set the TAPE 2 MONITOR button to off. • If the POWER switch of Sherwood component ■TAPE MONITOR function connected by the DIGI LINK II or III is kept pushed... - Page 10 AX5505(G-Eng)100204_AX5505(Eng).qxp 2010-02-23 오후 2:04 페이지 10 Operate the selected component for playback. To listen to a program source without the tone effect. Adjust the volume to a comfortable listening level. • You can listen to pure sound that bypasses the tone circuitry.
-
Page 11: Recording
AX5505(G-Eng)100204_AX5505(Eng).qxp 2010-02-23 오후 2:04 페이지 11 RECORDING • The volume and tone (bass, treble) settings, etc. have no effect on the recording signals. Recording with TAPE 1/MD Recording with TAPE 2 MONITOR Select the desired input as recording source Select the desired input as recording source except for TAPE 1/MD and TAPE 2 MONITOR. -
Page 12: Troubleshooting Guide
AX5505(G-Eng)100204_AX5505(Eng).qxp 2010-02-23 오후 2:04 페이지 12 Troubleshooting Guide If your unit should not perform as expected, consult the table below to see if the problem can be corrected before seeking help from your dealer or our service organization. POSSIBLE CAUSE REMEDY PROBLEM No power... -
Page 13: Specifications
AX5505(G-Eng)100204_AX5505(Eng).qxp 2010-02-23 오후 2:04 페이지 13 Specifications • Power output, 8 Ω, THD 0.3 %, 40 Hz~20 kHz 2 X 100 W • Total harmonic distortion, 8 Ω, 100 W, 1 kHz 0.02 % • Intermodulation distortion 60 Hz : 7 kHz = 4 : 1 SMPTE, 8 Ω, 100 W 0.05 % •... - Page 14 AX5505(EFDIS)cover_cover.qxp 2010-02-23 오후 2:03 페이지 2 AX - 5505 Stereo Integrated Amplifier Amplificateur intégré stéréophonique Stereo-Vollverstärker Amplificatore lntegrato Stereo Amplificador Integrado Estéreo 5707-00000-355-0S...
Need help?
Do you have a question about the AX-5505 and is the answer not in the manual?
Questions and answers