Table of Contents
Advertisement
Quick Links
Advertisement
Table of Contents

Related Manuals for VocoPro SDR-3000


Summary of Contents for VocoPro SDR-3000
- Page 1 SDR-3000 Dual Digital USB/SD Recorder O W N E R ’ S M A N U A L...
-
Page 2: Table Of Contents
Table of Contents FCC Information ............3 Listening for a Lifetime ..........4 Safety Instructions ........... 5 Welcome ............... 6 Before Getting Started ..........7 Getting Started ............8 Features ............. 11 Operations ............15 Troubleshooting ........... 18... -
Page 3: Fcc Information
FCC requirements. Modifications not expressly approved by 1. To ensure the finest performance, please read this Vocopro may void your authority, granted by the FCC, manual carefully. Keep it in a safe place for future reference. to use this product. -
Page 4: Listening For A Lifetime
Now itʼs time to consider how you can maximize the fun and excitement your equipment offers. VocoPro and the Electronic Industries Associationʼs Consumer Electronics Group want you to get the most out of your equipment by playing it at a safe level. One that lets the sound come through loud and clear without annoying blaring or distortion and, most importantly, without affecting your sensitive hearing. -
Page 5: Safety Instructions
Safety Instructions CAUTION 9. Heat - The appliance should be situated away from heat sources such as radiators, heat registers, stoves, or other appliances (including amplifiers) RISK OF SHOCK that produce heat. CAUTION: To reduce the risk of electric shock, do 10. -
Page 6: Welcome
Service directory! a KJ Service directory! We look forward to hearing you sound like a PRO, with VocoPro, the We look forward to hearing you sound like a PRO, with VocoPro, the singer’s ultimate singer’s ultimate choice. choice. -
Page 7: Before Getting Started
USB drive. Its user-friendly operation makes it an ideal recording platform for DJ mixes, band rehearsals, sermons, board meetings, and more. With a full set of playback controls, the SDR-3000 can also function as a dual SD/USB player with separate and mixed audio outputs. Its slim rack-mountable construction will fit neatly into standard rack cases. -
Page 8: Getting Started
Getting Started Unpacking This SDR-3000 has been inspected and tested prior to being shipped. During unpacking, carefully check that you have received all the required components. This is also the time to check the main unit for damage. If any damage is noticed, promptly report this to your shipping carrier. -
Page 9: Getting Connected
The SDR-3000 can record any audio signal from RCA outputs. Most commonly, users will be running the output from a mixing device. Other connections can include direct output from a computer or mp3 player, and even making a copy from the other side of the SDR-3000. Follow the instructions below for making the connections. - Page 10 Connecting individual audio outputs: You can connect the audio output from each side independently to a mixer (such as a DJ mixer). This allows the SDR-3000 to be used as a dual USB/SD player used in conjunction with DJ-style mixers with a crossfader.
-
Page 11: Features
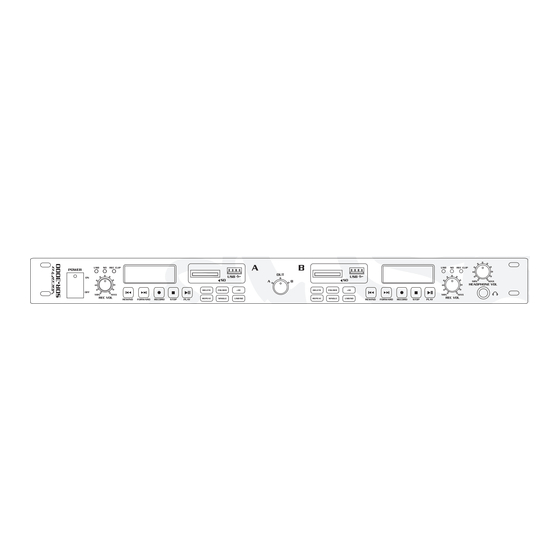
Features Front Panel: 1. POWER button – Use this button to turn the unit ON/OFF. 2. REC LEVEL knob – Use this knob to increase/decrease the recording level. (see page 16 for instructions on recording) 3. USB LED – Indicates USB is selected for playback/recording. 4. - Page 12 Features (cont.) Front Panel: 15 16 17 18 19 13 14 13. SINGLE button – Use this button to enter single playback mode. (see Operations section for instructions on repeat playback mode). 14. USB/SD button – Use this button to toggle between the USB and SD inputs. 15.
- Page 13 Features (cont.) Rear Panel: SIDE A&B 1. IN jacks – Connect the audio output from your audio source to these jacks. 2. OUT jacks – Connect the audio output from these jacks to the audio inputs on external mixers, amplifiers, or other devices. 3.
- Page 14 Features (cont.) LCD Window: 1. LINE – Indicates the SDR-3000 is set to record from the line in jacks. 2. DEL – Flashes in conjunction with “FILE” when deleting a file. 3. USB – Indicates that a USB device is selected for playback/recording 4.
-
Page 15: Operations
3. Use the USB/SD button to select SD. 4. Remove an SD card by pushing the card forward until it clicks and pushes out. NOTE: The SDR-3000 cannot accept cards larger than 4GB or SDHC cards. Inserting a USB Drive 1. - Page 16 *Increase til blinks RED Adjusting the Recording Level 1. Start your source signal plugged into the input of the SDR-3000. 2. With the source signal playing, increase the REC LEVEL KNOB until the REC CLIP LED starts to blink red.
- Page 17 FOLDER 001, 002, 003, 004, 005, REC, 001, etc. Record Folder The SDR-3000 stores all recorded files in a folder called RECORD. When a new SD card/USB drive is inserted, this folder will be created automatically during the first recording process.
-
Page 18: Troubleshooting
Check the recording level (see Operations section) No audio output from the SDR-3000. Check the output connections on the back of the SDR-3000 and connected devices. (see Operations section) Check to make sure the output toggle is set correctly. (see Operations section) Files are not recording to SD card/USB drive. - Page 19 Notes...
- Page 20 SDR-3000 Owner’s Manual © VocoPro 2011 v1.1207 www.vocopro.com...
Need help?
Do you have a question about the SDR-3000 and is the answer not in the manual?
Questions and answers