
Related Manuals for Performax 241-1448


Summary of Contents for Performax 241-1448
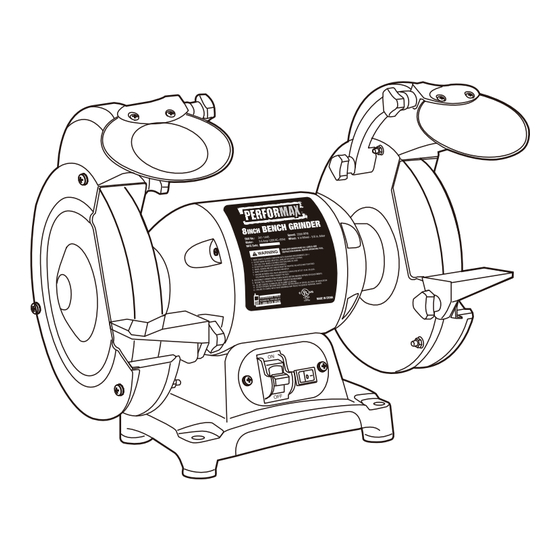
- Page 1 8" Bench Grinder 241-1448 Owner’s Manual MOTOR 3.6AMP, 120V~ 60Hz SPEED 3560 RPM (no load speed) WHEEL DIAMETER 8 in. WHEEL THICKNESS 1 in. ARBOR SIZE 5/8 in. POWER CORD 12 ft. MACHINE WEIGHT 32 lbs...
-
Page 2: Table Of Contents
TABLE OF CONTENTS Symbols…………………………..…………………………………..Page 2 Rules for safe operation …………..………………………………..Page 3 Carton contents …………..…………………………………………… Page 9 Description…………..…………………………………………....Page 10 Assembly and adjustment… …………………………………....Page10 Grinding Operation …………..……………………………………….. Page 12 Maintenance…………..………………………………………... ..Page 14 Parts list …………..……………………………………………...Page 16 Exploded view …..……………………………………………..... -
Page 3: Rules For Safe Operation
THIS SYMBOL DESIGNATES THAT THIS TOOL IS LISTED BY THE UNDERWRITER LABORATORIES INC. TO UNITED STATES AND CANADIAN STANDARDS. CONFORMS TO UL STANDAND No 987 Certified to Can/CSA STD. C22.2 No. 71.2 RULES FOR SAFE OPERATION GENERAL SAFETY RULES WARNING! Read and understand all instructions. Failure to follow all instructions listed below may result in electric shock, fire and/or serious personal injury. - Page 4 WEAR PROPER APPAREL. Do not wear loose clothing, gloves, neckties, rings, bracelets, or other jewelry which may get caught in moving parts. Nonslip footwear is recommended. Wear protective hair covering to contain long hair. ALWAYS USE SAFETY GLASSES. Also use face or dust mask if cutting operation is dusty.
- Page 5 stripes is the equipment-grounding conductor. If repair or replacement of the electric cord or plug is necessary, do not connect the equipment-grounding conductor to a live terminal. Repair or replace a damaged or worn cord immediately. Stay constantly aware of cord location and keep it well away from the rotating grinding wheels.
- Page 6 NEVER STAND, or have any part of your body in line with the path of the wheel. DO NOT TURN MOTOR SWITCH ON AND OFF RAPIDLY. This could cause the wheel to loosen and could create a hazard. Should this ever occur, stand clear and allow the wheel to come to a complete stop.
- Page 7 WARNING: Some dust created by power sanding, sawing, grinding, drill- ing, and other construction activities contains chemicals known to cause cancer, birth defects or other reproductive harm. Some examples of these chemicals are: • Lead from lead-based paints, • Crystalline silica from bricks and cement and other masonry products, and •...
- Page 8 WARNING: Keep the extension cord clear of the working area. Position the cord so that it will not get caught on lumber, tools or other obstructions while you are working with a power tool. Failure to do so can result in seri- ous personal injury.
-
Page 9: Carton Contents
Improper connection of the equipment-grounding conductor can result in a risk of electric shock. The conductor with insulation having an outer surface that is green with or without yellow stripes is the equipment- grounding conductor. If repair or replacement of the electric cord or plug is necessary, do not connect the equipment-grounding conductor to a live terminal. -
Page 10: Description
DESCRIPTION KNOW THE BENCH GRINDER (Fig. 3) The machine is intended for sharpening tools such as chisels, planer blades, scissors, etc., and for removing rust or corrosion. WARNING: Do not allow familiarity with the grinder to cause carelessness. Remember that a careless fraction of a second is sufficient enough to inflict severe injury. - Page 11 2. Attach the eyeshield assembly(C) to the wheel guard using a flat washer(I), lock washer(J) and eyeshield knob(H). NOTE: The eyeshield assembly w/ magnifier mounts on the left side. WARNING: The use of attachments or accessories from other types of grinder might be hazardous and could cause serious personal injury.
-
Page 12: Grinding Operation
4. Place the machine on the workbench and insert a bolt with a washer through the mounting holes in the base into each of the holes drilled in the workbench. Make sure the protruding length X (see figure) is at least 5/8" for each of the bolts used. - Page 13 ON/OFF SWITCH (Fig.7) Fig. 7 Your bench grinder is equipped with a switch that has a built-in locking feature. This feature is intended to prevent unauthorized and possible hazardous use by children and others. TO TURN YOUR BENCH GRINDER ON: With the switch key inserted into the switch, lift the switch button to turn Worklight switch...
-
Page 14: Maintenance
MAINTENANCE Before each use, inspect the grinder, switch and cord for damage. Check for damaged, missing, or worn parts. Check for loose screws, misalignment or binding of moving parts, or any other conditions that may affect the operation. If abnormal vibration or noise occurs, turn the tool off immediately and have the problem corrected before further use. - Page 15 Fig. 9 To replace the grinding wheel: 1. Turn off and unplug the grinder 2. Remove the wheel cover by loosening the screws. 3. To prevent wheel rotation, push a wood wedge between the grinding wheel and the guard. 4. Loosen the wheel nut in a clockwise direction for the left side and a counterclockwise direction for the right side.
-
Page 16: Parts List
PARTS LIST WARNING: When servicing, use only original equipment replacement parts. The use of any other parts may create a safety hazard or cause damage to the trim router. Any attempt to repair or replace electrical parts on this trim router may create a safety hazard unless repairs are performed by a qualified technician. -
Page 17: Exploded View
EXPLODED VIEW... -
Page 18: Warranty
(2) years from the date of original purchase, simply bring this tool with the original sales receipt back to your nearest MENARDS® retail store. At its discretion, PERFORMAX ®...
Need help?
Do you have a question about the 241-1448 and is the answer not in the manual?
Questions and answers