Advertisement
Available languages
Available languages
Quick Links
Remove Unit From Carton
Assemble The Unit
1 1
2
Remove all contents from
Place shield onto mount
the carton.
bracket. Securely screw 2 shield
screws through holes on mount
bracket and into shield. Make
sure screws are tightened equally
so there is an equal gap between
bracket and shield on each side.
Assemble The Unit
40:1
1 Gallon
3.2 oz
4
5
Mix thoroughly in separate
Place unit on a level surface
fuel can:
and fill fuel tank. DO NOT
– 3.2 fl. oz. of 2-cycle
overfill.
engine oil
– 1 gallon of unleaded
gasoline
NOTE: Do not mix directly in
fuel tank.
Start The Unit
1 8
9
Crouch in starting position.
SQUEEZE and HOLD
throttle for ALL further
steps.
Reload The Line*
Spool
Spring
Inner
Reel
3"-4"
Bump
Knob
1 1
2
Unscrew bump knob
Insert 10' of 0.080"
®
counterclockwise. Remove
SplitLine
through hole in top
inner reel and spring.
of reel. Pull most of line
through hole until 3"-4"
remains.
Reload The Line
Replacement SplitLine
Part #49U2134K953
For single line installation, refer to Line Installation
section of this manual.
For replacement spool installation, refer to
Installing a Prewound Reel section of this manual.
*This is to assist in the reloading of Splitline® only. These instructions
1 8
are NOT part of the fast assembly instructions. Line does not need to
be installed on the initial assembly and start-up.
Hold the inner reel in place.
Tighten Bump Knob
clockwise.
IMPORTANT: READ OPERATOR'S MANUAL THOROUGHLY AND FOLLOW THE SAFE OPERATION PRACTICES WHILE OPERATING THE UNIT.
NEED HELP?
769-07118 P00
Y60
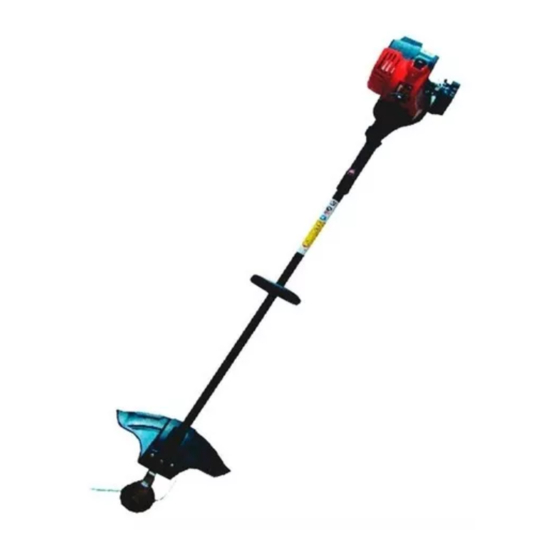
2-Cycle Trimmer
Operator's Manual
Min. 6"
3
Put handle on shaft. Move
handle a minimum 6 inches
away from shaft grip. Insert
bolt and tighten.
Start The Unit
Primer
Bulb
10 X
6
7
Press primer bulb 10 times,
Move choke lever to
or until fuel is visible
Position 1.
Choke Lever
5 X
10
11
Pull rope 5 times.
Move choke lever to
Position 2 and squeeze
throttle.
3
4
Bend short end and push it
Wind line tightly in direction
into the other hole. Pull tight.
of arrow. Split other end of
®
SplitLine
®
:
Call 1-800-800-7310 in U.S. or 1–800–668–1238 in Canada
Tools Required:
• #2 Phillips screwdriver
D-Handle
Choke Lever
3-5 X
12
Pull rope 3-5 times to start
engine. Run unit for 30-60
seconds to warm up.
5
Push 6"-7" ends into 0.080"
holding slots.
back 6"-7".
Spark Plug
Choke Lever
Air Filter Cover
Starter Rope
Fuel Cap
On/ Off Switch
Throttle Control
DIDN'T START?
Cutting Head Shield
IF engine doesn't start, go back to step 6.
IF engine fails to start after 2 attempts, move
choke lever to position 3 and pull the starter
rope until engine starts.
Cutting Head
IF engine hesitates, return choke to Position
2 and continue to warm-up.
NOTE: unit is properly warmed up when
engine accelerates without hesitation.
Choke Lever
13
14
Continue to squeeze
Continue to squeeze
throttle. Move choke lever
throttle. Run unit for an
to Position 3.
additional 60 seconds to
complete warm-up. Unit
may be used during this
time.
6
7
Insert or slide lines into the
Pull lines firmly to release
eyelets in spool. Insert spring
from holding slots.
and reel into spool.
Primer Bulb
04/11
Advertisement

Related Manuals for Yard Machines Y60


Summary of Contents for Yard Machines Y60
- Page 1 2-Cycle Trimmer Operator’s Manual Remove Unit From Carton Assemble The Unit Spark Plug Tools Required: Choke Lever • #2 Phillips screwdriver Air Filter Cover Starter Rope Primer Bulb Min. 6" Fuel Cap On/ Off Switch Remove all contents from Place shield onto mount Put handle on shaft.
-
Page 2: Table Of Contents
TABLE OF CONTENTS RULES FOR SAFE OPERATION Rules for Safe Operation ........................2 Oil and Fuel ............................3 OIL AND FUEL SAFETY Operating ............................... 3 WARNING: Gasoline is highly fl ammable and its vapors can explode if ignited. Take Maintenance ............................3 the following precautions: Cleaning and Storage .......................... -
Page 3: Oil And Fuel
OIL AND FUEL LINE INSTALLATION OIL AND FUEL MIXING INSTRUCTIONS LINE INSTALLATION WARNING: Gasoline is extremely fl ammable. Ignited vapors may explode. Always stop WARNING: Never use metal-reinforced line, wire, chain or rope. These can break off the engine and allow it to cool before fi lling the fuel tank. Do not smoke while fi lling the and become dangerous projectiles. -
Page 4: Troubleshooting
MAINTENANCE TROUBLESHOOTING REPLACING THE SPARK PLUG PROBLEM SOLUTION Use replacement #753-06193, a Champion RDJ7J spark plug, or equivalent. The correct air gap is 0.025 inch (0.635 mm). ENGINE WILL NOT START, IDLE OR ACCELERATE 1. Stop the engine and allow it to cool. Empty fuel tank Fill fuel tank with fuel 2. - Page 5 Manuel de l’utilisateur Coupe-bordure 2 temps Retirer l’appareil du carton Assembler l’appareil Bougie Outils requis : Levier d’étranglement • Tournevis cruciforme n°2 Couvercle du filtre à air Cordon de démarrage Poire d’amorçage Min. 6" Bouchon du réservoir de Bouton marche/arrêt (On/Off) carburant Retirez tous les éléments Placez l’écran de protection sur le...
- Page 6 TABLE DES MATIÈRES RÈGLES POUR UNE UTILISATION EN TOUTE SÉCURITÉ Règles pour une utilisation en toute sécurité ..................6 Huile et carburant ..........................7 AVERTISSEMENT : L’essence est extrêmement infl ammable et ses vapeurs peuvent Utilisation ............................... 7 exploser si on y met le feu. Veuillez prendre les précautions suivantes : Entretien .............................7-8 •...
- Page 7 HUILE ET CARBURANT INSTALLATION DU FIL DE COUPE INSTRUCTIONS DE MÉLANGE HUILE/ESSENCE INSTALLATION DU FIL DE COUPE AVERTISSEMENT : AVERTISSEMENT : L'essence est extrêmement infl ammable. Les vapeurs qui s'en N’utilisez jamais de fi l, de câble, de chaîne ou de cordon à dégagent peuvent exploser si on y met le feu.
- Page 8 ENTRETIEN RÉSOLUTION DES PROBLÈMES REMPLACEMENT DE LA BOUGIE D’ALLUMAGE PROBLÈME SOLUTION Utilisez une bougie de rechange de référence753-06193, Champion RDJ7J ou équivalent. L’espace doit être de 0,635 mm (0,025 pouce). LE MOTEUR NE DÉMARRE PAS, NE TOURNE PAS AU RALENTI OU N’ACCÉLÈRE PAS 1.
- Page 9 Manual del Operador para Recortadoras de 2 Tiempos Sacar la unidad de su caja Ensamblar la unidad Bujía Herramientas necesarias: Palanca del obturador • Destornillador Phillips #2 Tapa del filtro de aire Cuerda de arranque Pera del cebador Min. 6" Tapa del tanque de combustible Interruptor de Encendido/Apagado...
- Page 10 TABLA DE CONTENIDO NORMAS PARA UNA OPERACIÓN SEGURA Normas para una operación segura ...................... 2 Aceite y combustible ..........................3 Deje que la unidad se enfríe antes de almacenarla o transportarla. Cerciórese de asegurar la • Funcionamiento ............................. 3 unidad al transportarla. Mantenimiento ............................
- Page 11 ACEITE Y COMBUSTIBLE INSTALACIÓN DE LA LÍNEA INSTRUCCIONES PARA MEZCLAR EL ACEITE Y EL COMBUSTIBLE INSTALACIÓN DE LA LÍNEA ADVERTENCIA: ADVERTENCIA: La gasolina es sumamente infl amable. De prenderse, los gases No use nunca la línea reforzada con metal, alambre, cadena o soga. pueden hacer explosión.
- Page 12 MANTENIMIENTO LOCALIZACIÓN Y SOLUCIÓN DE PROBLEMAS CAMBIAR LA BUJÍA DE ENCENDIDO PROBLEMA SOLUCIÓN Use la pieza de repuesto No. 753-06193, una bujía Champion RDJ7J, o el equivalente. La abertura correcta de la bujía es de 0.025 pulgadas (0.635 mm). EL MOTOR NO ARRANCA NI FUNCIONA EN MARCHA EN VACÍO NI ACELERA 1.
- Page 13 NOTAS...
- Page 14 NOTES...
- Page 15 NOTES...
- Page 16 Yard Machines LLC garantit ce produit contre tout vice de matière ou de façon pendant une période de deux (2) ans à compter de la date d’achat initiale et elle se réserve le choix de réparer ou de remplacer, à...
Need help?
Do you have a question about the Y60 and is the answer not in the manual?
Questions and answers