
Related Manuals for Saunatec Pikkutonttu 1116-45-0405


Summary of Contents for Saunatec Pikkutonttu 1116-45-0405
-
Page 1: User Guide
User Guide Sauna heater Pikkutonttu Digital control panel Digi 2002 User Guide for the following models of the sauna heater Pikkutonttu: 1116-45-0405 (4,5 kW) 1116-65-0405 (6,5 kW) 1116-90-0405 (9,0 kW) - Page 2 The first is for you as a user and the second is for the installer. Saunatec is the world-leading producer of products for saunas and steam saunas. We develop, produce and market products for saunas and steam saunas in the whole world.
-
Page 3: Table Of Contents
Information to the user This user guide helps you to understand and use your new sauna products. We hope that you read this manual carefully and that you respect the warning texts. The user guide is divided into two sections: Information to the user and Information to the installer. -
Page 4: This Is How A Sauna Works
This is how a sauna works A sauna works in the same fashion as a room in a house. In the room there are heating elements that make sure that the room temperature is maintained at the desired temperature. Ventilation lets fresh air in and spent air is led out. -
Page 5: The Sauna Heater And Included Parts
The sauna heater and included parts Sauna heater The sauna heater Pikkutonttu is, with its design and technology, a heater that offers unique qualities. The low temperature of the mantle results in a safety distance between the mantle and the closest wood part of only 10 mm. You can begin ladling water on the heater at such low temperatures as 50–60°... -
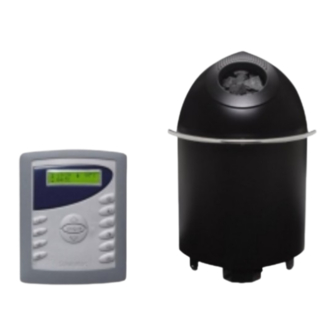
Page 6: The Control Panel And Included Parts
The control panel and included parts Display On/Off Temperature Memory button 1 Start time Duration Memory button 2 * Lighting Memory button 3 * Ventilation Memory button 4 The button prog ok The display Page upwards in the menu Start time Temperature 13:28 Activate function (OK) -
Page 7: Functions Of The Control Panel
Functions of the control panel With the control panel, you set the time for the heater to start, for how long it will work and the temperature in the sauna. It is also possible to program four memory buttons for special sauna baths. -
Page 8: Set The Time And Chose The Language
Set the time and chose the language The control panel returns automatically to the off-mode from the menu-mode if you do not push a button within three seconds. If a change is done it must be approved with the prog ok button before the control panel resumes off-mode, otherwise the change is not saved. -
Page 9: Set The Start Time
Set start time, temperature and duration Tips and advice Set the start time By holding the arrow button depressed the values are The start time is the time that the paged up or down fast. heater turns on, for example 18:30. 1. -
Page 10: Set The Temperature
Set the tempera- Set the duration ture The temperature is the tempera- Duration is the time that the heater ture that the heater produces in the will operate. Maximum duration is sauna, for example 80° C. six hours. 1. Push the button for 1. -
Page 11: Program And Activate The Memory Buttons
Program and activate the memory buttons The digital control panel has four Program a memory buttons. As a user you have memory button the opportunity to set four separate sauna bath programs. Each program 1. Enter a duration on the control has its owns adjustments, and you panel activate them with just a push of a... -
Page 12: Change The Settings During The Sauna Bath
Change the settings during the sauna bath The instructions below show how to change the settings during the sauna bath. You may want to lower the temperature or shorten the duration. Change the Turn off the sauna temperature 1. Push the On/Off button 1. -
Page 13: Calibrate The Temperature
Calibrate the temperature The function is not available for this product. Activate Smartsauna Smartsauna is a function that measures the temperature in the sauna and computes the length of time the heater will take to heat the sauna to the temperature that is set on the control panel. -
Page 14: Lock The Control Panel
Lock the control panel Lock the control panel When a control panel is locked it is not possible to start the Make sure that the control panel is in Off- heater. This might be suitable in mode before you lock the control panel. situations where you wish to 1. -
Page 15: Alarm
Alarm When there is an alarm situation, the control panel stops the heating, and the cause for the alarm is shown on the display of the control panel. Alarm Display What to do The cable of the Check the cable to and ALARM temperature sensor from the sensor. -
Page 16: General Information About Sauna Bathing
General information about sauna bathing Allow yourself plenty of time when you take a sauna bath. You should not feel stressed. To take a sauna bath should be a pleasure. Take a shower before entering the sauna. If the situation demands that you wear a towel, it should not be too tight. -
Page 17: Recommended Ventilation
Wet sauna A wet sauna means high humidity and low temperature. This is achieved by ladling water on the stones. The effect of a wet sauna is that you feel clean. To achieve this: 1. Set the temperature at about 60°C 2. - Page 18 Mechanical ventilation 2 Ventilator takes care Extra outlet of the spent air vent Fresh air Mechanical ventilation 2 Fresh air is let in through a vent, which has been placed in the ceiling or in the wall at least 500 millimetres above the heater (A). Spent air is let out through an outlet channel Sauna bench with the vent placed at floor level.
-
Page 19: Information To The Installer
Be sure to read all the Observe- and Warning-panels. The user guide applies to the following heater models: 1116-45-0405 (4.5 kW) 1116-65-0405 (6.5 kW) 1116-90-0405 (9.0 kW) Some portions of the user guide are more important than others. At these portions we use... -
Page 20: Important Information To The Installer
Important information to the installer Observe! This user guide is an important tool for you who will mount and install the sauna heater Follow the installation Pikkutonttu. There are several installation dimensions given in this dimensions that must be followed exactly due user guide. -
Page 21: Parts Included In The Delivery
Parts included in the delivery Sauna Heater Pikkutonttu 1 pc Temperature sensor with cord 1 pc Digital control panel Digi 2002 with cord 1 pc Control panel opener 2 pcs User Guide 1 pc Bracket 2 pcs Bracket-screw, 4,2 x 16 mm 2 pcs Bracket-screw, 4,2 x 9,5 mm 2 pcs... -
Page 22: Mount The Heater And Temperature Sensor
Mount the heater and tempera- ture sensor To mount the heater requires thoroughness by the installer. The different models of sauna heaters have their own specific installation dimensions, and these must be followed exactly due to safety reasons. There are three separate ways to mount the heater in the sauna: wall mounting, corner mounting and floor mounting. - Page 23 Wall mounting and corner mounting Distance on Upper sauna page 22. bench Temperature Temperature sensor sensor The picture shows a heater, which has been placed in the corner of a sauna room. The temperature sensor can be placed in two ways.
- Page 24 Floor mounting Heater foot Screw for floor fastening (not included) Bracket Adjustable foot The heater shall always be fixed to the floor with the included brackets. Separate the adjustable feet and place the bracket according to the picture to the right. The temperature sensor shall be mounted within the dotted area in the picture.
- Page 25 Mount the sensor: 1. Mark the spot on the sauna wall where the sensor should be placed. Study the illustrations on pages 23–24. 2. Open the lid of the sensor with the help of a screwdriver. See pictures 1 and 2. 3.
-
Page 26: Connect The Electricity
Connect the Connect electrical cables electricity To the heater 1. Lay the heater down and unscrew the feet and screws that keep the bottom plate in place. Connecting the electricity is the 2. Attach the sensor cable to the socket most important part of the J12. - Page 27 Facts about the connection of the heater to the electric network Output Fuse Heater connection Permanent (kW) HO7RN-F (mm connection (t ex RHH or VSB) from fuse (mm 3 x 10 5 x 1,5 5 x 1,5 3 x 10 5 x 1,5 5 x 1,5 3 x 16...
-
Page 28: Mount And Program The Control Panel
Mount and program the control panel The control panel has several holes in the back. These holes are used to mount the control panel outside the sauna. In order to reach the holes, the control panel must be opened using the two keys that are included. The control panel can be mounted in or on the wall. -
Page 29: Test The Sauna And Take Safety Measurements
Program the control panel The basic settings are to be done by the installer. They include setting the clock and choosing the language. After a power failure of more than 20 minutes the basic settings are deleted. In that case the user must reset the basic settings. - Page 30 PL 72 02201 ESPOO, Finland / PL 15 10901 HANKO, Finland Homepage: www.saunatec.fi - E-mail: info@saunatec.fi 314 SKLR 9 C...
Need help?
Do you have a question about the Pikkutonttu 1116-45-0405 and is the answer not in the manual?
Questions and answers