Advertisement
50 Bottle, Two Temp
INSTRUCTION MANUAL
Model No.: 273 02 50
PLEASE READ THIS MANUAL CAREFULLY BEFORE INSTALLING AND OPERATING.
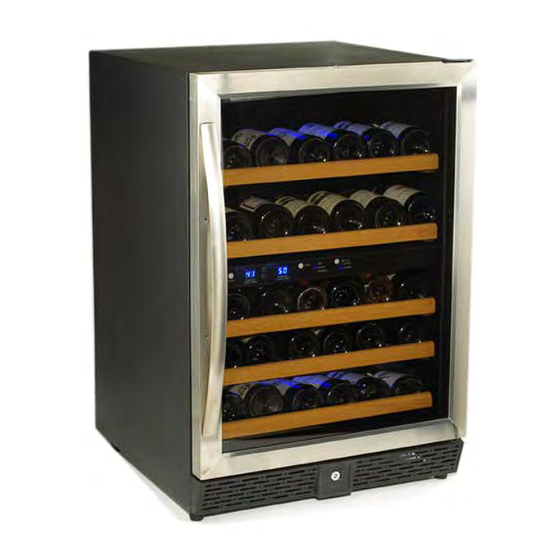
PLEASE NOTE: For Optimal Use Of This Product, The Temperature Of The Lower Cooling Zone Should Be Set At Least
4˚ F Above The Temperature Of The Upper Cooling Zone.
For More Information About The Operation Of This Product, Please Reference Pages 7 and 8 Of This Manual
1
Advertisement

Related Manuals for N'Finity 273 02 50


Summary of Contents for N'Finity 273 02 50
- Page 1 50 Bottle, Two Temp INSTRUCTION MANUAL Model No.: 273 02 50 PLEASE READ THIS MANUAL CAREFULLY BEFORE INSTALLING AND OPERATING. PLEASE NOTE: For Optimal Use Of This Product, The Temperature Of The Lower Cooling Zone Should Be Set At Least 4˚...
-
Page 2: Table Of Contents
TABLE OF CONTENTS Chapter Contents Page # Part I. Diagram & Description of Wine Cellar Part II. Important Safety & Pre-Use Instructions Part III. Installation Instructions (a) General Installation Instructions (b) Handle Installation (c) Installation of Built-In Unit (d) Reversing the Door Swing Part IV. -
Page 3: Part I. Diagram & Description Of Wine Cellar
PART I. DIAGRAM & DESCRIPTION OF WINE CELLAR... -
Page 4: Important Safety & Pre-Use Instructions
YOUR WINE CELLAR ALSO INCLUDES THE FOLLOWING: • Instruction manual • 5 rolling shelves • Two (2) keys • Handle, screws and bushings • Top and bottom hinges/screws (for changing the door hinge) PART II: IMPORTANT SAFETY INSTRUCTIONS To reduce the risk of fire, electrical shock, or injury when WARNING using your appliance, follow these basic precautions: Read all instructions before using the Wine Cellar. -
Page 5: (B) Handle Installation
Avoid locating the unit in damp areas. Plug the Wine Cellar into an exclusive, properly installed and grounded wall outlet. Do not under any circumstances cut or remove the third (ground) prong from the power cord. Any questions concerning power and/or electrical grounding should be directed to a certified electrician or authorized products service center. -
Page 6: (D) Reversing The Door Swing
(c) INSTALLATION OF BUILT-IN CELLAR The cutout dimension illustrated in figure (C) allows for door swing and access to the pull-out shelves when installed as a built-in appliance. If installing between frameless cabinets, a ½” wide filler strip or side panel may be needed on hinge side. The filler strip will act as a spacer between the appliance case and adjacent cabinet door swing. -
Page 7: Operating Your Wine Cellar
PART IV. OPERATING YOUR WINE CELLAR Each Wine Cellar includes an Operating Panel on the front of the unit. This Operating Panel includes several features to operate and control the temperature of both the UPPER and LOWER zones of the Wine Cellar. The Operating Panel includes the following features: ON/OFF: Turns the Wine Cellar on or off. -
Page 8: Temperature Settings
SETTING THE TEMPERATURE CONTROL IMPORTANT: IN ORDER FOR THIS UNIT TO FUNCTION AT OPTIMUM LEVEL, THE LOWER COMPARTMENT SHOULD BE SET AT LEAST 4-DEGREES (F) HIGHER THAN THE UPPER COMPARTMENT. 1. Make sure power cord is connected to a properly grounded outlet. 2. -
Page 9: Layout & Storage
time, there will be a few degrees variance between the temperature you select and the one indicated on the LED readout for the first few hours of operation. After a few hours of operation, the temperature will normalize to the displayed temperature. DOOR LOCK This unit comes with an optional key lock. -
Page 10: Part Vii. Removing The Rolling Shelf
PART VII. REMOVING THE ROLLING SHELF To remove a rolling shelf: 1. Remove all bottles 2. Pull the shelf out as far as possible 3. Push the side lever downward (as illustrated below) 4. Remove the shelf PART VIII. CARE AND MAINTENANCE Cleaning Your Wine Cellar. -
Page 11: Troubleshooting Guide
Moving Your Wine Cellar. Remove all items. Securely tape down all loose items (shelves) inside your appliance. Turn the adjustable leg up to the base to avoid damage. Tape the door shut. Be sure the appliance stays secure in the upright position during transportation. Also protect the outside of the appliance with a blanket or similar item. -
Page 12: Part X. Technical Information
PART X. TECHNICAL DATA Accommodation (bottles) Type of cooling compressor & air-circulated fan cooling y t i Nominal voltage/Frequency 220-240V/50-60HZ, 115V/60HZ 32-100.4 degrees Fahrenheit Ambient temperature Upper Zone: 41F - 60F Temperature range Lower Zone: 45F -64 F y t i ’’H PART XI.
Need help?
Do you have a question about the 273 02 50 and is the answer not in the manual?
Questions and answers