Table of Contents
Advertisement
Quick Links
D
ETECTION
This manual has been written to guide you through the operation of the DS7060 control
panel. It has been written in language that is easy to understand and if you follow some
simple guidelines, you will get the most out of your system and will not be bothered by
annoying false alarms. If you have any questions about this manual, please contact your
alarm installing company who will be pleased to assist. Industry statistics show that 95% of
alarms are caused by incorrect operation. Please take the time to become familiar with your
system by reading this manual. Some information contained in this manual is confidential.
Please keep it in a secure area.
Customising your system.
In several parts of this user guide, you will see sections that are denoted as a question.
e.g. ⇒ ⇒ Has residential operation been enabled?
Before your installer programs the system, have him fill in all the answers to the questions
so that the system will be configured to your requirements and so that you understand its
operation.
QUICK REFERENCE GUIDE TO USER OPERATIONS
NORMAL ARMING
PERIMETER ARMING NO DELAY
ZONE BYPASS
PERIMETER ARMING
QUICK ARM
CUSTOM ARMING
DISARM SYSTEM
CHIME MODE ON or OFF
SET TIME/DATE
ZONE TEST
READ ALARM HISTORY
BATTERY TEST
COMMUNICATOR TEST
FIRE RESET
REMOTE PROGRAM ANSWER
REMOTE PROGRAM DIAL OUT
SOUNDER TEST
DISPLAY TROUBLE TYPE
CLEAR BYPASSED ZONES
ENABLE GUEST CODE
In residential mode, a PIN is only required
for disarming and silencing the sounders.
S
YSTEMS Model DS7060
PIN
PIN
PIN
PIN
#
PIN
PIN
PIN
PIN
PIN
PIN
PIN
PIN
PIN
PIN
PIN
PIN
PIN
PIN
PIN
YES
NO
ON
No Entry Perim Only
Bypass
ZONE NUMBER
Perim Only
ON
#
4
OFF
#
7
#
0
#
8 1
#
8 9
System Reset
#
8 2
System Reset
#
8 6
#
8 3
#
8 5
#
8 7
Bypass
*
#
8 4
Advertisement
Table of Contents

Subscribe to Our Youtube Channel
Related Manuals for Detection Systems DS7060


Summary of Contents for Detection Systems DS7060
- Page 1 ETECTION YSTEMS Model DS7060 This manual has been written to guide you through the operation of the DS7060 control panel. It has been written in language that is easy to understand and if you follow some simple guidelines, you will get the most out of your system and will not be bothered by annoying false alarms.
-
Page 2: Table Of Contents
INDEX Automatic Arming Bypassing zones Chime mode Communications test Contact telephone numbers P 13 Set the Date Deleting or adding a PIN Delay before communicating P 12 Duress Easy Exit Special emergency keys P 11 Fire alarms Force arming Guest code P 10 Event history System information... -
Page 3: What Is A Security System P
WHAT IS A SECURITY SYSTEM? An alarm system is made up of a number of sensing devices (sensors) that are wired back to a control panel. A keypad, which is usually placed near one or more entry doors is also connected to the control panel. -
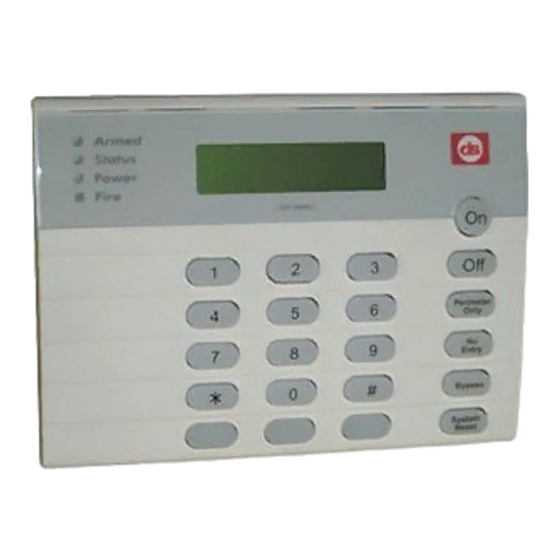
Page 4: The Keypad P
THE KEYPAD Your keypad is used by you to operate your system. It also tells you the status of the system, i.e. whether the system is ready to arm, its armed state, the condition of the battery, the mains supply and even the telephone line. Usually it is placed near an entry/ exit door for your convenience. -
Page 5: Deleting Or Adding A Pinp
ADDING A PIN User code 1 is used to add or delete a PIN. It is also used to change the factory setting for PIN 1 of 1234. For programming purposes, user PINs are numbered from 001 to 015. Step 1 Enter user code 1 and press # and 0 e.g. -
Page 6: Turning The System Offp
Arming type Keys to press How the LEDs respond NORMAL ARMING PIN and ON The ARM light will flash. A single beep will sound. The ARM light will go steady at the end of exit delay time. The system is fully armed. PERIMETER ARMING PIN and Perim The ARM light will flash. -
Page 7: Automatic Arming
FORCE ARMING Sometimes it may be more convenient to arm the system prior to closing your exit door. In some cases, you may also have a motion sensor covering the area where the keypad is installed. In cases such as these your installer can program the system to enable you to arm the system with these zones faulted. -
Page 8: Bypassing Zones
To delay the Automatic Arm time : Enter your PIN followed by the # key and 99. Enter the number of hours, from the current time, when you want the system to Auto Arm. For example: If it is 3:30 now and you want the system to Auto Arm at 9:30, enter 06. -
Page 9: Chime Mode
CHIME MODE Chime mode causes the keypad sounder to beep for two seconds each time an entry/exit zone or perimeter zone is violated when the system is disarmed. This is useful as a door warning system. Your installation company determines which zones will chime. To enable and disable Chime mode : Enter your PIN followed by # 7 SET THE TIME... -
Page 10: Event History P
ZONE TEST Zone test enables you to test each zone for correct operation. This ensures that when a sensor is violated, the control panel will respond. Zones programmed as 24 hour zones (such as panic buttons) and also fire zones cannot be tested using this procedure. To carry out a zone test : Enter your PIN followed by # 8 1 The zone lights for non 24 hour and non fire zones will flash. -
Page 11: Communications Test
COMMUNICATIONS TEST This test is only applicable if your system is connected to a monitoring centre and has the test function enabled. A long beep will initially be heard from the keypad to acknowledge the start of the test. If the test is successful, a long beep will be heard from the keypad. If the test fails, the keypad will sound continuously. -
Page 12: Guest Code P
CONTROL PANEL TROUBLE CONDITIONS Your system constantly monitors several functions and will warn you if any problems occur. It does this by flashing the POWER light. If the POWER light is flashing you can cause the panel to display the respective trouble condition using a command and watching the zone lights. -
Page 13: Special Emergency Keys P
occupants of the premises about these sounds so that you will be ready to respond appro- priately. You should develop a response plan BEFORE any alarms occur. You should seek the advice of your alarm company as they install the system. If there is any threat or danger to yourself or others on the premises, such as in the event of a fire alarm, everyone should be instructed to leave the premises immediately. -
Page 14: Delay Before Communicating P
other zones programmed as fire are activated, an immediate alarm is signalled. If there are no new alarms for two minutes following a power restoral, no action is taken. Are fire sensors programmed for verified fire alarm operation?. YES NO DELAY BEFORE COMMUNICATING In order to minimise nuisance calls to the monitoring centre, a delay of 15 seconds may be programmed to allow you to cancel an alarm before it is transmitted to the monitoring... -
Page 15: Contact Telephone Numbers
SYSTEM TIMERS ⇒ ⇒ The exit delay timer has been set at seconds. ⇒ ⇒ The entry delay timer has been set at seconds. ⇒ ⇒ The siren timer has been set for minutes. CONTACT TELEPHONE NUMBERS ⇒ ⇒ If you need service on your alarm system call_____________________________ ⇒... - Page 16 Detection Systems, Inc., 130 Perinton Parkway, Copyright © 2001 Detection Systems, Inc. Fairport, New York, USA 14450-9199 DS7060 AUS Users Guide (585) 223-4060 • (888) 289-0096 • Fax: (585) 223-9180 P/N: 32578D 9/01 Page 16...
Need help?
Do you have a question about the DS7060 and is the answer not in the manual?
Questions and answers