Brod & Taylor FP-201 Instructions & Recipes
Folding proofer
Hide thumbs
Also See for FP-201:
- Instructions & recipes (44 pages) ,
- Instructions manual (10 pages) ,
- Instruction manual (96 pages)

Related Manuals for Brod & Taylor FP-201


Summary of Contents for Brod & Taylor FP-201
- Page 1 Folding Proofer Instructions & Recipes Model FP-201 www.brodandtaylor.com For your safety, read this instruction manual before using product.
- Page 2 Congratulations on your purchase of a Brød & Taylor Folding Proofer! CHOCOLATE BREAD YOGURT Safely melt without burning Rise and ferment yeast bread Large capacity yogurt and hold tempered chocolate. dough with professional results. maker (up to 8 litres). Professional bread bakers prize the ability to control fermentation temperatures to produce the best flavors in their loaves.
- Page 3 IMPORTANT 10. Do not place on or near a hot gas or electric burner, or in a SAFEGUARDS heated oven. 11. Extreme caution must be used when moving an appliance contain- When using electrical appliances, ing hot oil or other hot liquids. basic safety precautions should always be followed including the 12.
- Page 4 SAVE THESE NOTICE INSTRUCTIONS This appliance is for household use only. Use on Alternate Current Please read and keep these in- (50/60 Hertz) only with voltage as structions to obtain the best results indicated on the manufacturer type from your Folding Proofer. plate.
-
Page 5: Control Panel
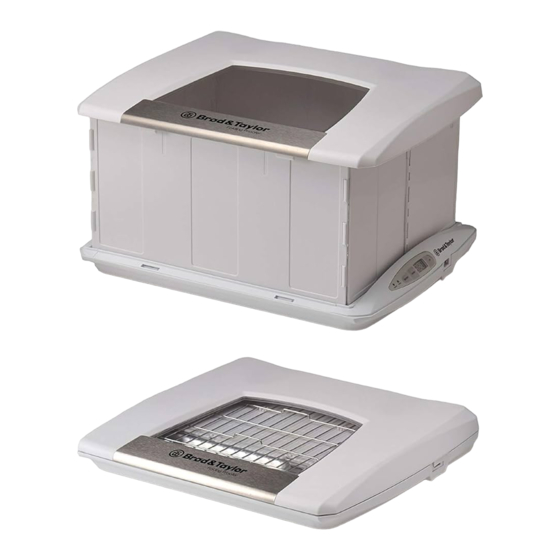
NOTE: The display may be configured to display in °F or °C. To switch between modes, press and hold both the “UP” button and the “DOWN” button for two seconds. DOWN HEATING POWER Features 1. Lid 2. Expanding box section Control Panel 3. - Page 6 GENERAL OPERATING INSTRUCTIONS Set Up Open the lid by lifting the front edge of the proofer. Allow the lid to rest in a vertical position. Remove the wire rack, power cord and water tray. Lift the expanding box section from the front edge, fold it open and fit into the base.
- Page 7 Select Celsius or Fahrenheit The display on the control panel indicates the temperature set point. The display may be configured to display in °F or °C. To switch between modes, press and hold both the “Temperature UP” button and the “Temperature DOWN”...
- Page 8 CLEANING AND USER MAINTENANCE 1. This appliance is virtually maintenance free, no lubrication is needed. If the cord or the appliance is damaged or does not operate properly, return it to service for repair. This appliance has no user serviceable parts.
-
Page 9: Table Of Contents
RECIPES General Guidelines Rustic Pizza Crust Golden Three-Wheat Boule Cranberry Pecan Boule Country Wheat Sandwich Bread Greylock Sourdough Yogurt, Custard Style Strawberry Frozen Yogurt Tempering Chocolate Page 9... -
Page 10: General Guidelines
General Guidelines for Fermenting Bread Dough in the Proofer Prepare the Proofer. For bread dough, the proofer should always have the water tray filled one-third to one-half full with clean water, and the tray should be placed in the center of the warming plate. The wire rack goes on top of the water tray. -
Page 11: Rustic Pizza Crust
Rustic Pizza Crust This easy recipe is our favorite pizza crust. The soft dough is a pleasure to work with and forms a nicely raised border with a crisp crust and open crumb. The dough can be mixed anytime the day before, or on the morning of making the pizzas. - Page 12 Retard the Dough. Place the dough in the oiled bowl and turn it over so that it is lightly coated with oil. Cover and chill in the refrigerator for at least six hours, or up to 30 hours. Choose a Timetable. From the chart below, choose a fermentation temperature and its corresponding time to remove the dough from the refrigerator.
- Page 13 isn’t necessary for creating a non-stick surface, we use a little semolina with parchment because it creates a crisp and delicious crust. If shaping on a peel, use a more generous layer of semolina so the pizza won’t stick. We find shaping on parchment is easier than a peel, because the dough will stick to the parchment and not spring back when stretched, yet once the pizza is baked for a minute or so, the non-stick properties of the parchment kick in and the pizza slides off the paper effortlessly.
-
Page 14: Golden Three-Wheat Boule
Golden Three-Wheat Boule This bread has a beautiful golden crumb, a sweet, complex aroma and a rustic crust. Bread flour from hard red winter wheat forms the backbone of the bread, while durum wheat and whole grain “white” wheat contribute wonderful flavor. - Page 15 Put the flours and yeast in a medium bowl and whisk to combine. Measure or weigh the ice water, add to the bowl and whisk vigorously until very smooth and lump free, about one minute. Scrape down the sides of the bowl, cover, and ferment in the proofer for 12 hours at 24C. When the poolish is ripe, it will have doubled in size and the surface will be covered with bubbles (you may see some pop) and a few wrinkles or dents.
- Page 16 20, 40 and 60 minutes. To stretch and fold, gently stretch one side of the dough with oiled fingers, then fold it towards the center and repeat on the opposite side, creating a business letter fold. Repeat with the other two sides, forming a square package in which all four sides have been stretched and folded to the center.
- Page 17 Baker’s Overall Bread Formula Grams Ounces Percentage Unbleached flour, 11.7% – 12.3% protein 206 g 7.3 oz 62.5% Whole grain white wheat flour 86 g 3.0 oz 25.9% (sifted to remove bran) Semolina flour 39 g 1.4 oz 11.7% Instant yeast 1.0 g 0.04 oz 0.3%...
-
Page 18: Cranberry Pecan Boule
Cranberry Pecan Boule This delicious boule is studded with toasted pecans and tart cranberries, and has the wholesome goodness of whole wheat. Poolish Volume Grams Ounces Unbleached bread flour 3/4 cup 118 g 4.4 oz Instant yeast 1/4 tsp Water, 70-78F 1/2 cup 118 g 4.4 oz... - Page 19 volume. The dough is somewhat heavy due to the addition of cranberries and nuts so it does take a little while to rise fully. Shape and Proof the Boule. Turn the dough out onto a lightly floured counter and shape the dough into a tight round ball. Place the dough ball seam side up into a well floured dough rising basket or a bowl/colander lined with a heavily floured linen cloth.
-
Page 20: Country Wheat Sandwich Bread
Country Wheat Sandwich Bread This soft sandwich loaf is made with 22% whole wheat flour and is enriched with a touch of butter and milk for delicious flavor. Baker’s Volume Grams Ounces Percentage Unbleached bread flour 3 1/2 cups 446 g 15.75 oz 81.7% Whole wheat flour... -
Page 21: Greylock Sourdough
Greylock Sourdough This rustic bread gets complex flavor and a mild, delicious tang from a little dark rye in the sourdough starter. It has enough whole wheat and rye to give it a robust, earthy flavor, yet still retains a moist and open crumb with a bit of chew. - Page 22 Mix and Autolyse the Main Dough. Warm the water to about 29 - 32C (cooler if room temp is over 23C). Measure or weigh the flours into a bowl, add the lukewarm water, and mix until all the flour is moistened. Cover and let sit for 30 minutes.
- Page 23 Slash and Bake with Steam at 232C. Gently invert the loaf onto parchment or a floured peel. Brush excess flour from the top and sides of the loaf. Using a baker’s lame or serrated knife, slash in two long, slightly angled lines.
-
Page 24: Yogurt, Custard Style
Making Yogurt: Custard-Style, Greek or Classic This recipe details all the steps for making thick, creamy “custard-style” yogurt, plus straining instructions for Greek yogurt. There’s a variation at the end for classic yogurt that has a fresh taste and thinner texture. Custard-Style Yogurt This method highlights two techniques for creating thick yogurt: holding milk at 90C for ten minutes before culturing, and allowing the yogurt to... - Page 25 Step Two: Cool Milk to 46 - 43C. In order to heat the jars and speed cooling by dividing the milk into smaller containers (both increase food safety), pour the hot milk into the jars and allow to cool (bubbles left on the surface from whisking will prevent a skin from forming).
- Page 26 Greek Yogurt Strain the yogurt. Line a colander or strainer with several layers of cheesecloth or one layer of paper coffee filters. Set the colander/strainer over a bowl and spoon in the chilled yogurt. Cover and refrigerate. Allow to strain for 1-3 hours, or until desired thickness is reached. For our frozen yogurt recipe, below, we strained the yogurt overnight.
- Page 27 Protein is Key to Thickening. The casein (protein) clusters in milk thicken yogurt by unraveling and forming a three-dimensional mesh when exposed to the lactic acid created by culturing. Heating milk above 78C before culturing denatures one of the main whey proteins, lactoglobulin, which allows it to join in the mesh (instead of remaining inactive) and effectively increases the amount of protein in the milk that will be available to thicken the yogurt.
-
Page 28: Strawberry Frozen Yogurt
Strawberry Frozen Yogurt Making Creamy Frozen Yogurt. To keep the texture of our frozen dessert creamy, we limit the water content so that large ice crystals are less likely to form. Both milk and strawberries have plenty of water, so we strain the yogurt and reduce the juices that drain from the berries. - Page 29 freezing). Chill the pre-mix thoroughly, then freeze according to your ice cream maker’s instructions. When frozen, transfer to the pre-frozen containers and allow to freeze until a little firmer, about 30 minutes. If desired, serve with chunks of fresh strawberry and top with a whole strawberry. Once the yogurt freezes for several hours it may be too firm to scoop- short bursts in the microwave (5-10 seconds) can soften it for serving.
-
Page 30: Tempering Chocolate
Tempering Chocolate Tempering allows the right crystal structure to form from the cocoa butter in chocolate, making the texture smooth, shiny and crisp. Step One: Melt the Chocolate. Set up the proofer with wire rack in place and the thermostat at 46C. The water tray may be placed underneath the rack, but make sure it is completely dry. -
Page 31: Specifications
SPECIFICATIONS Dimensions: • Inside box (open): 32 x 38 x 22 cm high • Outside body (open): 46 x 37 x 27 cm high • Outside body (closed): 46 x 37 x 6.5 cm high Temperature Range: 21 - 49C Maximum capacity: Two “large” loaves – approximately 0.9 kg dough each (1.8 kg. total) from recipes with about 250-375 g of flour per loaf. This product is intended for interior household use only, in an operating environment of 16C or greater. - Page 32 Berkshire Innovations, LLC P.O. Box 712 Copyright 2010-12 Williamstown, MA 01267 All Rights Reserved. U.S.A. Rev.UK0912.1 www.brodandtaylor.com...
Need help?
Do you have a question about the FP-201 and is the answer not in the manual?
Questions and answers