Brod & Taylor FP-201 Instructions & Recipes
Folding proofer
Hide thumbs
Also See for FP-201:
- Instructions manual (10 pages) ,
- Instruction manual (96 pages) ,
- Instructions & recipes (52 pages)
Table of Contents
Advertisement
Quick Links
Download this manual
See also:
Instruction Manual
Advertisement
Table of Contents

Related Manuals for Brod & Taylor FP-201


Summary of Contents for Brod & Taylor FP-201
- Page 1 Folding Proofer Instructions & Recipes Model FP-201 www.brodandtaylor.com For your safety, read this instruction manual before using product.
- Page 2 Congratulations on your purchase of a Brød & Taylor Folding Proofer! Bread Yogurt Chocolate and more Ideal environment for Easily make fermenting and rising up to 2 gallons/8 litres No-hassle melting Accomplished cooks know that the secret to many kitchen processes — from rising bread to making yogurt to tempering chocolate for dessert to making healthy probiotic foods —...
-
Page 3: Important Safeguards
IMPORTANT 10. Do not place on or near a hot gas or electric burner, or in a SAFEGUARDS heated oven. 11. Extreme caution must be used when moving an appliance contain- When using electrical appliances, ing hot oil or other hot liquids. basic safety precautions should always be followed including the 12. - Page 4 Please read and keep these in- structions to obtain the best results HOUSEHOLD from your Folding Proofer. USE ONLY SPECIAL NOT INTENDED FOR CORDSET COMMERCIAL USE INSTRUCTIONS A short power supply cord is pro- vided to reduce the risks resulting from becoming entangled in or tripping over a longer cord.
-
Page 5: Control Panel
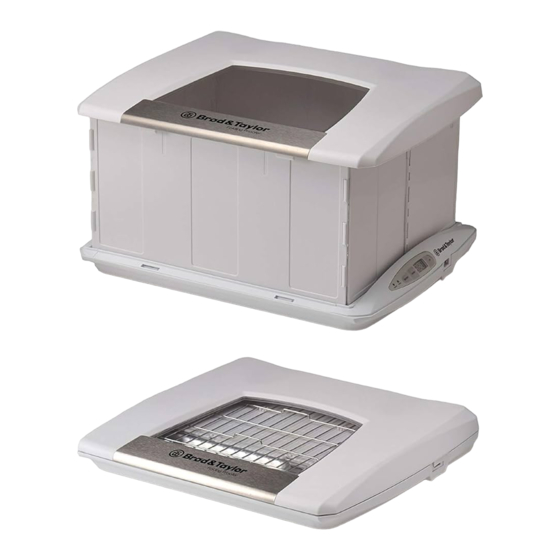
NOTE: The display may be confi gured to display in °F or °C. To switch between modes, press and hold both the “UP” button and the “DOWN” button for two seconds. Features 1. Lid 2. Expanding box section Control Panel 3. -
Page 6: General Operating Instructions
GENERAL OPERATING INSTRUCTIONS Set Up Open the lid by lifting the front edge of the Proofer. Allow the lid to rest in a vertical position. Remove the wire rack, power cord and water tray. Lift the expanding box section from the front edge, fold it open and fi t into the base. - Page 7 Select Celsius or Fahrenheit The display on the control panel indicates the temperature set point. The display may be confi gured to display in °F or °C. To switch between modes, press and hold both the “Temperature UP” button and the “Temperature DOWN”...
- Page 8 CLEANING AND USER MAINTENANCE 1. This appliance is virtually maintenance free, no lubrication is needed. If the cord or the appliance is damaged or does not operate properly, re- turn it to service for repair. This appliance has no user serviceable parts. No repairs should be attempted by the user.
- Page 9 PRECAUTIONS IMPORTANTES Lorsque vous utilisez des appareils électriques, des précautions de base doivent toujours être prises, y compris celles qui suivent : 1. Veuillez lire toutes les instructions 2. Evitez de toucher aux surfaces chaudes. Utilisez des poignées ou des boutons 3.
- Page 10 données des instructions par celui qui est responsable de leur sécurité. 17. Les enfants doivent être surveillés afi n d’assurer qu’ils ne jouent pas avec l’appareil. 18. Si le cordon d’alimentation est endommagé, il doit être remplacé par le fabricant, par son agent de service ou par une personne également qualifi...
- Page 11 NOTE: L’affi chage peut être confi guré en °F ou °C. Pour changer de mode, maintenez appuyer les deux boutons « Temperature up » and « Temperature down » pendant deux secondes. DOWN HEATING POWER Caractéristiques 1. Couvercle Panneau de 2.
- Page 12 INSTRUCTIONS GENERALES D’OPERATION Installation Ouvrir le couvercle en soulevant le bord avant de l’étuve. Faîtes en sorte que le couvercle garde une position verticale. Retirez la grille, le cordon d’alimentation et le bac à eau. Soulever la section expansion du caisson depuis le bord avant, dépliez-le et rentrez-le dans la base.
- Page 13 Sélectionner Celsius ou Fahrenheit L’affi chage sur le panneau de contrôle indique la température de consigne. L’affi chage peut être confi guré en °F ou °C. Pour changer de mode, maintenez appuyer les deux boutons « Temperature up » and « Temperature down »...
- Page 14 Rabaissez la partie ainsi pliée dans la base. Placez le bac à eau dans la partie avant de la base. Tournez la grille à l’envers et placez-le dans la base. Enlevez le cordon d’alimentation de l’étuve, pliez et placez-le sur l’arriére de la grille.
-
Page 15: Table Of Contents
RECIPES General Guidelines Rustic Pizza Crust Golden Three-Wheat Boule Cranberry Pecan Boule Country Wheat Sandwich Bread Brød & Taylor Sourdough Yogurt, Custard Style & Greek Strawberry Frozen Yogurt Yogurt, Lactose-Free Yogurt-Making Notes Tempering Chocolate Page 15... -
Page 16: General Guidelines
General Guidelines for Rising and Fermenting Bread Dough in the Proofer Prepare the Proofer. For bread dough, the Proofer should always have the water tray fi lled one-third to one-half full with clean water, and the tray should be placed in the center of the warming plate. The wire rack goes on top of the water tray. -
Page 17: Rustic Pizza Crust
Rustic Pizza Crust This easy recipe is our favorite pizza crust. The soft dough is a pleasure to work with and forms a nicely raised border with a crisp crust and open crumb. The dough can be mixed any time the day before, or on the morning of making the pizzas. - Page 18 Retard the Dough. Place the dough in the oiled bowl and turn it over so that it is lightly coated with oil. Cover and chill in the refrigerator for at least six hours, or up to 30 hours. Choose a Timetable. From the chart below, choose a fermentation temperature and its corresponding time to remove the dough from the refrigerator.
- Page 19 isn’t necessary for creating a non-stick surface, we use a little semolina with parchment because it creates a crisp and delicious crust. If shaping on a peel, use a more generous layer of semolina so the pizza won’t stick. Shaping on parchment is easier than a peel, because the dough will stick to the parchment and not spring back when stretched, yet once the pizza is baked for a minute or so, the non-stick properties of the parchment kick in and the pizza slides off the paper effortlessly.
-
Page 20: Golden Three-Wheat Boule
Golden Three-Wheat Boule This bread has a beautiful golden crumb, a sweet, complex aroma and a rustic crust. Bread fl our from hard red winter wheat forms the backbone of the bread, while durum wheat and whole grain “white” wheat contribute wonderful fl... - Page 21 Put the fl ours and yeast in a medium bowl and whisk to combine. Measure or weigh the ice water, add to the bowl and whisk vigorously until very smooth and lump free, about one minute. Scrape down the sides of the bowl, cover, and ferment in the Proofer for 12 hours at 75F/24C.
- Page 22 and fold the dough three times, at 20, 40 and 60 minutes. To stretch and fold, gently stretch one side of the dough with oiled fi ngers, then fold it towards the center and repeat on the opposite side, creating a business letter fold.
- Page 23 Baker’s Overall Bread Formula Grams Ounces Percentage Unbleached fl our, 11.7% – 12.3% protein 206 g 7.3 oz 62.5% Whole grain white wheat fl our 86 g 3.0 oz 25.9% (si ed to remove bran) Semolina fl our 39 g 1.4 oz 11.7% Instant yeast...
-
Page 24: Cranberry Pecan Boule
Cranberry Pecan Boule This delicious boule is studded with toasted pecans and tart cranberries, and has the wholesome goodness of whole wheat. Poolish Volume Grams Ounces Unbleached bread fl our 3/4 cup 118 g 4.4 oz Instant yeast 1/4 tsp Water, 70-78F 1/2 cup 118 g... - Page 25 Ferment the Dough. Put the dough into a lightly oiled bowl and place back in the Proofer at 80F/27C. Let the dough rise for 60-90 minutes or until it has doubled in volume. The dough is somewhat heavy due to the addition of cranberries and nuts so it does take a little while to rise fully.
-
Page 26: Country Wheat Sandwich Bread
Country Wheat Sandwich Bread This soft sandwich loaf is made with 22% whole wheat fl our and is enriched with a touch of butter and milk for delicious fl avor. Baker’s Volume Grams Ounces Percentage Unbleached bread fl our 3 1/2 cups 446 g 15.75 oz 81.7%... -
Page 27: Brød & Taylor Sourdough
Brød & Taylor Sourdough This rustic bread gets complex fl avor and a mild, delicious tang from a little dark rye in the sourdough starter. It has enough whole wheat and rye to give it a robust, earthy fl avor, yet still retains a moist and open crumb with a bit of chew. - Page 28 Mix and Autolyse the Main Dough. Warm the water to about 85-90F/29- 32C (cooler if room temp is over 74F/23C). Measure or weigh the fl ours into a bowl, add the lukewarm water, and mix until all the fl our is moistened.
- Page 29 Prepare to Bake. About an hour before baking, place a pizza stone in the middle of the oven and preheat to 450F/232C. Prepare to steam the oven using your regular method (such as tossing ice on a preheated sheet pan) or set out a deep, oven-proof rectangular pan to cover the loaf and create a steam chamber.
-
Page 30: Yogurt, Custard Style & Greek
Making Yogurt: Custard-Style, Greek or Classic This recipe details all the steps for making thick, creamy “custard-style” yogurt, plus straining instructions for Greek yogurt. Custard-Style Yogurt This method highlights two techniques for creating thick yogurt: holding milk at 195F/90C for ten minutes before culturing, and allowing the yogurt to thicken at a lower temperature. - Page 31 Step Three: Cool Milk to 115F/46C and Innoculate with Live Culture. Remove the hot milk from the heat. Placing the pan in cold water will speed cooling. Wait until the milk reaches 115F/46. To inoculate the milk, add a cup/240 ml of the warm milk to a small bowl. Add the appropriate amount of yogurt with live cultures (1Tb for every 2 cups/30g for every 1 litre) and stir until smooth.
-
Page 32: Strawberry Frozen Yogurt
Strawberry Frozen Yogurt Making Creamy Frozen Yogurt. To keep the texture creamy, limit the water content so that large ice crystals are less likely to form. Both milk and strawberries have plenty of water, so we strain the yogurt and reduce the juices that drain from the berries. - Page 33 Make and Chill the Pre-Mix. Fold the fruit into the extra-thick yogurt and stir in the extracts. Taste and correct for sugar (the mixture will seem a little less sweet after freezing). Chill the pre-mix thoroughly, then freeze according to your ice cream maker’s instructions. After freezing and mixing in the ice cream maker, transfer to the pre- frozen containers and allow to freeze until a little fi...
-
Page 34: Yogurt, Lactose-Free
Lactose-Free Yogurt Make lactose-free yogurt without the high sugar levels and additives that are often found in commercial products. Regular milk and classic live cultures create a delicious, pure yogurt. The ability to set the Proofer to exact temperatures and customize the culture timing so that lactose is eliminated is an important differentiator among yogurt makers. - Page 35 Set up the Proofer. While the milk is cooling, set up the Proofer and adjust the temperature to 120F/49C. Make sure to use the rack, but the water tray is not required. Place glass jars in the Proofer to warm. Put the lid on the Proofer and allow it to come to temperature.
- Page 36 Making Lactose-Free Honey-Vanilla Yogurt The 19-hour culture creates a lactose-free yogurt that is thick and creamy but quite tart. To create a mild, lightly sweetened honey-vanilla yogurt, fi rst stir in the baking soda and allow to sit for a few minutes while some of the acid is neutralized.
-
Page 37: Yogurt-Making Notes
Yogurt-Making Notes Which Culture Should I Use? Our testing showed that store-bought yogurts are not all created equal—some make dramatically better starter cultures than others. While all the brands of plain “live culture” supermarket yogurt will work, some produce thinner textures while others are thicker, and a few produce yogurts that fi... - Page 38 yogurt will be more likely to leak whey when it thickens at temperatures above 104F/40C, and less likely to leak whey below 104F/40C. At lower temperatures there is also a longer window of opportunity to stop the culturing before the yogurt turns lumpy. Our “High-Low”...
-
Page 39: Tempering Chocolate
Tempering Chocolate Tempering allows the right crystal structure to form from the cocoa butter in chocolate, making the texture smooth, shiny and crisp. Step One: Melt the Chocolate. Set up the Proofer with wire rack in place and the thermostat at 115F/46C. The water tray may be placed underneath the rack, but make sure it is completely dry. - Page 40 NOTES: Page 40...
- Page 41 NOTES: Page 41...
- Page 42 NOTES: Copyright 2011-13 All Rights Reserved. Berkshire Innovations, LLC P.O. Box 712 Williamstown, MA 01267 www.brodandtaylor.com Page 42...
- Page 43 TIONS SPECIFICA FP-201 Dimensions: • Inside box (open): 32 x 38 x 22 cm high • Outside body (open): 46 x 37 x 27 cm high • Outside body (closed): 46 x 37 x 6.5 cm high Temperature Range: 21 - 49C Maximum capacity: Two “large”...
- Page 44 Berkshire Innovations, LLC P.O. Box 712 Copyright 2010-13 Williamstown, MA 01267 All Rights Reserved. (800) 768-7064 Rev.0813.1 www.brodandtaylor.com...
Need help?
Do you have a question about the FP-201 and is the answer not in the manual?
Questions and answers