Table of Contents
Advertisement
Quick Links
Advertisement
Table of Contents

Related Manuals for Duratrax VW Baja Bug


Summary of Contents for Duratrax VW Baja Bug
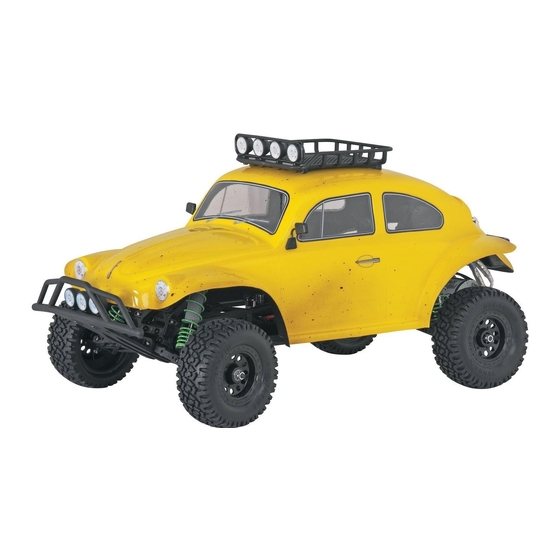
- Page 1 ® www.Duratrax.com...
- Page 2 These are included with your VW Baja Bug. Chassis Receiver Antenna Tube Body Instruction Manual Transmitter Replacement Parts Guide These are items you will need to run your VW Bug. ONYX 6C 7.2V 2000MAH NIMH STICK DTXC2035 ONYX 100 AC/DC PEAK CHARGER...
-
Page 3: Warranty
➤ After the 90 day warranty, you can still ➤ Do not operate the VW Baja Bug near it before we can honor the warranty. Further, have your VW Baja Bug repaired for a people. -
Page 4: Transmitter Preparation
TRANSMITTER PREPARATION Battery Tray Door AA BATTERIES x4 RECEIVER ANTENNA INSTALLATION DO NOT CUT THE ANTENNA WIRE! - Page 5 6-CELL BATTERY INSTALLATION RADIO SYSTEM CHECK Your radio system’s transmitter and receiver are preset at the factory. If your radio system needs to be rebound: 1. Remove the radio box lid. 2. Turn on the transmitter and receiver. 3. Carefully press the bind button on the top of the receiver and hold it down until the L.E.D.
- Page 6 RADIO SYSTEM CHECK (STEERING) Steering Throttle Trim Steering Trim Servo Reverse Switch ALWAYS CHECK THE RADIO OPERATION BEFORE EACH RUN! On/Off 2.4 GHz Throttle/ESC Reverse Switch Reverse Forward ward ELECTRONIC SPEED CONTROL (ESC) SET UP ➤ Connect the battery pack to the ESC. Turn on the Tx, and then the ESC.
-
Page 7: Maintenance Tips
➤ Motor brushes are dirty or the motor is bad. Clean with a 6. Check to make sure that all wires are properly connected. motor spray (such as Duratrax Power Shot ™ , DTXC2458) and re-oil the bushings or replace the motor. -
Page 8: Tuning Guide
WHEEL BASE TUNING GUIDE: Front When tuning the VW Baja Bug make sure that you have equal Long Middle Short length shocks, camber rods and steering rods on both sides (left and right). They do not have to be the same front to rear. -
Page 9: Front Shock Adjustment
FRONT SHOCK ADJUSTMENT CLEANING TIPS The VW Baja Bug is fun to drive through the dirt and mud. Top Shock Outer Positions: Top Shock Inner Positions: More Steering, Slower Steering, When it comes time to clean the chassis, here are a few tips:... -
Page 10: Maintenance Guide
MAINTENANCE GUIDE: The following section is provided to help you with maintenance and repairs to your VW Baja Bug. Pay extra attention to the notes and tips for proper assembly. Bulkhead, Bulkhead Brace, Front Suspension Arm, Front Shock Tower, Front Bumper 1. - Page 11 Steering Servo Saver Assembly 1. Insert the short servo saver post (99) into the right side brass bushing (105). 2. Install two short ball studs (81) into the right servo saver (46) in the holes shown. 3. Insert a plastic bushing (48) into each end of the right servo saver. Make sure the bushings are fully seated.
- Page 12 Rear Shock Tower, Rear Transmission Plate, Rear Bulkhead, Rear Suspension Arm 1. Attach the rear chassis plate (41) to the chassis (1) using four 3x10mm round head screws (C). 2. Attach the rear suspension arms (36,37) to the rear chassis plate using the inner rear hinge pins (97).
- Page 13 Pin Hole Bearing Keyed Mount Section Pin Hole Differential 1. Place one of the 10x16mm bearings (110) on the bearing mounts on the diff gear case (18) and the diff gear case cover (12). 2. Install the outdrives (10) through the diff gear case and the gear cover, and install the pins (11) into their holes. 3.
- Page 14 Slipper Clutch 1. Install the inner slipper plate (84) onto the top shaft (83). Make sure the notch in the inner slipper plate keys onto the 2x10 spring pin (116). 2. Place the slipper pad (64) and outer slipper plate (85) onto the top shaft.
- Page 15 75 (Front) 76 (Rear) 68 (Front) 69 (Rear) 70 (Front) 71 (Rear) Shock Assembly 1. Install a 2.5mm e-clip (S) onto the groove on the shock shafts (68,69) closest to the center of the shaft. 2. Place the shock piston (4) on top of the 2.5mm e-clip. 3.
- Page 16 © 2011 Hobbico ® , Inc. All rights reserved. DTXD36xxMNL...
Need help?
Do you have a question about the VW Baja Bug and is the answer not in the manual?
Questions and answers