Advertisement
Quick Links
Advertisement

Related Manuals for Hartmann DS4

Summary of Contents for Hartmann DS4
- Page 1 hartmann...
- Page 2 ....1 This manual contains sections of Safety Instructions,Operating Instructions, Installation Instructions and Troubleshooting Tips etc. Carefully reading it before using the dishwasher will help you to use and maintain the dishwasher properly.
- Page 3 Under certain conditions, Hydrogen gas may be produced in a hot-water system that has not been used for two weeks or more. HYDROGEN GAS IS EXPLOSIVE. If the hot-water system has not been used for such a period, before using the dishwasher turn on all hot-water faucets and let the water flow from each for several minutes.
- Page 4 To get the best performance from your dishwasher,read all operating instructions before using it for the first time. Power Switch: Turn o n/off the power supply. Delayed Button: Press this button to set the delayed Half washing light:To come on when select the hours for washing.
- Page 5 Draw out the lower and upper basket, load the dishes and When the dishwasher is running, you want to change the using push them back. It is commended that loading the lower programme, you should do according the following step. basket first, then the upper one.
- Page 6 Pre-wash For the heaviest soiled loads, wash(50 ) ℃ such as pots, pans, casserole Wash (50/60/70℃) 5/25 g. dishes and dishes that have Rinse been sitting with dried food on Rinse (65/70/70℃) them for a while. Drying. Pre-wash Pre-wash For heavy soiled loads, such as pots , plates, glasses...
- Page 7 The dispenser must be refilled before the start of each wash cycle following the instructions provided i n the" Wash Cycle Table".Your dishwashers use less detergent and rinse aid than conventional dishwashers. Generally, only one tablespoon of detergent is needed for a normal wash load. Also, more heavily soiled items need more detergent. Always add the detergent just before starting dishwasher, otherwise it could get damp and will not dissolve properly.
- Page 8 To open the dispenser, turn the cap to the "open" (left) arrow and lift it out. Pour in rinse -aid into the container is fill (approx . 140 ml) , Being careful not to overfill. Replace the cap by inserting it aligned w ith "open" arrow and turning i t to the closed (right) arrow.
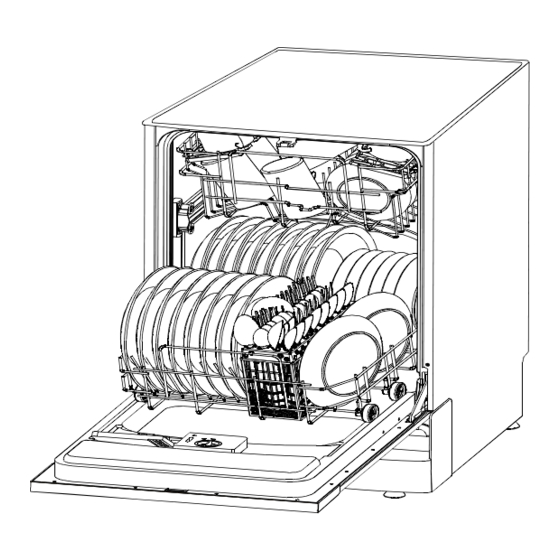
- Page 9 Scrape off any large amounts of left-over food. It is not necessary to rinse the dishes under running water. Place objects in the dishwasher in following way 1.Items such as cups, glasses, pots/pans, etc. are stood upside down. 2.Curve items, or those with recesses, should be at a slant so that water can run off. 3.They are stacked securely and cannot tip over.
- Page 10 improve stacking of pots and pans, the spikes can be folded down. We recommend that you place large items which are most difficult to clean into the lower rack: pots, pans, lids, serving dishes and bowls, as shown in the figure to the right. It is preferable to place serving dishes and lids on the side of the racks in order to avoid blocking the rotation of the top spray arm.
- Page 11 Wooden cutlery and utensils-these will leach out and become unsightly. Sensitive ornamental glasses, craft utensi l and vases,special antique or irretrievable utensils.These ornaments are not dishwasher-proof. Plastic parts sensitive to hot water. Copper and tin utensils. Utensils which are soiled with ash,wax,lubricating grease or ink. Absorbent materials such as sponges and cloths.
- Page 12 It is necessary to clean the spray arms regularly , for hard water chemicals will clog the spray arm jets and bearings. To remove the spray arm, screw off the nut clockwise to take out the washer on top of the spray arm and remove the arm. Wash the arms in soapy and warm water and use a soft brush to clean the jets.
- Page 13 Please see the rating lable to know the rating voltage and connect the dishwasher to appropriate power supply,Use required fuse 12 amp. Fused electrical supply is required-copper wire only. Time delay fuse or circuit breaker recommended and provide separate circuit serving only this appliance. Outlet should be placed in adjacent cabinet. After making sure that the voltage and the frequency values for the current in the home correspond to those on the rating plate and that the electrical system is sized for the maximum voltage on the rating plate, insert the plug into an electrical socket which is...
-
Page 14: Power Outlet
Connect the cold water supply hose to a threaded 3/4(inch) connector and make sure that it is fastened tightly in place. If the water pipes are new or have not been used for an extended period of time, let the water run to make sure that the water is clear and free of impurities. - Page 15 Fuse blown, or the Replace fuse or reset circuit breaker. Remove any other circuit breaker acted appliances sharing the same circuit with the dishwasher Power supply is not Make sure the dishwasher is turned on and the door is turned on closed securely.
-
Page 16: What To Do Before Calling For Service
Combination of soft Use less detergent if you have soft water and select a water and too much shortest cycle to wash the glassware and to get them clean. detergent Tea or coffee stains using a solution of 1/2 cup of bleach and 3 cups warm water to remove the stains by hand. - Page 17 Height : 820mm(adjustable+10mm) Width : 595mm Depth : 540mm Voltage connected Load : see rating label Water pressure: 0.04-1.0MPa Hot water connection : max 60 ℃ Power supply: see rating label Capacity: 12 Place settings...
Need help?
Do you have a question about the DS4 and is the answer not in the manual?
Questions and answers