Canon PowerShot S30 User Manual
Digital camera
Hide thumbs
Also See for PowerShot S30:
- User manual (163 pages) ,
- Parts catalog (15 pages) ,
- Software starter manual (117 pages)
Table of Contents
Advertisement
Quick Links
ENGLISH
Camera User Guide
Flow
Flow
Flowchart and Reference Guides
• This guide covers both the PowerShot S30 and PowerShot S40 digital cameras.
• Please start by reading the Precaution on the reverse side of this cover.
• Please see the User Guide that accompanies each printer.
ra U
ra U User
User
ser Gu
ser Gu
er G
rt and Refe
rt and Refe
t and Ref
eren
eren
This Guide
This
This
uide
uide
Shooting with the Camera
Software Starter Guide
Installing the Software
Software Starter Guide
Connecting the Camera to a Computer
Software Starter Guide
Downloading Images to a Computer
Guid
Guid
Advertisement
Table of Contents

Related Manuals for Canon PowerShot S30


Summary of Contents for Canon PowerShot S30
- Page 1 Software Starter Guide Downloading Images to a Computer • This guide covers both the PowerShot S30 and PowerShot S40 digital cameras. • Please start by reading the Precaution on the reverse side of this cover. • Please see the User Guide that accompanies each printer.
-
Page 2: Trademark Acknowledgements
• Canon Inc. reserves the right to change the specifications of the hardware and software reserves the rig reserves the righ to chan to chang described herein at any time without prior notice. -
Page 3: Table Of Contents
Table of Contents Read this First ................4 Quick Start .................. 8 Components Guide ..............10 Front View ................... 10 Back / Bottom View ..............11 Controls ..................12 Shooting Mode Dial ..............13 ....Operating the Multicotroller ............14 .... - Page 4 Self-Timer ................58 Continuous Mode ..............59 Digital Zoom ................60 Shooting - Selecting Particular Effects ........61 Changing the Resolution and Compression ........61 Changing the File Format .............. 64 Program AE ................. 65 Setting the Shutter Speed ............. 66 ....
- Page 5 Printing with a Direct Print Compatible Printer (Optional) ... 112 Connecting a Direct Print Compatible Printer to the Camera ..112 Printing ..................114 Printing with DPOF Print Settings ..........119 Printing with the Direct Print Compatible Bubble Jet Printer (Optional) ................
-
Page 6: Read This First
Before you try to photograph important subjects, we highly recommend that you shoot several trial images to confirm that the camera is operating and being operated correctly. Please note that Canon Inc., its subsidiaries and affiliates, and its distributors are not liable for any consequential damages arising from any malfunction of a camera or accessory, including CompactFlash™... - Page 7 Canon Customer Support l authorized b l authorized b by your cam y your cam era distrib era distrib...
- Page 8 • Remove the power cord on a regular periodic basis and wipe away the dust and dirt that collects on the plug, the exterior of the electrical outlet and the surround area. In dusty, humid or greasy environments, the dust that collects around the plug over long periods of time may become saturated with humidity and short-circuit, leading to fire.
-
Page 9: Preventing Malfunctions
• Always keep the terminals of the battery charger clean. Do not place metal objects on top of the terminals. There is a risk of fire and other hazards. Cautions • Avoid using, placing or storing the equipment in places subject to strong sunlight or high temperatures, such as the dashboard or trunk (boot) of a car. -
Page 10: Quick Start
Quick Start Charge the Battery (p. 15). Charge the battery using the supplied battery charger. The charging is complete when the charging indicator turns from orange to green. • Please note that the battery charger shape varies between regions. Charging indicator Install the Battery (p. - Page 11 Focus (p. 34). Aim the camera and lightly press the shutter button halfway. Two beeps will sound when the autofocus is set. Shoot (p. 34). t (p. 34) t (p. 34) Press the shutter button all the way. You will hear Press Press ss the shutte...
-
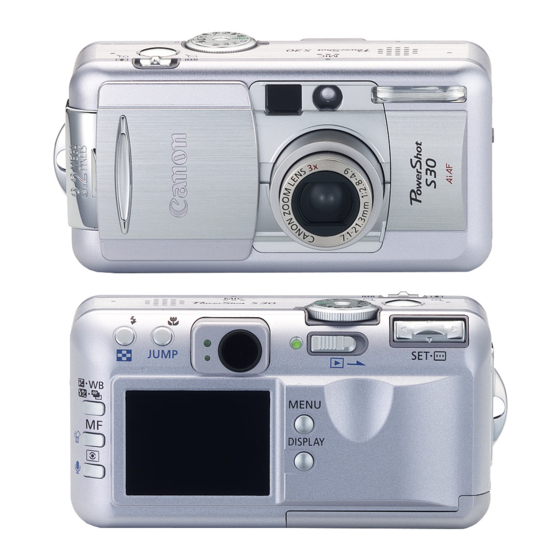
Page 12: Components Guide
Components Guide Front View Optical Viewfinder Window (p. 36) Shooting Mode Dial AF-Auxiliary Light Emitter Light E Light E Emitter Emitter Shutter button (p. 34) Red-Eye Reduction Lamp (p. 47) Eye Re ye R eduction L eduction L uctio amp (p. 47 amp (p. -
Page 13: Back / Bottom View
Back / Bottom View Strap Eyelet (p. 26) ap Eyelet (p ap Eyelet (p Viewfinder (p. 36) finder (p. 3 3 6) finder (p. 3 DC Coupler Cable Cover (p. 19) CF Card Slot/Battery Cover (p. 17, 21) Tripod Socket •... -
Page 14: Controls
Controls (Exposure) / (White Balance) / Power/Mode Indicator (p. 27) (AEB) / (Flash Exposure Compensation) Button (p. 73, 74, 77, 78) Power/Replay Lever (p. 27, 29) (Flash) / (Index) Button (p. 47, 94) (Macro) / Multicontroller (p. 14, 71) Multi i controller icontroller (Jump) ump) -
Page 15: Shooting Mode Dial
Shooting Mode Dial Use the shooting mode dial to switch between the shooting modes. • : Auto (p. 44) The camera automatically selects settings. ngs. Auto • Image Zone The camera automatically selects settings according to tomatical tomatical lly selects s lly selects s y selec settings ac... -
Page 16: Operating The Multicontroller
Operating the Multicontroller The multicontroller is used to select choices, images and menus on the LCD monitor and confirm the selection. Moving the cursor on the LCD monitor up and LCD m down. Use C or D to select a menu item on the LCD select a select a selec... -
Page 17: Preparing The Camera
It can be recharged at any time. • It takes approximately 80 minutes to bring a fully discharged battery pack to full charge (based on standard Canon testing criteria). Charge it within a temperature range of 5 to 40º C (32 to 104º F). - Page 18 Charging the Battery Pack (continued) Battery Pack Handling Precautions Keep the battery pack and camera terminals ( ) clean at all times. Dirty • terminals may cause a poor contact between the battery pack and camera. Polish the terminals with a tissue or a dry cloth before charging or using the battery pack. or using t or using t Do not cover the battery charger with anything, such as a tablecloth, cushion or...
-
Page 19: Installing The Battery Pack
Installing the Battery Pack Install Battery Pack NB-2L (supplied) into the camera as follows. Use a household power source to power the camera for extended periods (p. 19). Turn off the camera (p. 27, 29). • Check that the power/mode indicator is not lit. lit. - Page 20 Approx. 420 images x. 420 images x. 420 images PowerShot S40 Approx. 150 minutes The data above reflects standard Canon testing conditions. The actual figures will vary according to the shooting he actual figure he actual figure ual fig will vary acco will vary acco conditions and settings.
-
Page 21: Using A Household Power Source
Using a Household Power Source You are advised to use AC Adapter Kit ACK700* (optional) for long periods of use and when connecting to a computer or printer. * Consists of Compact Power Adapter CA-PS700, DC Coupler DR-700 and a power cord. Attach the power cord to the compact ord to th ord to th... - Page 22 Using a Household Power Source (continued) • Always turn the camera’s power off before connecting or disconnecting the compact power adapter. • Use of any adapter other than AC Adapter Kit ACK700 may cause malfunction of y cau y cau the camera or AC adapter kit.
-
Page 23: Installing A Cf Card
Installing a CF Card Turn off the camera (p. 27, 29). • Check that the power/mode indicator is not lit. Slide the CF card slot/battery cover in ard slo ard slot lot/battery lot/battery the direction of the arrow to open the irection irection n of the a... - Page 24 112 sec 223 sec 457 sec 916 sec 1834 sec • These figures reflect standard shooting conditions established by Canon. Actual totals may vary according to the ect sta ect sta ting conditions est ing conditions est g conditions e...
- Page 25 CF Card Handling Precautions CF cards are high-precision electronic devices. Do not bend, force, or subject • them to shocks or vibration. Do not attempt to disassemble or alter a CF card. • Moving a CF card rapidly between temperature extremes may cause condensation •...
-
Page 26: Setting The Date / Time
Setting the Date / Time The Set Date/Time menu will appear the first time the camera power is turned on or whenever the built-in rechargeable lithium battery charge is low. Start from Step 5 to set the date and time. Turn on the camera (p. -
Page 27: Setting The Language
Setting the Language Turn on the camera (p. 27). Press the button. • The (Rec.) or (Play) menu appears. (Rec.) Menu. (Set up) menu using A on Select the (Set up (Set up) p) me p) men the multicontroller. controlle controlle •... -
Page 28: Attaching The Strap
Attaching the Strap Thread the small loop of the wrist strap through the strap holder on the camera and pull the large loop through the small loop until the strap is firmly strap is strap is secured. • Avoid waving the camera about or catching it on other items when suspending it aving the ca aving the cam mera about o... -
Page 29: Basic Functions
Basic Functions Turning the Power On / Off The power/mode indicator remains lit while the power of the camera is on. The power/mode indicator indicates the state of the camera as follows. Orange: Shooting mode Green: Replaying mode/Printer connection mode* er con er con Yellow: Computer connection mode*... - Page 30 Turning the Power On / Off (continued) • You will hear a startup sound and see the startup image when the power comes on. (To change the startup sound and image, see below and pages 41 and 139.) • The startup image does not appear when the LCD monitor is off or the is off is off terminal is connected to a TV.
-
Page 31: Switching Between Shooting And Replaying
Switching between Shooting and Replaying You can quickly switch between Shooting mode and Replaying mode. This is convenient when you wish to shoot again after checking or deleting an image immediately after it is shot. 2 Shooting Mode Slide the power/replay lever to the right (p. 27). r to the r r to the r right (p. -
Page 32: Switching The Lcd Monitor Display Mode
Switching the LCD Monitor Display Mode The LCD monitor can be used to confirm an image during shooting, to replay recorded images or to adjust menu settings. Pressing the button switches the LCD monitor display mode. 2 Shooting Mode • Pressing the button cycles the LCD monitor to the next mode each time nitor to nitor to... -
Page 33: Information Displayed On The Lcd Monitor
57 Macro Mode o Mode o Mode Frame p. 85, 86 Manual Focus l Foc l Foc (PowerShot S30) ot S x3.8 x4.8 x6.0 x7.4 x10 x6.0 7.4 x1 .4 x1 p. 60 Digital Zoom Setting (PowerShot S40) rShot x4.3 x5.3 x6.7 x8.2 x11... - Page 34 Switching the LCD Monitor Display Mode (continued) 2 Replaying Mode In simple display mode, the following information File Number appears. p. 61 Compression Settings ssion Setting ssion Setting Resolution Settings Resolut Resoluti ution Settin tion Settings p. 61 L M1 M2 S p.
-
Page 35: About The Histogram
About the Histogram The histogram is a graph that allows you to judge the brightness of the recorded image. The greater the bias toward the left in the graph, the darker the image. The greater the bias toward to the right, the brighter the image. If the image is dark, adjust the exposure compensation to a positive number. -
Page 36: Pressing The Shutter Button
Pressing the Shutter Button The shutter button features a two-stage action. Pressing Halfway Pressing halfway automatically sets the exposure, focus and white balance. • The indicators shine or flash as follows. s shine shine e or flash as e or flash as Green: Metering complete (two beeps en: M n: M... - Page 37 • If the orange or yellow indicator flashes while you press halfway, you can still press fully to take the shot. • Images are first saved into the camera’s internal memory before being recorded onto the CF card, allowing the next images to be taken immediately as long as sufficient space is available in the internal memory.
-
Page 38: Using The Optical Viewfinder To Shoot
Using the Optical Viewfinder to Shoot The camera is equipped with an optical viewfinder. • Align the square brackets (autofocus metering field) inside the viewfinder on the primary r on t r on t subject to compose the image. the image. the image. -
Page 39: Adjusting The Zoom (Focal Length)
Adjusting the Zoom (Focal Length) The focal length can be adjusted from 7.1 to 21.3 mm (equivalent to 35 to 105 mm in 35 mm film format). Telephoto / Wide Angle • Slide the zoom lever toward ward ward to zoom in (telephoto). -
Page 40: Selecting Menus And Settings
Selecting Menus and Settings Menus are used to adjust shooting, replaying, date / time and electronic sound settings. Watch the LCD monitor while performing the following procedures. Press the button. • In Shooting mode, the [ (Rec.)] menu appears. In Replaying mode, the pears. -
Page 41: Menu Settings And Factory Defaults
50* / 100 / 200 / 400 / 800 / AUTO 0* / 100 / 20 0* / 100 / 20 ISO Speed p. 87 Menu (ISO 800 available on PowerShot S30 only) (ISO (ISO SO 8 (Red) On / Off* p. - Page 42 Selecting Menus and Settings (continued) Reference Available Settings Menu Item Page On* / Off Beep p. 137 Normal / Bright* p. 137 LCD Brightness Off / 1 / 2* / 3 / 4 / 5 Speaker Vol. p. 137 Auto Power Down On* / Off p.
-
Page 43: Customizing The Camera (My Camera Settings)
Customizing the Camera (My Camera Settings) My Camera allows you to customize the start-up image and start-up, shutter, operation and self-timer sounds. Each menu item has three choices. e.g. Start-up image Default camera theme era theme era theme Science fiction theme iction theme ction theme Animal (bird or dog) theme... - Page 44 Changing My Camera Settings (continued) Select setting content using B or A on the multicontroller. Press the button. utton. utton • Pressing the button closes the menu and makes the settings take button close button close tton c ses the menu an ses the me nu and effect.
-
Page 45: Customizing My Camera Settings
Customizing My Camera Settings You can customize the contents of menu [ ] and [ ] using the supplied software and storing these to your camera. File format of My Camera Settings Start-up Image Recording image format JPEG (Base line JPEG) (Base line (Base line e JPEG) -
Page 46: Shooting - Letting The Camera Select Settings
Shooting - Letting the Camera Select Settings Auto Mode In this mode, all you have to do is press the shutter button and let the camera do everything else. Check that the camera is in Shooting mode (p. 27). e (p. 27) e (p. - Page 47 • You can change the following settings. (Large)* / (Medium 1) / (Medium 2) / (Small) Resolution Compression (Superfine) / (Fine) / (Normal) (Red-Eye Reduction Auto)* / (Auto) / (Off) Flash Settings Macro Off* / On Digital Zoom On / Off* Drive Mode Off / 2sec.
-
Page 48: Checking An Image Right After Shooting
Checking an Image Right after Shooting Checking the Image After a photo is taken, the image displays on the LCD monitor for two seconds. There are two ways to display the image for longer. 2Keeping the Shutter Button Pressed The image continues to appear on the LCD monitor as long as you keep the LCD mon D mon nitor as lon... -
Page 49: Using The Flash
Using the Flash Use the flash according to the guidelines below. The flash fires automatically as required by the lighting level, and the Red-eye reduction, Auto red-eye reduction lamp fires each time the main flash fires Auto The flash fires automatically as required by the lighting level. the lighting he lighting Red-eye reduction, Flash on... - Page 50 Using the Flash (continued) • When shooting with a high ISO sensitivitiy and using the built-in flash, there is more of a chance of overexposure the closer you are to the subject. • The fastest shutter speed for flash synchronization is 1/250 second. The camera 1/250 secon 1/250 secon automatically resets the shutter speed to 1/250 second if a faster speed is selected.
-
Page 51: Portrait Mode
Portrait Mode Use this mode when you want the subject to appear sharp and the background to blur. Turn the shooting mode dial to . • Shooting procedures are the same as for the me as for me as for Auto Mode (p. -
Page 52: Night Scene Mode
Night Scene Mode Use this mode to capture human subjects against the backdrop of an evening sky or night scene. The people are illuminated with light from the flash while the backdrop is captured at a slow shutter speed so that both appear correctly exposed. Turn the shooting mode dial to mode e dial to... -
Page 53: Slow Shutter
Slow Shutter Use this mode to shoot moving objects to make them appear blurred such as river rapids. Turn the shooting mode dial to al to al to • Shooting procedures are the same as for the e the sa e the sa same as for same as for... -
Page 54: Changing The Color Effect
Changing the Color Effect You can shoot with different color effects. Vivid Emphasizes the contrast and color saturation to record in bold color. Neutral Tones down the contrast and color saturation to record neutral hues. reco Sepia Records in sepia tones. Records in black and white. -
Page 55: Stitch Assist Mode
Stitch Assist Mode Use this mode to shoot a series of overlapping frames for merging (stitching) into a large panoramic image using a computer. Horizontal Vertical 2 x 2 • Please use the bundled PhotoStitch program to merge the images on a computer. Framing a Subject PhotoStitch detects the overlapping portions of adjoining images and merges them. - Page 56 Stitch Assist Mode (continued) • Compose each frame so that it overlaps 30 to 50% of the adjoining image. Try to keep the vertical misalignment to within 10% of the image height. • Do not include moving items in the overlap. •...
- Page 57 Shoot the first image. • The exposure and white balance settings are set and locked with the first image. Compose and shoot the second image so that it overlaps the first. • Minor discrepancies in the overlap can be corrected with the software.
-
Page 58: Movie Mode
CF card b e CF card becomes ful ecomes ful comes f * The data reflects standard Canon testing conditions. The actual figures will vary according to the ts standard s standar anon testing cond anon testing cond non testing co itions. -
Page 59: Macro Mode
Macro Mode Use the macro mode to shoot close-ups of subjects in the range of 10 to 80 cm (3.9 in. to 2.7 ft.) at maximum wide angle and 30 to 80 cm (1.0 ft. to 2.7 ft.) at maximum telephoto. Press the button to turn the LCD monitor on. -
Page 60: Self-Timer
Self-Timer You can take pictures with the self-timer in any shooting mode. In the [ (Rec.)] menu, select [Drive Mode]. • See Selecting Menus and Settings (p. 38). Select [ ] or [ ], then press the ], then p ], then pr , then press the... -
Page 61: Continuous Mode
When [ ] is selected: Approx. 1.5 frames per second When [ ] is selected: Approx. 2.5 frames per second * Large/Fine, LCD monitor off mode. (These figures reflect standard Canon testing conditions. The actual figures will vary according to the shooting conditions and settings.) •... -
Page 62: Digital Zoom
With the combined optical and digital zoom functions, images can be zoomed as follows. PowerShot S30: 3.8 times, 4.8 times, 6.0 times, 7.4 times, and 10 times PowerShot S40: 4.3 times, 5.3 times, 6.7 times, 8.2 times, and 11 times... -
Page 63: Shooting - Selecting Particular Effects
2272 x 1704 pi 2272 x 1704 xels 160 x 120 pixels M1 (Medium 1) 1600 x 1200 pixels x 12 • Common to PowerShot S30 and PowerShot S40 M2 (Medium 2) 1024 x 768 pixels 1024 x 76 pixels... - Page 64 Unit : KB / sec. Unit : KB / sec. * This figure reflects standard shooting conditions established by Canon. Actual figures may vary according to the subject and shooting conditions. * Please see the list of CF cards and their approximate capacities (p. 22).
- Page 65 • In mode, the resolution can be set for the first frame only. • The resolution and compression settings are affected by the shooting mode selection as follows (only the resolution in mode). Initial Shooting Next Shooting Mode Resolution and Compression after Change Mode Settings change to those of the next mode Settings do not change...
-
Page 66: Changing The File Format
The resolution (PowerShot S30: 2048 x 1536, PowerShot S40: 2272 x owerS werS 1704) and compression settings cannot be adjusted for these images. -
Page 67: Program Ae
Program AE Use the program AE mode to have the camera automatically set the shutter speed and aperture settings to match the brightness of the scene. Turn the shooting mode dial to . al to . al to Shoot the image. image image •... -
Page 68: Setting The Shutter Speed
Setting the Shutter Speed When you set the shutter speed in the shutter speed-priority AE mode, the camera automatically selects an aperture setting to match the brightness. Faster shutter speeds allow you to catch an instantaneous image of a moving subject while slower speeds create a flowing effect and allow you to shoot without a flash in witho witho... - Page 69 • Please note that camera shake becomes a factor at low shutter speeds. If the camera shake warning appears in the center of the LCD monitor, secure the camera to a tripod before shooting. • The aperture value and shutter speed change according to the zoom state as follows.
-
Page 70: Setting The Aperture
Setting the Aperture When you set the aperture in the aperture-priority AE mode, the camera automatically selects a shutter speed to match the brightness. Selecting a lower aperture value (opening the aperture) allows you to fade the background and create a beautiful portrait. A higher aperture value (closing it) brings the entire bring bring range from foreground to background into focus. - Page 71 • If the shutter speed shows in red on the LCD monitor, the image is under- or overexposed (insufficient light). Adjust the aperture value using B or A on the multicontroller until the shutter speed display turns white. • Please note that camera shake becomes a factor at low shutter speeds. If the camera shake warning appears in the center of the LCD monitor, secure the camera to a tripod before shooting.
-
Page 72: Manually Setting The Shutter Speed And Aperture
Manually Setting the Shutter Speed and Aperture You can manually set the shutter speed and aperture to achieve a particular effect. This is convenient for shooting fireworks and other images where it is difficult to set the correct exposure automatically. Turn the shooting mode dial to mode e dial to... -
Page 73: Selecting An Af Frame
Selecting an AF Frame The AF frame indicates the area of the composition on which the camera focuses. You can set the AF frame in the following way. The camera automatically selects the AF frame to focus according to Auto Selection (AiAF) the shooting conditions. - Page 74 Selecting an AF Frame (continued) • If any particular AF frame is selected, it is recommended that you use the LCD monitor to check the AF frame while shooting. • When the Spot AE Point is selected as the light metering method, you can use the ethod ethod selected AF frame as the Spot AE Point (p.
-
Page 75: Adjusting The Exposure Compensation
Adjusting the Exposure Compensation Adjust the exposure compensation setting to avoid making the subject too dark when it is backlit or shot against a bright background. Press the button once. • The icon and exposure compensation bar will will will appear on the LCD monitor if it is on. -
Page 76: Setting The White Balance
Setting the White Balance When the white balance mode is set to match the light source, the camera can reproduce colors more accurately. Set the white balance mode to a natural or artificial light setting according to the circumstances. Settings are automatically set by the camera Auto Daylight For recording outdoors on a bright day... -
Page 77: Setting A Custom White Balance
Setting a Custom White Balance You can set a custom white balance to obtain the optimal setting for the shooting conditions by having the camera evaluate a subject such as a white piece of paper or cloth, or a photo-quality gray card. Press the button twice. - Page 78 Setting the White Balance (continued) • To set and use a custom white balance setting, it is advisable to select the shooting mode and set the exposure compensation and flash exposure compensation to zero (±0). The correct white balance may not be obtained when not b not b the exposure is incorrect (image is completely black or white).
-
Page 79: Auto Exposure Bracketing (Aeb Mode)
Auto Exposure Bracketing (AEB Mode) In this mode, the camera automatically changes the exposure within a set range to take three shots after you press the shutter button once. You can adjust AEB settings in 1/3EV steps within the range of -2EV to +2EV of the standard exposure setting. AEB settings can be combined with exposure compensation settings (p. -
Page 80: Adjusting The Flash Output (Flash Exposure Compensation)
Adjusting the Flash Output (Flash Exposure Compensation) You can adjust the flash output for flash photography. Press the button four times. • The icon and the flash exposure osure osure compensation bar appears on the LCD monitor. bar a bar ap ears on ears on n the LCD m... -
Page 81: Locking The Exposure Setting (Ae Lock)
Locking the Exposure Setting (AE Lock) You can set the exposure and focus separately. This is effective when the contrast is too strong between the subject and background or when a subject is backlit. For an explanation of how different combinations of light metering options and a selected AF frame affect where the AE lock is metered, see page 80. - Page 82 Locking the Exposure Setting (AE Lock) (continued) • The AE lock function cannot be used when the optical viewfinder is used to shoot. • This function can only be selected in the , shooting modes. shooting shooting The automatically selected combinations of shutter speeds and aperture values can d com d com mbinations of...
-
Page 83: Locking The Flash Exposure Setting (Fe Lock)
Locking the Flash Exposure Setting (FE Lock) You can lock the flash exposure so that the exposure settings are correctly set for a particular portion of your subject. For an explanation of how different combinations of light metering options and a selected AF frame affect where the FE lock is metered, see page 80. -
Page 84: Switching Between Light Metering Modes
Switching between Light Metering Modes Center-weighted averaging is the default light metering mode. This can be switched to spot light metering. Appropriate for standard shooting conditions, including backlit scenes. The camera divides images into several zones for light metering. The camera for light mete or light met Evaluative... - Page 85 Select the [Center] or [AF Point] option, then press the button. • When [Spot AE Point] is set to [Center], the spot AE point frame appears at the center of the LCD monitor, and when [Spot AE Point] is set to [AF Point], it appears inside the selected AF frame.
-
Page 86: Shooting Problem Subjects For The Autofocus
Shooting Problem Subjects for the Autofocus The autofocus may not work well on the following types of subjects. Subjects with extremely low contrast to the surroundings • Subjects mixing close and far objects • Subjects with extremely bright objects at the center of the composition e com e com •... - Page 87 Focus Lock Method 2 Press the button to turn on the LCD monitor. Press the shutter button halfway to lock the focus. Keep it pressed and press the button. • The icon appears on the LCD monitor. • The focus setting will lock even if the shutter button and the er button er button r but...
-
Page 88: Shooting In Manual Focus Mode
Shooting Problem Subjects for the Autofocus (continued) Shooting in Manual Focus Mode The focus can be manually set. Press the button to turn on the LCD monitor. the LC the LC LCD moni LCD monit Press and hold the button, then use utton, then tton, then en use... -
Page 89: Manually Setting Image Characteristics
• You can select from 50 (default setting), 100, 200, elect from 50 lect from 50 (default sett fault sett tting), 100 tting), 100 400, 800 (only for PowerShot S30) and AUTO. (only f (only f werShot S30 werShot S30 rShot 0) an 0) an •... - Page 90 Manually Setting Image Characteristics (continued) Shoot the image. • These functions can only be selected in the , in the in the shooting modes. In mode, however, the ISO speed cannot be set to [Auto]. speed canno peed canno d ca not be set to ot be set to be se...
-
Page 91: Resetting The File Number
Resetting the File Numbers You can select the way file numbers are assigned. The file numbers are reset to the start (100-0001) each time a new CF card is inserted. New images recorded on CF cards with existing files are assigned the next available number. The file number of the last image to be shot is memorized so that images recorded to a new es rec es rec... -
Page 92: Functions Available In Each Shooting Mode
Functions Available in Each Shooting Mode This chart shows the functions available in each shooting mode. Reference Page Red-Eye Reduction, Auto – – – – – Auto – – – – – – Flash Red-Eye Reducti o n, Fl a sh On p. - Page 93 Reference Page p. 87 ISO Speed – – – – – – – – – – Digital Zoom p. 60 – – Contrast – – – – – – – – – Sharpness p. 87 – – – – – –...
-
Page 94: Replaying
Replaying Viewing Images Singly (Single Image Replay) You can view the recorded images on the LCD monitor. Slide the power/replay lever to the leve leve right. • The last recorded image appears (Single Image rded ima rded ima rded mage appea age appea Replay). -
Page 95: Magnifying Images
Magnifying Images In single image replay, the displayed image can be shown magnified by an approximate factor of 2.5 or 5 for PowerShot S30 and 3 or 6 for PowerShot S40. Slide the power/replay lever to the right. Slide the zoom lever toward... -
Page 96: Viewing Nine Images At A Time (Index Replay)
Viewing Nine Images at a Time (Index Replay) Up to nine images can be viewed at once in Index Replay. Slide the power/replay lever to the right. ight. ight. Press the button. • Nine images appear at once (Index Replay). s appear at once (In (Index Repla s appear a t once (In... -
Page 97: Jumping Between Images
Jumping Between Images The display can be advanced or set back 9 images in either single image replay or index replay. Press the button while in single replay (p. 92) or index y (p. 92) y (p. 92) replay (p. 94). •... -
Page 98: Viewing Movies
Viewing Movies You can replay the images shot in mode. Slide the power/replay lever to the right. • Movies cannot be viewed in index replay. Display an image shot in mode using mode mode using us using B or A on the multicontroller. ontr ontr roller. -
Page 99: Rotating Images In The Display
Rotating Images in the Display Images can be rotated 90º and 270º clockwise on the LCD monitor. Original 90º 270º In the [ (Play)] menu, select [Rotate] (Pla (Play)] me )] m )] m enu, selec Rot enu, selec nu, se ect [R ct [R R ot and press... -
Page 100: Attaching Sound Annotations To Images
Attaching Sound Annotations to Images In replay mode (including single replay, index replay, magnifying replay and the replay immediately after shooting in Shooting mode) you can attach sound annotations (up to 60 seconds) to an image. The sound data is saved in WAVE format. Press the button while replaying images. -
Page 101: Automated Playback (Slide Show)
Automated Playback (Slide Show) Starting a Slide Show All images, or a selection of images, can be displayed one-by-one in an automated slide show. All Images Plays all the images on the CF card in order Slide Show 1 - 3 Plays the images selected for each show in order (p. -
Page 102: Selecting Images For Slide Shows
Automated Playback (Slide Show) (continued) Selecting Images for Slide Shows You can mark images for inclusion in slide shows 1-3. Up to 100 images may be marked per slide show. Images display in the order of their selection. Display the slide show menu (p. 99). Select [Program] using C on the ng C ng C o... -
Page 103: Adjusting The Play Time And Repeat Settings
Press the button. • The image selection screen will close. Adjusting the Play Time and Repeat Settings You can change the play time for all the images in a show and have the show nd have t nd have t repeat itself continuously. - Page 104 Automated Playback (Slide Show) (continued) Press the button. • The set up menu closes. • The display interval may vary somewhat for some images. at for at for r some imag r some imag ges. • Slide shows can be easily edited on a computer with the supplied software. See on a comp on a comp puter with t...
-
Page 105: Protecting Images
Protecting Images You can protect important images from accidental erasure. In the [ (Play)] menu, select [Protect] and press • See Selecting Menus and Settings (p. 38). Select an image you want to protect image yo image you u want to u want to want o protect... -
Page 106: Erasing
Erasing Erasing Images Singly • Please note that erased images cannot be recovered. Exercise caution before erasing a file. Set the camera to the replay mode (p. 29). p. 29 p. 29 Select the image you wish to erase using B or A on the se using B or A o or A o... -
Page 107: Erasing All Images
Erasing All Images • Please note that erased images cannot be recovered. Exercise caution before erasing a file. In the [ (Play)] menu, select [Erase all] all] and press • See Selecting Menus and Settings (p. 38). gs (p. 38 s (p. -
Page 108: Formatting A Cf Card
• If the camera does not work properly, the inserted CF card may be malfunctioning. Formatting the CF card may solve the problem. • When a non-Canon brand CF card is malfunctioning, reformatting it may solve the problem. • CF cards formatted in another camera, computer or peripheral device may not operate correctly. -
Page 109: Print Settings (Dpof Print Settings)
Print Settings (DPOF Print Settings) Images on a CF card can be individually selected for printing in a specified number of copies. You can also select the print type and whether or not to print the date and file number. These settings are compatible with the Digital Print Order Format (DPOF) standards so that images can be printed on DPOF-compliant digital printers or at participating photo labs. - Page 110 Selecting Images for Printing (continued) Select images for printing. Number of Copies Single Images • When the print type (p. 99) is set to [Standard] or [Both], select an image using B or A on the multicontroller. You can set the number of copies pies pies (up to 99) to be printed using C or D on the...
-
Page 111: Setting The Print Style
Setting the Print Style The following print settings can be selected. Prints one image per page Standard Prints the selected images together at a reduced size in an index format Print Type Index Prints the images in both the standard and index formats and index and index f Both... - Page 112 Setting the Print Style (continued) File No. • Select [On] or [Off]. Press the button. ton. ton. • The set up menu will close and the Print Order menu will reappear. p menu will c menu will ll close and l close and the Print t Order menu w the Print t Order me...
-
Page 113: Resetting The Print Settings
Resetting the Print Settings The print settings can all be removed at once. The print type is reset to [Standard] and the date and file number options are set to [Off]. Display the Print Order menu (p. 107). Select [Reset] using B or A on the n the n the multicontroller and press... -
Page 114: Printing With A Direct Print Compatible Printer (Optional)
Printing with a Direct Print Compatible Printer (Optional) A Direct Print compatible printer, sold separately, can be connected to the camera and used to print images very easily directly from the camera. It can also be used with DPOF print settings. To find out which Direct Print compatible printer can be used with this camera, please refer to the System Map. -
Page 115: To Turn On The Camera
Slide the power/replay lever to the right to turn on the camera. • appears on the camera LCD monitor and the power/mode indicator is lit in green when the printer is properly connected to the camera. • When you detach the cable from the camera, hold the plug and do not pull the cable. -
Page 116: Printing
Printing An image can be printed when displayed in single replay or selected in index replay. Choose an image using B or A on the multicontroller and press Set the number of prints, the print style and cropping settings he print he print t style an n d cropp t style an... - Page 117 Selecting the Number of Copies In Replaying mode, press and select the [Copies] option using C or D on the multicontroller. Specify the desired number of copies using B or A on the B or A o B or sired n sired n umber mber...
- Page 118 Printing (continued) Choose [Image], [Borders] or [Date] using C or D on the multicontroller. Set the selection using B or A on the multicontroller. election us s ing B o sing B o A on t election us on t the mu the mu e mu...
- Page 119 Trimming (Printing a Portion of an Image) You can specify which portion for an image gets printed. Prior to Trimming Please set the Print Style (Image, Borders and Date) first before setting the trimming settings (p. 115). In Replaying mode, press choose [Trimming] using C or D on the on t multicontroller and press...
-
Page 120: Setting Menu
Printing (continued) Press the button to close the setting menu. Trimming Frame • The trimming setting only applies to one image. • The trimming setting is cancelled with the following operations. - When you set the trimming settings for another image. - When you close the Print mode (when you turn the camera power off, change the camera mode, or detach the DIF-100 direct interface cable). -
Page 121: Printing With Dpof Print Settings
Printing with DPOF Print Settings You can use the DPOF print settings to print with a Direct Print compatible printer (optional). In the [ (Play)] menu, select [Print Order] and press and pres and pres • See Selecting Menus and Settings (p. 38). •... - Page 122 Printing with DPOF Print Settings (continued) • To print the date, set the [Date] setting in the print order menu in Step 2 on the previous page to [On]. You cannot set the date to print with the [Style] menu in Step 3 on the previous page.
-
Page 123: Printing With The Direct Print Compatible Bubble Jet Printer (Optional)
• When you insert the cable, make sure the en y ou i ou in “Canon” logo on the cable faces the front of Cano anon anon ” lo ” lo To Bubble ubble ubble the camera (lens side). - Page 124 Connecting Bubble Jet Printer to the Camera (continued) • When you detach the cable from the camera, hold the plug and do not pull by the cable. • Please see the Bubble Jet Printer Quick Start Guide manual for instructions to anual for in anual for in al fo...
-
Page 125: Printing
Printing An image can be printed when displayed in single replay or selected in index replay. Choose an image using B or A on the multicontroller and press Set the number of prints, the print style and cropping settings e print s e print s style and d croppin style and... - Page 126 Printing (continued) Selecting the Number of Copies In Replaying mode, press and select the [Copies] option using C or D on the multicontroller. Specify the desired number of copies using B or A on the the desir the desire d number r of cop d number numb er of cop...
- Page 127 Choose [Paper], [Borders] or [Date] using C or D on the multicontroller. Set the selection using B or A on the multicontroller. e multico multico o ntroller ticon trol Paper Borders Date Choose [Borderless] or Choose [Card #1], [Card #2], Choose [On] or [Off].
- Page 128 Printing (continued) Trimming (Printing a Portion of an Image) You can specify which portion of an image gets printed. Prior to Trimming Please set the Print Style (Paper, Borders and Date) first before setting the trimming te) first te) first te) f st before settin t before setti...
- Page 129 Press the button to close the setting menu. Trimming Frame Trimming Trimming • The trimming setting only applies to one image. • The trimming setting is cancelled with the following operations. - When you set the trimming settings for another image. - When you close the Print mode (when you turn the camera power off, change the camera mode, or detach the cable).
-
Page 130: Printing With Dpof Print Settings
Printing with DPOF Print Settings You can use the DPOF print settings to print using Bubble Jet Printer with the direct print function (optional). In the [ (Play)] menu, select [Print Order] and press ] and pr ] and pr •... - Page 131 • To print the date, set the DPOF [Date] setting to [On]. The date will not print with the Print Style date setting under these circumstances (p. 109). If the print type is set to [Index], the date will not print even if the [Date] setting is set to [On] in Step 2. •...
-
Page 132: Image Transfer Settings (Dpof Transfer Order)
Image Transfer Settings (DPOF Transfer Order) Using the camera, you can make marks on images you wish to transfer and attach to e-mails. (Please use the supplied software for actually transferring images.) These settings are compatible with the Digital Print Order Format (DPOF) standards. •... - Page 133 Select images for transferring. Single Images • Select an image using B or A on the multicontroller and mark or remove marks from images using C or D on the multicontroller. • You can use the same procedures to select images in index replay (3 images).
-
Page 134: Resetting The Transfer Settings
Resetting the Transfer Settings The transfer marks can all be removed at once. Display the Transfer Order menu (p. 130). Select [Reset] using B or A on the multicontroller and press Select [OK] using B or A on the OK] using OK] using multicontroller and press trolle... -
Page 135: List Of Menu Options
61 Resolution • • • Large Large Large (Excluding PowerShot S30 (2048 x 1536 pixels) Powe Powe erShot S30 (20 erShot S30 (204 ot S30 48 x 1536 pixe 8 x 1536 pix PowerShot S40 (2272 x 1704 pixels) - Page 136 Rec. Menu (continued) Reference Item Menu Screen Settings Content Page p. 87 ISO Speed Sets the sensitivity at which images are recorded. (S30) (S40) • 50 • 50 • 100 • 100 • 100 • 200 • 200 • 200 •...
- Page 137 Reference Item Menu Screen Settings Content Page p. 87 Contrast Adjusts the image contrast. • – • 0 • + Adjusts the image sharpness. ness. ness. p. 87 Sharpness • – • 0 • + • + p. 87 Saturation Adjusts the image saturation.
-
Page 138: Play Menu
Play Menu Reference Item Menu Screen Settings Content Page Protect p. 103 Protects images from accidental erasure. Rotate p. 97 Rotates images 90 or 270 degrees clockwise in Rotates Rotates images 90 or images 90 or ges 90 270 degrees c 70 degrees the display. -
Page 139: Set Up Menu
Set up Menu Reference Item Menu Screen Settings Content Page p. 34 Sets whether or not the beep sounds when the Beep shutter button is pressed or when a menu operation is performed. • On • Off (Still beeps to warn of an error even when (Still b (Still b eeps to warn... - Page 140 Set up Menu (continued) Reference Item Menu Screen Settings Content Page p. 28 Auto Power Down Sets whether or not the camera automatically powers down after a specified period of time elapses without something being pressed. ing being pr ing being pre •...
-
Page 141: My Camera Menu
My Camera Menu You can select the start-up image and start-up, shutter, operation, and self-timer sounds. You can customize [ ] and [ ] of each item using the supplied software. For details, please refer to the Software Starter Guide. Reference Item Menu Screen... - Page 142 My Camera Menu (continued) Reference Item Menu Screen Settings Content Page p. 40 Operation Sound Sets the sound when the multicontroller or any button other than the shutter button is operated. See also “How the [Beep] setting in the [ p] setting in p] setting in (Set...
-
Page 143: Resetting All Of The Settings To Default
Resetting all of the Settings to Default You can reset all of the menu and button operation settings to default except for [Date/Time], [Language], and [Video System]. Turn on the camera. • You can turn on the camera into either Shooting or Replaying mode. ting or ting or or Replaying... -
Page 144: Shooting / Replaying With A Tv Monitor
Shooting / Replaying with a TV Monitor A video-compatible television connected via the supplied AV cable AVC-DC100 can be used to view images as you shoot or replay them. Turn off the camera (p. 27, 29). Attach AV Cable AVC-DC100 to the terminal on the camera. -
Page 145: Appendices
• Never use synthe use synthe hetic clean etic clean clea sers sers or lens. If dirt remains, contact the nearest Canon or lens. or lens. or le s. If dirt rem s. If dirt rem ains, ains, Customer Support Help Desk. -
Page 146: Troubleshooting
• If reformatting doesn't work, the CF card logic circuits • If r • If re formatting do rmatting tting do work work may be damaged. Contact the nearest Canon be da e dam act t act th Customer Support Help Desk. tome tome Lens will not •... - Page 147 Problem Cause Solution Battery pack capacity Battery pack • Replace the battery pack with a new one. consumed reduced because of disuse quickly for one year or more after being fully charged Battery life exceeded • Replace the battery pack with a new one. Battery life exceeded Battery pack •...
- Page 148 Troubleshooting (continued) Problem Cause Solution Subject too close • Adjust the flash output with the flash exposure Subject in recorded compensation function (p. 78). Subject bright in • Set the exposure compensation to a negative (-) setting. nsation to a sation to a image is too comparison to the...
-
Page 149: List Of Messages
List of Messages The following messages may appear on the LCD monitor. Reset settings to default? Do you wish to reset all the camera and menu settings to default? Resetting Resetting all the camera and menu settings to default menu setti menu settin Busy... - Page 150 List of Messages (continued) Cannot magnify!: You attempted to magnify an image that was photographed with another camera, recorded in a different format, or edited on a computer. Cannot rotate: You attempted to rotate an image that was image tha image tha photographed with another camera, recorded in a another...
- Page 151 The following messages may appear on the camera’s LCD monitor when a Direct Print compatible printer is printing. Depending on the printer model, some messages may not display. No Paper: Paper cassette is incorrectly inserted or out of paper. Or the paper feed isn’t operating correctly. No Ink: The ink cartridge has not been inserted or has run out rted...
- Page 152 You can restart printing by pressing the RESUME/ CANCEL button on Bubble Jet Printer. Please request replacement of the waste tank to the shop where you purchased the printer or your nearest Canon customer support center listed in the Bubble Jet Quick Start Guide.
-
Page 153: Specifications
Specifications All data is based on Canon’s standard testing methods. Subject to change without notice. PowerShot S30 / PowerShot S40 Camera effective S30 Approx. 3.2 million pixels: Approx. 4 million Image sensor: 1/1.8 inch CCD (Total number of pixels: approx. 3.3 million) - Page 154 Specifications (continued) Flash range: (When sensitivity is set to AUTO) 35 cm - 4.8 m (1.15 ft. - 15.75 ft.) (W), 35 cm - 3.0 m (1.15 ft. - 9.84 ft.) (T) (When sensitivity is set to ISO 100 equivalent) 55 cm –...
- Page 155 My Camera Settings Start-up Image, Start-up Sound, Shutter Sound, Operation Sound (customizing): and Selftimer Sound Customizing is possible by downloading data from your computer using the supplied software. Interface: Universal Serial Bus (USB), Audio/Video Output (NTSC or PAL selectable, monaural audio) Power source: 1.
- Page 156 Compact Power Adapter CA-PS700 (optional) Input voltage: AC 100 - 240 V (50/60 Hz) 0.32 A Rated output: 7.4 V DC / 2.0 A Operating temperatures: 0 - 40°C (32 - 104°F) 112 × 29 × 45 mm (4.4 × 1.1 × 1.8 in.) Dimensions: Weight: Approx.
-
Page 157: Index
Index DPOF Print Settings 107, 119, 128 AC Adapter Kit Transfer Order AEB Mode AE Lock AF Frame Erasing Auto Selection All Images Manual Selection Displayed Images Aperture-Priority AE ( Single Images Aperture Settings 65, 66, 68, 70 Exposure Auto Mode ( Auto Exposure Bracketing (AEB Mode) AE Lock Auto Replay (Slide Show) - Page 158 Landscape Mode ( RAW File Format 64, 133 Language Settings 25, 138 Recording File Format LCD Monitor 30 - 33 Red-Eye Reduction Function Brightness Replay Light Metering Index Replay Center-Weighted Averaging Jumping Evaluative LCD Monitor Spot AE Point (AF Point) Magnifying Images Spot AE Point (Center) Movies...
- Page 159 Start-up Image 28, 41 - 43, 139 Sound 28, 41 - 43, 139 Stitch Assist Mode ( Framing Subjects Shooting Strap Telephoto Transfer Order Reset Selecting Images Troubleshooting 144 - 146 Video System 138, 142 Viewfinder LCD Monitor 12, 30 2, 30 2, 3 Optical...
- Page 160 Precautions This digital camera is designed to perform optimally when used with genuine Canon brand digital camera accessories (“Canon Brand Accessories”). You may use non Canon Brand Accessories with this Digital Camera. However, Canon Makes no warranties concerning, and is not responsible for damages...
- Page 161 CDI-E055-010 XXXXXXX © 2002 CANON INC. PRINTED IN JAPAN...
Need help?
Do you have a question about the PowerShot S30 and is the answer not in the manual?
Questions and answers