Table of Contents
Advertisement
Available languages
Available languages
Quick Links
J-4) Procedura da seguire qualora l'inserto filettato venga deformato in modo anomalo stringendo i due manici
Inserto filettato
Pezzo
bloccato e deformato
Fori di fissaggio testa
Testa
Fermo perno
Perno fori di fissaggio
Ruotare
l'utensile
Aprire leggermente i 2 manici (1); quindi ruotare
l'utensile per allineare i fori di fissaggio della testa e
il foro di fissaggio lungo della sede mandrino; infine,
inserire il perno dei fori di fissaggio nei fori e fissare
con il fermo perno (2). Il mandrino filettato non
dovrebbe più essere in grado di ruotare
liberamente.
Inserto filettato
bloccato e deformato
Pezzo
Pezzo
Mandrino
Ruotare l'intero
filettato
utensile in
senso antiorario
Ruotare l'utensile in senso antiorario per sfilare il
mandrino filettato dall'inserto filettato bloccato (1).
Rimuovere il fermo e il perno dei fori di fissaggio.
(2)
Inserto filettato
bloccato in
modo anomalo
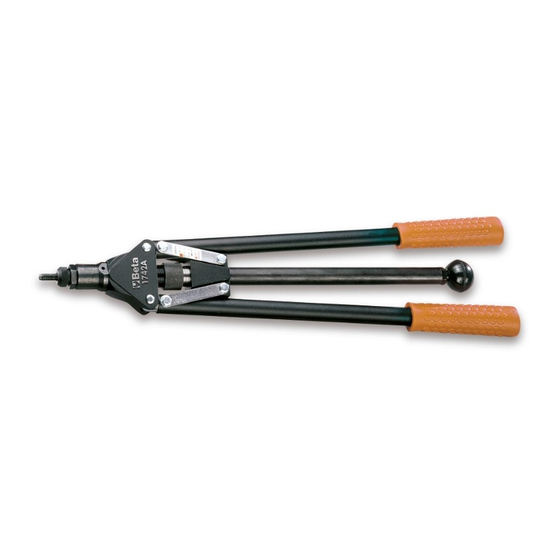
Rivettatrice di potenza professionale a inserti filettati completa di unità di foratura rapida
Il presente manuale d'uso illustrato comprende le seguenti sezioni: CARATTERISTICHE, SPECIFICHE
TECNICHE, ELENCO DEI COMPONENTI, ISTRUZIONI D'USO, MANUTENZIONE e TROUBLESHOOTING.
Prima di azionare questo utensile, leggere attentamente il presente MANUALE D'USO illustrato ai fini di un
utilizzo sicuro, corretto e soddisfacente.
I
1742A
Manuale d'uso
Advertisement
Table of Contents

Related Manuals for Beta 1742A


Summary of Contents for Beta 1742A
- Page 1 Pezzo bloccato e deformato bloccato e deformato Inserto filettato bloccato in Fori di fissaggio testa Testa 1742A modo anomalo Pezzo Manuale d’uso Fermo perno Perno fori di fissaggio Pezzo Rivettatrice di potenza professionale a inserti filettati completa di unità di foratura rapida Mandrino Ruotare l’intero...
-
Page 2: Caratteristiche Tecniche
FILETTATO o il MANICOTTO FILETTATO si innesti e venga rapidamente rilasciato dall’INSERTO FILETTATO o dal BULLONE/PRIGIONIERO FILETTATO! Regolare il - La rivettatrice di potenza 1742A è inoltre dotata di un DISPOSITIVO PER FORI DI FISSAGGIO, basato Figura sull’indicatore della regolatore sul semplice inserimento del PERNO PER FORI DI FISSAGGIO, per risolvere il problema dell’eventuale... -
Page 3: Componenti Principali
J-2) Nuova regolazione della corsa per proteggere l’utensile e la filettatura dell’inserto C. COMPONENTI PRINCIPALI filettato da eventuali danni, qualora non sia possibile stringere manualmente i manici per farli entrare in contatto con il corpo posteriore: Inserto filettato e pezzo in presa Inserto filettato e pezzo in presa TESTINA... - Page 4 Inserto filettato e pezzo in presa Lunghezza Altezza (H) sporgente Inserto filettato e pezzo in presa dell’inserto filettato dell’inserto filettato Mandrino filettato MANDRINO FILETTATO TESTINA CONTRODADO TESTINA TESTA Ruotare l’intero utensile FORI FISSAGGIO TESTA Ruotare la testina in senso antiorario CORPO ANTERIORE REGOLATORE CORSA INDICATORE CORSA...
-
Page 5: Manutenzione
I. MANUTENZIONE D. SOSTITUZIONE DEL MANDRINO FILETTATO E DELLA TESTINA Il presente utensile è caratterizzato da un’estrema solidità e affidabilità. Richiede esclusivamente il ATTENZIONE: Verificare le dimensioni della filettatura del BULLONE di fissaggio e lo spessore del PEZZO rabbocco occasionale di olio leggero per le filettature del mandrino (1), della testina (2) e del regolatore per rilevare le dimensioni della filettatura, il campo di serraggio, il materiale e il tipo di INSERTO della corsa (3). - Page 6 Ruotare in senso ANTIORARIO per montare il mandrino filettato Mandrino Fori di filettato Pezzo fissaggio Testina Inserto filettato in presa Chiavetta Inserto Testina Controdado di servizio filettato testina Perno fori di Fermo perno fissaggio Testa Bullone Completare la procedura di fissaggio avvitando un bullone all’inserto Con la Inserire il...
-
Page 7: Regolazione Della Corsa
E. REGOLAZIONE DELLA CORSA Inserto Foro filettato predisposto Inserto avvitato filettato in AVVERTENZA Incurvatura presa La corsa corretta viene definita in base allo spessore del pezzo e al campo di serraggio dell’inserto Inserto Foro Pezzo filettato predisposto filettato. Ciascun inserto filettato presenta un proprio campo di serraggio, con un valore massimo avvitato e un valore minimo. - Page 8 F. REGOLAZIONE DELLA LUNGHEZZA SPORGENTE (L) DEL MANDRINO FILETTATO G. POSIZIONAMENTO DELL’INSERTO FILETTATO ATTENZIONE: Prima di azionare questo UTENSILE, devono essere state completate le procedure descritte alle sezioni “E”, per l’installazione della misura corretta del MANDRINO FILETTATO e della TESTINA, “F”, per la regolazione della corsa, e “G”...
- Page 9 Deformed stuck Deformed stuck rivet nut rivet nut Workpiece Abnormally Head fixing holes stuck rivet nut Workpiece 1742A Pin retainer Fixing hole pin Workpiece Operation Manual Threaded Turn the whole mandrel Heavy duty & professional hand rivet nut with Quick-Drill Unit...
-
Page 10: Specifications
Rotate nosepiece - 1742A is equipped with a QUICK-DRILL UNIT, simply "Push & Pull" the DRILL UNIT KNOB to drive the THREADED MANDREL or THREADED SOCKET to engage with and be released from the RIVET NUT or RIVET BOLT/STUD quickly! -
Page 11: Main Parts
J-2) How to readjust the correct stroke distance to protect the tool and the rivet nut C. MAIN PARTS threads from damage, should you not manage to manually press the handles to touch the rear body: NOSEPIECE Gripped rivet nut & workpiece Gripped rivet nut &... - Page 12 Gripped rivet nut & workpiece Gripped rivet nut & workpiece Rivet nut Rivet nut height protruding length (L) Threaded mandrel THREADED MANDREL NOSEPIECE NOSE PIECE LOCK NUT HEAD Turn the whole tool FIXING-HOLES OF HEAD Rotate nosepiece anti-clockwise FRONT BODY STROKE ADJUSTER STROKE INDICATOR Drill unit...
-
Page 13: Maintenance
I. MAINTENANCE D. HOW TO CHANGE THE THREADED MANDREL AND NOSEPIECE This tool is extremely sturdy and reliable, it only requires an occasional application of Light Oil to the PRECAUTION : Check the Thread Size of the Fastening BOLT and the WORKPIECE Thickness to determine mandrel (1), nosepiece (2) and stroke adjuster (3) threads. - Page 14 Turn ANTI- CLOCKWISE to Assemble the threaded mandrel Threaded Workpiece mandrel nosepiece nosepiece Gripped rivet nut Fixing holes Service Rivet nut threads Nosepiece wrench lock nut Fixing hole pin Pin retainer head bolt Complete the fastening by fixing a bolt to the gripped rivet nut Use the Assemble Screw the...
- Page 15 E. HOW TO ADJUST THE STROKE DISTANCE Prepared Screwed hole rivet nut Gripped bulge rivet nut WARNING Prepared The correct stroke distance is defined on the basis of the Workpiece thickness and the rivet nut workpiece Screwed hole rivet nut grip range.
- Page 16 F. HOW TO ADJUST THE PROTRUDING LENGHT (L) OF THREADED MANDREL G. HOW TO OPERATE THIS TOOL TO SET RIVET NUT PRECAUTION: Before operating this TOOL, it is strongly requested to follow the above "E" to install the correct size of the THREADED MANDREL and NOSEPIECE, the above "F" to adjust the proper Stroke Distance, and the above "G"...
Need help?
Do you have a question about the 1742A and is the answer not in the manual?
Questions and answers