Table of Contents
Advertisement
Quick Links
Advertisement
Table of Contents

Related Manuals for Gates Underwater Products XA25


Summary of Contents for Gates Underwater Products XA25
-
Page 1: Setup, Use, And Care Guide
XA25 Underwater Housing Setup, Use, and Care Guide... - Page 2 Introducing the XA25 Page 2 Copyright 2013, Gates Underwater Products, Inc. Last document revision: November 2013 This manual and current revision is available in 8.5 x 11 size and full color at http://www.gateshousings.com/documentation.html Gates Underwater Products, Inc. 13685 Stowe Drive Poway, California 92064 USA Phone: 800.875.1052 toll-free in the U.S.
-
Page 3: Table Of Contents
Changing Ports ..............27 Cleaning Ports and Filters ..........28 Diopters ................29 Buoyancy and Trim ............29 Tips for Shooting Video with the XA25 ......30 Housing Care and Maintenance ........31 O-Ring Care and Maintenance ........31 5: ... -
Page 4: 1: Introducing The Xa25
Canon XA25, XA20 and HF-G30 digital video cameras. Please read through this entire guide to learn about the housing so you can get the most out of this imaging tool. In this section, we’ll introduce you to the features of the XA25 so you can get started. -
Page 5: Unpacking The Xa25
Page 5 Unpacking the XA25 After you remove the XA25 from its shipping container, carefully inspect it for missing parts or damage that may have occurred during shipment. If you discover any discrepancies, contact Gates or your dealer immediately for assistance. -
Page 6: 2: Cautions
USER RESPONSIBILITY. This Setup, Use and Care guide contains important detailed procedures for setup and use of the XA25. It is the user’s responsibility to read, understand and employ these procedures. Failure to do so can result in poor or non-operation of the XA25 and may void your warranty. -
Page 7: 3: The Xa25 Setup
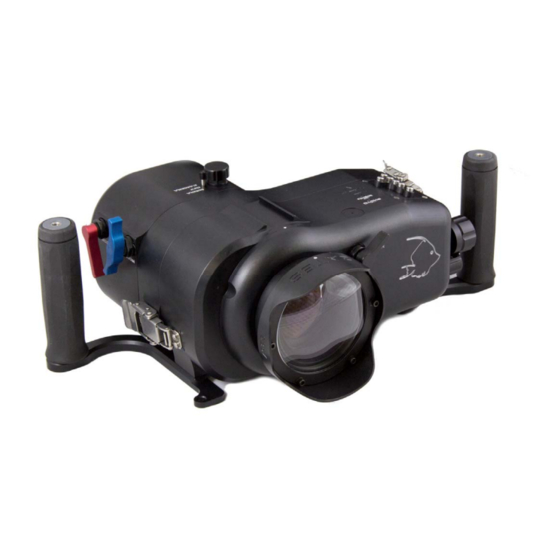
3: The XA25 Setup Handle Installation If the handles are not already installed on the XA25 Housing, perform this step first. Secure the handle arms to the housing using the 10-32 x 0.5”L socket cap screws. Tighten with the supplied 5/32 hex tool. -
Page 8: Xa25 Housing Preparation
Page 8 XA25 Housing Preparation Open the XA25 shell. Two stainless steel safety latches secure the housing halves. They have a positive locking feature, so to open them you must first depress the center bar release while lifting the rear lever. -
Page 9: Camera Preparation
Install a charged battery and SD Cards. NOTE that Class 10 SD cards are required to utilize the highest recording data rate available on the XA25, XA20 and HF-G30 cameras. Tighten the hand strap to its shortest position and tuck the ‘tail’ back into the hand strap. -
Page 10: Installing The Camera Into The Housing
The XA25 Setup Page 10 Installing the Camera into the Housing Pull out Manual, Custom and Assign Controls. The manual and custom control need only be retracted ~ 1in / 2.5cm Carefully insert the camera into the front housing half as shown. - Page 11 The XA25 Setup Page 11 Open the LCD and seat into the receiver. Push in the Manual, Custom and Assign Controls Insert the Canon IR Remote into the housing here.
-
Page 12: Closing The Housing
The XA25 Setup Page 12 Closing the Housing Carefully inspect o-ring on back half and the sealing surface on front half. Make sure they are clean and in good condition. Pull up the Power control. Place back half onto the front housing half. You will clearly see when the housing halves align and seat together properly. - Page 13 The XA25 Setup Page 13 Carefully inspect the parting line between front and rear housing. If this line is not even all the way around, remove the back and determine the reason. (O-ring out of place, hand strap interference, etc.) Failure To Do This May Result In A Wet Camera! Push in the Power Control.
-
Page 14: Remote Button Arm Installation
The XA25 Setup Page 14 Remote Button Arm Installation The Remote Button Arm can be installed to aid actuation of the remote push buttons. It provides a firm handle grasp closer to the buttons. The arm is a standard part included with your housing, but not installed. -
Page 15: Water Alarm (Optional)
The XA25 Setup Page 15 Water Alarm (Optional) If you have the optional water alarm installed there are three alarm conditions to know: Condition Siren New Battery Bright Intense blink while Ascending tones played 4 times (Insertion) siren plays Water Intrusion Bright Intense Blink Warble sound. -
Page 16: Seal Check (Optional)
Seal Check Manual. Follow the procedures in the Seal Check manual for verifying integrity of the housing and monitor. NOTE. Pulling a vacuum on the XA25 will take only a few seconds. Be careful to avoid excessive vacuum greater than 8 in Hg. Seal Check Fitting on XA25 Housing. -
Page 17: Carry Handle (Optional)
The XA25 Setup Page 17 Carry Handle (Optional) Position the Carry Handle on the top dovetail, then secure by finger tightening the thumbscrew. Light Mounts (Optional) The top of each handle grip has a 1/4-20 threaded insert for mounting lights or other accessories. - Page 18 Two types of Gates Tripods exist: a symmetric version and a newer, asymmetric version specifically designed for XA25-style housings. Either can be used with the XA25. Mounting diagrams follow. The symmetric version of the Gates Tripod.
-
Page 19: Final Checks
The XA25 Setup Page 19 The asymmetric version of the Gates Tripod. Use 1/4-20 x.75”L flat head screws to mount the adapter, and 1/4-20 x .5”L flat head screws to mount the tripod plate. NOTE: only the Gates Tripod plate is shown. The extensible legs and clamps are omitted for clarity. -
Page 20: 4: Xa25 Operation
XA25 Operation Page 20 4: XA25 Operation Your Gates housing utilizes 100% mechanical controls to provide you with the most reliable operation possible. They either rotate and/or depress to provide smooth and consistent operation. (see ‘Housing Care and Maintenance’ section). -
Page 21: Right Side Controls
XA25 Operation Page 21 Right Side Controls Record / Standby. The Record/Standby control is red and operates with a momentary counter clockwise rotation. Zoom. The Zoom control is blue and operates with a momentary rotation. TIP: The Zoom control operates free and smooth when well lubricated. This should be done after storage and often during heavy use (as much as every 2 or 3 dives). -
Page 22: Left Side / Rear Controls
Left Side / Rear Controls Assignable Buttons 1 & 2 (left) / 3 & 4 (rear) The Assignable buttons access function that can be set for your style of shooting. Refer to the XA25 camera manual for more information. Focus Ring. This control rotates the focus ring on the camera. -
Page 23: Remote Control
XA25 Operation Page 23 Remote Control The remote is used to give full menu access to change settings deeper in the menu structure of the camera. -
Page 24: White Balance
Page 24 White Balance Setting white balance is a two step process, but first requires specific setup of the Canon XA25, XA20 or HF-G30 camera. Set an assign button to jump to the white balance menu. FUNC-->MENU--> -->Assign Button (1,2 ,3 or 4)-->White Balance-->Exit Set White Balance. -
Page 25: Exposure
XA25 Operation Page 25 Exposure Using manual exposure on the Canon XA25, XA20 or HF-G30 cameras requires specific setup within the camera menu. Set an assign button to jump to the manual exposure screen. FUNC-->MENU--> -->Assign Button (1,2 ,3 or 4)-->Exposure-->Exit Set Manual Exposure. -
Page 26: Changing Filters
XA25 Operation Page 26 Changing Filters The color correction filter in your housing may be changed to accommodate different gradient filters. “Blue water” and “green water” are the two most common, recognizable by their orange and purple color, respectively. Removal. The color filter is held in place by a tension screw in the filter holder. -
Page 27: Changing Ports
XA25 Operation Page 27 Changing Ports Gates offers several ports for your XA25 housing, which attach with a bayonet-style mount. Port changes are easy and straightforward: Removal. You will see alignment dots on the housing and on the port. When aligned, the port is fully engaged and ready for underwater use. -
Page 28: Cleaning Ports And Filters
XA25 Operation Page 28 Verify the port is fully seated and secure. Cleaning Ports and Filters Gates ports can be cleaned readily by following these simple guidelines. Dust or Lint can be blown with compressed air, preferably from a can. Do not clean the surfaces if it is unnecessary. -
Page 29: Diopters
Page 29 Diopters Diopters may be used with the XA25 housing and the FP32A Flat Port for close up/macro imaging. There is sufficient space between the camera and port to utilize up to three diopters stacked on the camera. The camera utilizes diopters in a 58mm holder. -
Page 30: Tips For Shooting Video With The Xa25
The GP32 wide angle port further provides a large depth of field (DOF), so most everything in front of your camera will be in focus, too. Note however, that the auto focus capability of the XA25, XA20 and HF-G30 cameras is remarkably good. If your subject has detail and contrast, the camera will accurately track focus. -
Page 31: Housing Care And Maintenance
XA25 Operation Page 31 Housing Care and Maintenance Proper care of your Gates housing is important to provide you reliable operation and long life. You’ll find all the guidelines in the “Housing Care and Maintenance” document included with your Gates housing. You can also find it on Gates web site at www.GatesHousings.com. -
Page 32: 5: Customer Support
Customer Support Page 32 5: Customer Support Should you have any questions about the XA25 and its operation, please contact Gates at the numbers below. Email: Customer.srvc@GatesHousings.com Web: www.GatesHousings.com Phone: 858.391.0052 Fax: 858.391.0053...
Need help?
Do you have a question about the XA25 and is the answer not in the manual?
Questions and answers