
Subscribe to Our Youtube Channel
Related Manuals for DriSteem Vaporstream


Summary of Contents for DriSteem Vaporstream
- Page 1 ® Va po rs t re am El e c t r i c H umi di f i e r Installatio n, Ope ratio n an d M ain tenan ce Man u al...
- Page 2 ATTENTION INSTALLER W A R N I N G ! Read this manual before installing. Leave manual with product owner. Disconnect electrical power before installing supply wiring. Contact with energized circuits can cause severe personal injury or death as a result DRI-STEEM ®...
-
Page 3: Table Of Contents
Trapeze hanger ........10 web site: www.dristeem.com Wall brackets . -
Page 4: Overview
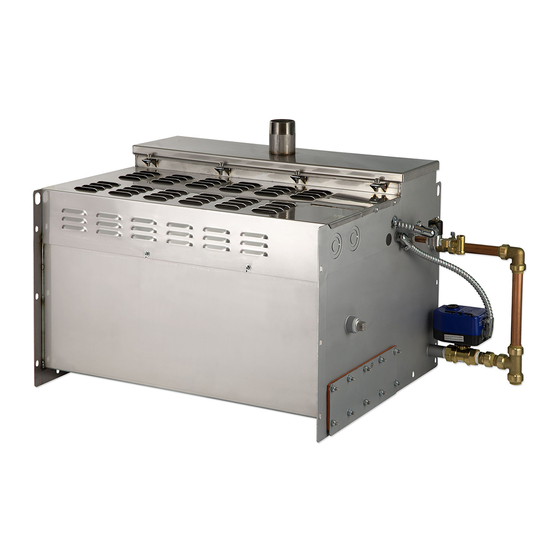
Control cabinet OM-628 Important notes: Standard water models (Model VLC) Vaporstream VLC humidifiers use electricity to heat potable or models can be converted in the field for softened fill water into steam for humidification. A conductivity use with deionized/reverse osmosis (DI/ probe monitors water level, requiring water conductivity to be at RO) water. - Page 5 Deionized water models (Model VLDI) each rod. VLC-OM-030 Vaporstream VLDI humidifiers use electricity to heat deionized (DI) or reverse osmosis (RO) fill water into steam for humidification. VLDI models control water level using a float valve Figure 3-3: with low water cutoff switch.
-
Page 6: Model Vldi
Total humidifier load = load to meet design conditions + load to compensate for steam loss from the dispersion assembly and interconnecting piping. If total humidifier load is more than the humidifier's maximum capacity, design conditions will not be met. For steam loss data see the DRI-STEEM Design Guide available for downloading and printing at www.dristeem.com... -
Page 7: Dimensions
Overview Figure 5-1: Table 5-1: Vaporstream dimensions Standard control cabinet dimensions and weights Shipping Cabinet dimensions Cabinet weight* size inches 16 h x 14 w x 6 d 406 h x 356 w x 152 d 20 h x 20 w x 7 d... - Page 8 Notes: * Control cabinet sizes in this table are for the largest required cabinet for each model. Depending on Vaporstream options chosen you may receive a smaller cabinet than the one shown in this table. Contact DRI-STEEM if you need more detailed information about control cabinet sizes. Control cabinet dimensions are shown on the next page.
-
Page 9: Installation
(see dispersion section of this manual) condensate return piping (see the piping section of this manual) such as power distribution transformers and high horsepower motors controlled by variable frequency drives. Figure 7-1: Vaporstream clearance recommendations Top: Back: Right side Cleanout... - Page 10 Installation I m p o r t a n t : Mounting methods Installation must comply with governing To ensure that the water level control system works properly, the codes. tank must be mounted level side to side and front to back. For overhead installations, install a drip pan to prevent possible water damage (see drawing on the next page).
-
Page 11: Support Legs
Installation Support legs Use enclosed bolts, nuts, and washers to fasten legs to tank. Shim or adjust so the tank sets level side to side and front to back. Verify level after the tank is filled and is at operating weight. More on next page ▶... -
Page 12: Trapeze Hanger
Secure trapeze hanger to an overhead structure that is strong above expensive apparatus or equipment. enough to support the operating weight of the Vaporstream A broken water pipe, leaking valve gland, humidifier and field installed piping, plus the weight of the control condensation or other water leaks can occur cabinet if it is mounted on the humidifier. -
Page 13: Wall Brackets
12-heater models on a metal stud required) VLC-OM-007 rated for the operating weight of the Vaporstream humidifier. Locate the wall brackets so they are flush to the front and back flanges of the tank. Table 11-1:... -
Page 14: Weather Cover
The optional weather cover is water- Weather cover exploded view resistant and designed to protect a Top panel Vaporstream unit from rain and sun. The Vaporstream weather cover has been tested and approved by ETL Testing Laboratories, Panel A Panel B Inc., and is listed to UL Standard 1995... - Page 15 Seal after making steam connection to maintain weather protection. supply can be disconnected easily for removal of the weather cover to gain access to the Vaporstream for service and maintenance. Annual weather cover maintenance requirements...
- Page 16 3. All piping from the Vaporstream unit to the steam outlet is stainless steel pipe. Depending on the application, interconnecting piping from the steam outlet to the dispersion assembly can be tubing, pipe or DRI-STEEM vapor hose. See the Dispersion section, beginning on Page 32, for more information about connecting to the dispersion assembly.
- Page 17 Installation Figure 15-1: Vaporstream outdoor enclosure, top view Pipe chase extending Standard steam outlet (exits enclosure here) Optional steam outlet (exits enclosure through pipe chase) Vaporstream humidifier Side access door Control cabinet (Note: Some 9-12 Side section heater heater models...
-
Page 18: Outdoor Enclosure
1090 24-4, 36-4, 48-4, 64-4, 84-4, 100-4 1190 Note: * Includes humidifier Specifications Table 16-2: Vaporstream outdoor enclosure connection sizes input requirements. Description All Vaporstream models using an outdoor enclosure with a heater Water makeup (fill) ¼” pipe thread (DN8) package. - Page 19 Installation The outdoor enclosure option is used when DRI-STEEM humidifiers are installed outdoors. The following information is not intended to supersede any requirements of federal, state or local codes having jurisdiction; prior to installing the unit, consult authorities having jurisdiction. Operating temperatures DRI-STEEM humidifiers housed in an outdoor enclosure operate Insulate supply water piping to avoid dripping from condensation.
- Page 20 Legs unit. (Vaporstream models with 1-6 heaters only) if forks extend across the entire unit. Forks that do not extend across the entire unit could cause tipping resulting in unsafe conditions or damage to the unit.
- Page 21 Installation configurations. The standard configuration has a steam outlet on one side of the outdoor enclosure for connecting to steam dispersion unit piping. The optional internal steam distribution configuration routes steam within the outdoor enclosure and down through the pipe chase into a building. See Page 15 for outdoor enclosure dimensions.
- Page 22 Installation controlled heaters are provided: one strip heater is located in the control cabinet section, and one strip heater is located in the front section to keep the enclosure at a constant minimum temperature. drain from the enclosure through this drain. control, a keypad with standard 5' (1.5 m) cable ships mounted to the subpanel in the outdoor enclosure.
- Page 23 Installation transporting to the roof. Curbs are manufactured of 16-gauge galvanized steel and shipped with all hardware for bolt-together assembly. All holes are matched before leaving the factory. Curb is to be a minimum of 14" (356 mm) high. A 2" × ½" closed-cell curb gasket with adhesive on one side is supplied with hardware.
- Page 24 Installation Operation When power is applied to the outdoor enclosure: humidifier is not allowed to operate unless the temperature The strip heaters will power down when the temperature inside humidifier will allow the humidifier to continue operating until to cool the electronic components. greater, a high limit switch powers down the humidifier.
- Page 25 Installation Figure 23-1: Field piping overview for Vaporstream Model VLC (standard water models) Steam outlet Shock arrester recommended to reduce water hammer Install level Water supply line; water pressure range 25 psi to 80 psi (172 kPa to 552 kPa); water conductivity minimum 100 μS/cm. If water piping to humidifier is nonmetallic, we recommend that the first 3' (1 m)
- Page 26 Installation Figure 24-1: Field piping overview Vaporstream Model VLDI (DI/RO water models) Steam outlet Install level Overflow Optional condensate Water supply line; water pressure range 25 psi to 80 psi (172 kPa return piping from to 552 kPa); first 3' (1 m) is recommended to be stainless steel...
- Page 27 1/8"/ft (1%) toward the drain. Governing codes may require more DRI-STEEM's Drane-kooler, shown mounted pitch. to a Vaporstream humidifier, tempers discharged water temperature. For other If the proximity of a drain requires the humidifier drain and skim Drane-kooler mounting options or for more...
- Page 28 Installation Model VLC humidifier. The drain connection to a VLC standard Figure 26-1: Lifting drain water installer should place a union directly after the factory drain fitting, provide a water seal of height H1 (from the table on Page 23), and Discharge pipe.
- Page 29 Installation Water supply piping general instructions The Vaporstream humidifier has a 1" (25 mm) internal air gap to prevent back siphoning into a potable water system. However, some governing codes may require additional protection such as a vacuum breaker or backflow preventer.
-
Page 30: Water Supply
W A R N I N G ! VLDI models control water level with a float valve, and have a ¼" Do not supply a Vaporstream Model VLDI humidifier with tap water. Tap water causes the float valve assembly to become clogged... -
Page 31: Wiring
When All wiring must be in accordance with all governing codes and with drilling penetrations in the control cabinet, Vaporstream wiring diagrams. make sure the unit is powered off. Contact with energized circuits can cause property... - Page 32 Installation Wiring requirements The length of wire from the control cabinet to the humidifier must not exceed 50' (15 m). The left side of the control cabinet is the control circuit side, and the right side is the power circuit side. Place conduit connection holes in the control cabinet so that the control and power wire routing is limited to their respective sides of the control cabinet.
- Page 33 Installation Proper wiring prevents electrical noise W A R N I N G ! Electrical noise can produce undesirable effects on electronic control circuits, thereby affecting controllability. Electrical noise is DRI-STEEM strongly recommends installing a generated by electrical equipment such as inductive loads, electric duct airflow proving switch and a duct high motors, solenoid coils, welding machinery, or fluorescent light limit humidistat.
- Page 34 Installation I m p o r t a n t : Installing the keypad Control wiring instructions If the keypad has been shipped loose, The following wiring methods for external low voltage control position the keypad in a convenient location wiring should minimize electrical noise problems: for easy access, but do not locate the keypad inside the control cabinet.
- Page 35 Installation Humidistat and transmitter locations are critical Humidistat and humidity transmitter locations have a significant impact on humidifier performance. DRI-STEEM recommends that you do not interchange duct and room humidity devices. Room humidity devices are calibrated with zero or little airflow; whereas duct humidity devices require air passing across them.
- Page 36 In this document: required for non-wetting to occur. If you have questions about absorption non-wetting distances, see the non-wetting tables installation, Pages 35-37 in the Vaporstream catalog, available for viewing, printing or ordering at www.dristeem.com instructions, Pages 38-42 ® installation instructions,...
- Page 37 Installation Connecting humidifier to dispersion assembly with vapor hose W A R N I N G ! Dispersion tube, vapor hose, tubing, or hard a minimum pitch of 2"/ft (15%) back to the humidifier. pipe can contain steam, and surfaces can be outlet and the dispersion system with pipe hangers.
- Page 38 Installation I m p o r t a n t : Connecting humidifier to dispersion assembly with tubing or pipe (continued) Failure to follow the recommendations in this section can result in excessive back pressure on the humidifier. This will result condensation.
-
Page 39: Drip Tee Installation
90° long sweep or Pitch two 45° elbows Obstruction Insulate tubing and hard pipe Vaporstream humidifier to reduce steam loss To dispersion assembly Tubing or pipe drip tee, by installer. DRI-STEEM part numbers for 304 stainless steel in-line tees: DC-1166 Open drain required. -
Page 40: Single Tube And Multiple Tube
Installation I m p o r t a n t : Installation Failure to follow the recommendations in installing single tube and multiple tube dispersion assemblies. this section can result in excessive back pressures on the humidifier. This will result in unacceptable humidification system applications. - Page 41 Vapor hose, tubing or pipe. Insulate tubing and hard pipe to reduce steam loss. Do not insulate vapor hose. mounting nut Pitch* Secure and seal duct Vaporstream escutcheon plate (15%) humidifier 90° long sweep or Maximum capacity of two 45° elbows dispersion tube: 28.4 lbs/hr (12.9 kg/h)
- Page 42 (see Note 2 below) 90° long sweep or two 45° elbows Pitch tube toward recommended Vaporstream humidifier Water seal Condensate drain tube, (DN20); must be suitable for 212 °F (100 °C) water air gap Open drain required. See Note 1 below.
- Page 43 Pitch* two 45° elbows Pitch tube air vent minimum toward drain (DN8) water seal minimum Vaporstream humidifier H2 (see table, thread (DN20) Page 24) condensate return connection (on face plate) Return line piping material must be suitable for 212 °F (100 °C) water.
- Page 44 Mounting 90° long sweep or (M10) Pitch* two 45° elbows Pitch tube toward drain Vaporstream (152 mm) humidifier pipe thread Water seal Condensate drain tube provided by installer, air gap Open drain required. Locate air gap only in spaces with adequate temperature and air movement to absorb flash...
-
Page 45: Rapid-Sorb
Installation I m p o r t a n t : General Rapid-sorb installation instructions Failure to follow the recommendations in this section can result in excessive back this manual. pressures on the humidifier. This will result in unacceptable humidification system of all Rapid-sorb components with packing list. - Page 46 Installation Rapid-sorb pitch requirements airflow duct, consider the following pitch issues: length to accommodate the 1/8"/ft (1%) pitch requirements flush to the ductwork. The 1/8"/ft (1%) pitch typically can be accomplished in the length of the hose cuffs used to connect the tubes to the header.
- Page 47 Open drain required. pipe toward Rapid-sorb: Locate air gap only in spaces with adequate temperature and air movement to absorb flash Vaporstream humidifier vapor hose steam; otherwise, condensation may form on nearby surfaces. Refer to governing codes for tubing or pipe drain pipe size and maximum discharge water temperature.
- Page 48 Installation Note: Assembly and installation instructions for a Rapid-sorb installed with header outside the duct (continued) See Page 47 for steam supply and condensate drain line connection L-bracket to the end of the dispersion tubes with the provided instructions. bolt, lock washer, and flat washer. 5.
- Page 49 (1%) Note: * Pitch vapor hose, tubing, or Open drain required. pipe toward Rapid-sorb: Vaporstream Locate air gap only in spaces with adequate humidifier temperature and air movement to absorb flash using vapor hose steam; otherwise, condensation may form on nearby surfaces.
- Page 50 Installation Assembly and installation instructions for a Rapid-sorb installed with header inside the duct (continued) lubricant. 5. Allow the dispersion tubes to rest against the bottom of the duct. 6. Position the flange of the L-bracket so it is upstream of the tubes when the assembly is rotated into position.
- Page 51 Installation Steam supply connections to the Rapid-sorb header 1. Connect the steam supply interconnecting piping from the humidifier to the Rapid-sorb. The steam supply piping requires a minimum of 1/8"/ft (1%) pitch toward the header. 2. If multiple humidifiers are supplying one Rapid-sorb, a multiple steam supply connector is provided.
-
Page 52: Sdu-I
(13.6 kg/h), draws in room air, humidifies that air with steam, and then discharges the humidified air into the room with no visible vapor trail. Choosing a location for the SDU-I fan unit When used with a Vaporstream, the SDU-I can be located: on Page 36 to determine maximum distance). - Page 53 (expansion bolts). Secure SDU frame in place. proving switch terminals to the humidifier electrical panel Control board in terminals. Refer to the external connections diagram in the Vaporstream control cabinet package shipped with the unit. humidifier and in the SDU-I. Minimum wire size for field wiring is 18-gauge (1.5 mm...
-
Page 54: Sdu-E
Space Distribution Unit, external Choosing a location for the SDU-E fan unit absorption (SDU-E) When used with a Vaporstream, the SDU-E can be located: The SDU-E, designed for maximum capacity of 102 lbs/hr (46.3 kg/h), draws in room air, humidifies it with steam, and discharges it back into the room (visible steam absorbs on Page 36 to determine maximum distance). - Page 55 120V circuit for the fan. With all other power supply voltages (other than 120V), provide a separate 120V circuit for the fan, or order from DRI-STEEM a transformer installed in the control cabinet. Control board in Vaporstream Table 53-1: control cabinet SDU-E specifications Maximum...
- Page 56 Installation Condensate drain connection to SDU-E Figure 54-1: fan unit SDU-E condensate drain connection and rated for 212 °F (100 °C) minimum SDU-E frame continuous operating temperature. 2. Drain line must be piped as shown in water seal to: the dispersion box drain line Union 3.
-
Page 57: Area-Type Fan
Installation Area-type fan dispersion Table 55-1: The table on the following page lists the Area-type steam minimum Area-type electric fan specifications rise, spread, and throw nonwetting dimensions. Surfaces or objects Motor 120 V, 50/60 Hz located within this minimum dimension can cause condensation and dripping. - Page 58 Installation Table 56-1: Area-type (evaporative steam) minimum non-wetting distances* 60 °F (16 °C) Maximum steam 30% RH 40% RH 50% RH capacity Rise Spread Throw Rise Spread Throw Rise Spread Throw lbs/hr kg/h 10.0 10.0 10.0 12.0 12.0 12.0 13.0 14.0 14.0 13.0...
-
Page 59: Operation
After the system is installed and connected properly, you can begin Only qualified electrical personnel should start-up procedures. perform start-up procedure. 1. Verify that the Vaporstream humidifier, controls, piping, electrical connections, steam supply, and dispersion unit(s) are Contact with energized circuits can cause installed according to the following: property damage, severe personal injury or death as a result of electrical shock or fire. -
Page 60: Standard Water Models
Vapor-logic keypad. information. Each time the Vaporstream refills, it fills to an elevation near the lip of the skim/overflow fitting. A portion of the refill water then Download DRI-STEEM literature flows to the drain carrying most of the minerals left by the previous Most DRI-STEEM product manuals can be evaporating cycle. - Page 61 When performing maintenance on the Note: Fresh make-up water is used to speed up cooling. Do not close the manual water supply before cooling down the Vaporstream humidifier: humidifier; otherwise the tank could stay hot for several witch the keypad control mode to hours.
- Page 62 Maintenance Inspection and maintenance (continued) Figure 60-1: 2. Seasonally (or as required, depending on water quality) Probe tool – Remove cleanout plate; slide the cleanout tray out (when provided) and dispose of any loose scale that has collected in the tray. –...
- Page 63 Maintenance Inspection and maintenance (continued) Humidifier De-scaling Solution Scale buildup on humidifier heaters acts as an insulator, reducing humidifier – Water should drain from the skimmer drain pipe after performance while increasing energy each fill cycle. This should be verified visually by a weekly costs.
- Page 64 Maintenance Vaporstream VLDI models DI water quality recommendations W A R N I N G ! When performing maintenance on the correctly. The presence of chlorides in improperly processed Vaporstream-DI humidifier (after the tank DI water can cause pitting and failure of the tank and its has cooled down and drained): caused by chloride corrosion.
- Page 65 Maintenance Inspection and maintenance Note: When replacing the cleanout plate, tighten 1. Annually (also recommended when maintenance is performed) nuts to a torque measurement of 40 in-lb (4.5 N-m). and off to verify they are functioning. These include: – High limit switch –...
- Page 66 Maintenance C A U T I O N ! Always shut off electrical service disconnect prior to outdoor enclosure electrical service door. working on the humidifier. annually. humidifier. Table 64-1: Outdoor enclosure troubleshooting guide Symptom Possible cause Recommended action Fans not operating Check for power to outdoor enclosure.
- Page 68 Replacement parts Figure 66-1: Vaporstream tank replacement parts Note: VLC-OM-033...
-
Page 69: Replacement Parts
Replacement parts Table 67-1: Tank replacement parts list Description Models used Part no. Tank Cover Cover, heater louvered 167745- * Pan-head mach. screw, 700300-013 Heater 409600- * Gasket, cover 160691- * Cleanout plate 165472 Gasket, cleanout plate 308225 Switch, door interlock 408475 Thermal cut-out 409560-001... -
Page 70: Control Cabinet
Replacement parts Figure 68-1: Control cabinet replacement parts Note: VLC-OM-035... - Page 71 407900-016 Terminal end bracket 408252-006 Board, Vapor-logic3 main 408491- * microprocessor Board, Vapor-logic3 Multiple stage 408490-003 Vaporstream expansion Optional SDU or Area-type fan Circuit breaker, single pole 406775- * dispersion 20 amp DIN rail terminal 408252-001 Terminal ground 408252-010 SSR control...
-
Page 72: Sdu-I
Replacement parts Figure 70-1: SDU-I replacement parts OM-1504 Table 70-1: SDU-I replacement parts Description Quantity Part no. Shroud 330001-002 Blower 409540-003 Switch, airflow 406190 700170-007 Nut retainer, 8-32 409593-001 Cap, black 409593-002 310285-006... -
Page 73: Sdu-E
Replacement parts Figure 71-1: SDU-E replacement parts OM-1503 Table 71-1: SDU-E replacement parts Description Quantity Part no. Shroud 330002-001 Blower 409540-003 Switch, airflow 406190 700170-007 Nut retainer, 8-32 409593-001 Cap, black 409593-002 160445-003 160445-004... - Page 74 Replacement parts Figure 72-1: Outdoor enclosure replacement parts Note: For humidifier replacement parts, refer to your humidifier's installation, operation and maintenance manual. OM-953 Table 72-1: Outdoor enclosure replacement parts Number in drawing Description Part number 500W strip heater 405800-052 1100W strip heater 405800-053 Cooling fan 405800-068...
- Page 76 DRI-STEEM ships such product, whichever date is the earlier. on quality is evident in the construction of the Vaporstream, which features cleanable, If any DRI-STEEM product is found to be defective in material or workmanship stainless steel construction, and an industry- during the applicable warranty period, DRI-STEEM’s entire liability, and the...
Need help?
Do you have a question about the Vaporstream and is the answer not in the manual?
Questions and answers