Table of Contents
Advertisement
Quick Links
Advertisement
Table of Contents

Subscribe to Our Youtube Channel
Related Manuals for Swissvoice SV29


Summary of Contents for Swissvoice SV29
- Page 3 SWISSVOICE SV29 Rugged mobile phone with Solar panel © 01/2011...
-
Page 4: Table Of Contents
Table of Contents Your new mobile phone ............5 Contents in the giftbox ............5 Important Notes ................6 Safety Information..............6 Treatment of cells and batteries ...........8 Symbols used ..............8 Product Description ..............9 Front ..................9 Rear Panel.................10 The screen.................10 The other symbols on the screen........11 Menu Description...............11 Specifications .................12 Preparation ................13... - Page 5 Memory Speed Dial ............19 Choose a number speed dial memory .......20 Save numbers in the directory ...........20 Manual entry..............20 Create a contact from the list, auto redial......21 Create a contact from the list of incoming calls ....21 Making a call from the Contact List ........22 Lock / unlock the keypad ...........23 Turn off the ringer ..............23 Turn on the ringer ..............23...
- Page 6 Torch light ................32 FM Radio .................32 Games ..................33 Entering text ................33 The keys on the keypad.............33 Choice of entry mode............34 Compliance Statement ............35 Swissvoice declaration............35 Warranty disclaimer ............36 Approval conformity ............36 How to charge your SV29 solar powered phone ....38...
-
Page 7: Your New Mobile Phone
Our ultimate goal is enabling users to enjoy the state-of-the-art Swissvoice-designed product anytime, anywhere. We are confident in our products and would like to hear from you if you will have any comment or suggestion to Swissvoice for better product experience! Contents in the giftbox •... -
Page 8: Important Notes
Important Notes Safety Information • The information in this manual may be amended or supplemented without prior notice. • Please keep all the accessories in an appropriate place. • The illustrations in this manual are examples only and are not 100% the same as the actual product. - Page 9 • Persons equipped with pacemakers should observe a safe distance between the phone and the pacemaker. If in doubt, contact your doctor. • Do not use your phone near petrol stations, fuel depots, chemical plants, or any place where such operations are performed for destruction by explosive, and in any environment presenting risks of explosion, such as places of supply, storage of storage, or decks of boats and freighters.
-
Page 10: Treatment Of Cells And Batteries
Treatment of cells and batteries The batteries should NOT be thrown in the rubbish bin. The legislation of most of the countries now requires every consumer to dispose of batteries used in the bins provided specifically for this purpose. You can leave your batteries at municipal waste sites and in the places where they are sold. -
Page 11: Product Description
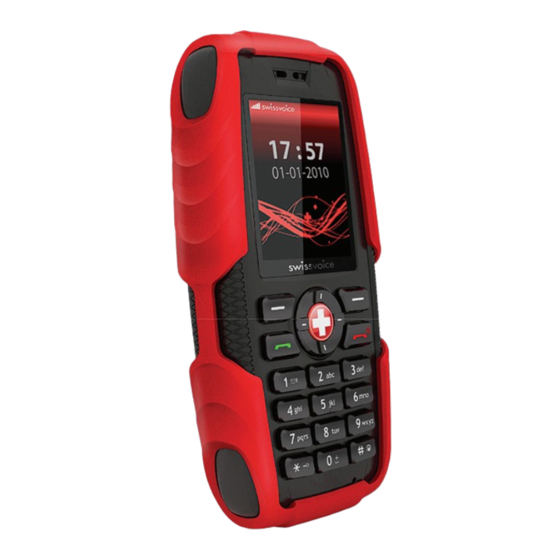
Product Description Front 1. Front Speaker 7. Keypad 2. Flashlight 8. Microphone 3. Navigation keys 9. USB port 4. Menu key 10. Dial button 5. Selection key M2 11. Selection key M1 6. Start / stop button, hang up 12. Screen... -
Page 12: Rear Panel
Rear Panel Battery compartment cover The screen 1. Display of signal strength 2. Display of battery status 3. Name of the telephone 4. Time 5. Date 6. Display functions for the selector M2 7. Display functions for the menu 8. Display functions for the selector M1... -
Page 13: The Other Symbols On The Screen
The other symbols on the screen Transferring calls is activated. The headphones are connected. The unit is in "roaming". You received a new SMS. The device is muted. The keypad lock is activated. An alarm is activated. Menu Description 1. Contact 2. -
Page 14: Specifications
Specifications 1.8 inch Battery Li-Ion, 1000 mAh Standby Around 200 hours Autonomy max. Around 180 minutes conversation Antenna Integrated Frequency GSM 900/1800 Internal Memory 32 Mb Vibration Supported SIM card Single SIM Directory / SMS 100 entries Alarm, calendar, calculator, flashlight, Tools (integrated) games Dimensions... -
Page 15: Preparation
Preparation Insert the SIM card Unpack the handset and accessories carefully. Open battery compartment located at the rear of phone. To do this, unscrew solar module with a screwdriver and remove it. Then insert a SIM card provided by an operator. Please pay attention to the instructions from the following diagram. -
Page 16: Insert The Battery
Insert the battery Place the battery so that the white contacts at the top of the battery are placed exactly opposite the contact pins of the phone. You'll find that the battery is inserted correctly if it slips easily into place and sets up easily. -
Page 17: Charging
Charging Before the first use of the phone, the battery must be fully charged. For this it is essential to use the included AC adapter. With the adapter, the total charge time is about 4 hours. For charging via the solar module, the total charging time will be extended by several hours, depending on the sunlight. -
Page 18: Buttons And Controls
Buttons and controls Control your mobile phone via the buttons above the keypad. The keys have the following functions: In menus, press this key to confirm your choice, or access additional options. In menus, press this key to delete characters or interrupt the process. -
Page 19: Menu Options
Menu Options You can access the Options windows through most menus. These menus contain various items that can help to set the menu item accessed. For example, you can transfer phone numbers in the directory, delete data, send or reply to messages, or call the phone number. -
Page 20: Call
Call Making a phone call To call a contact, first enter the number on the keypad. Then press the green button. Answering a call When you receive a call you can answer by pressing the green button. Rejecting a call If you do not want to answer a call, you can either press the M2 button or the red button. -
Page 21: Frequently Used Functions
Frequently used functions Memory Speed Dial Open the menu with the Menu key. Select Contacts Confirm with M1. Then choose Advanced. Confirm with M1. Select Speed Dial. Confirm with M1. Select the desired button. Confirm with M1. Confirm entry Set/Change again with M1. Select the desired entry in the directory. -
Page 22: Choose A Number Speed Dial Memory
Choose a number speed dial memory In the main screen, press for about 2 seconds on the set in memory for speed dial number you want to call. The corresponding entry is displayed on the screen and the number is dialed automatically. -
Page 23: Create A Contact From The List, Auto Redial
Create a contact from the list, auto redial. Press the green button to display the redial list. Select the desired number. Press M1 for options. Select Save number. Confirm with M1. You can save the number on the SIM card (as space allows) or on your phone. -
Page 24: Making A Call From The Contact List
Press M1 for options. Select Save number. Confirm with M1. You can save the number on the SIM card (as space allows) or on your phone. Confirm with M1. Enter the contact's name under which the entry must be registered. Confirm with M1. -
Page 25: Lock / Unlock The Keypad
Lock / unlock the keypad Press and hold for 3 seconds the button to activate the keypad lock. Press the M1 and then the buttons to deactivate the keypad lock. Turn off the ringer Press and hold for about 3 seconds the # key to turn off the ringer. -
Page 26: The Messages Option
The Messages Option The SMS service center is the service of your mobile operator that handles the sending of SMS between subscribers. Usually the phone number for this service is registered in the SIM card. Occasionally it may happen that you have to save this number yourself before you can receive or send text messages. -
Page 27: Read Sms (Inbox)
Read SMS (Inbox) Press the Menu button. Choose Messages. Confirm with M1. Select Inbox. Confirm with M1. Using the phone number or name displayed in the phonebook, select the text you want to read. Confirm with M1. Use the arrow keys to scroll the text of the SMS in both directions. -
Page 28: Alarm
Alarm We often need a reliable alarm outside the house for some important appointments, or to be woken up in time when on a trip by train, for example. SV29 provides 3 different alarms to serve this function. Alarm setting Press the Menu button. -
Page 29: Suspend The Alarm For 5 Minutes
Choose the line entering the time. Set the desired time for ringing the alarm. Select the following line. Select the alarm you want. Confirm with M1. Suspend the alarm for 5 minutes When the alarm rings, press M1 and the phone will be ringing again 5 minutes later. -
Page 30: Call Log
Call Log Calls The call log is used to check all incoming, outgoing and missed calls. Each point is the management and overview. For each entry, you can access additional options for editing, thanks to the M1 button. Orders are placed with the arrow keys. Tools Tools This menu offers a preview of the calendar and a simple... -
Page 31: Profiles
Profiles Settings Profiles Profiles In this menu you can select and manage multiple profiles. The profiles are used to quickly adapt the phone settings to different environments without having to change settings every time. Activate Profile With the directional buttons, select a profile from the list and press M1 twice. -
Page 32: Display Settings
Display Settings Settings Display This menu offers various options for displaying your screen. You can change the backlight, set an idle test in standby screen of the phone, choose a background image or change the display mode from the date you time. Swiss Lock Settings General... -
Page 33: Language
Language Settings General Language This menu allows you to choose the language displayed on your phone. Keypad Locking Settings General Swiss Lock Keypad Lock This option allows you to manage the automatic keypad lock. The keypad lock prevents accidental key presses when you carry the phone in a pocket, etc. -
Page 34: Using Standard Settings
Using standard settings Settings Factory default This menu will reset the factory settings of the phone, action must be explicitly confirmed before being made. The password is 0000. Warning: All changes and customizations made previously on the phone will be deleted and lost! Use this option only if you are totally confident. -
Page 35: Games
Use these buttons to access the next or previous station in the station list. Games Games SV29 installed with 2 Games for entertainment. User can use up and down key to choice the game and select the game by pressing M1 button. Entering text... -
Page 36: Choice Of Entry Mode
Example: Tap three times on the 2 button, you get the letter “C”. Press twice the button 7, you get the letter “Q”. Press button 6 once, you get the letter “M”. Choice of entry mode There are several ways to enter text, you can choose between different input modes. -
Page 37: Compliance Statement
USB jack cover. SV29 also contains a high efficiency solar charging panel at the back for emergency battery charging under clear and direct sunlight. The solar charging panel only works under sunlight but not with any artificial lighting. -
Page 38: Warranty Disclaimer
Warranty disclaimer Your telephone is subject to a guarantee from the date of purchase in accordance with the legal provisions of the country in which the unit was purchased. As evidence of the date of purchase, please keep the receipt or the warranty card completed by the retailer. -
Page 40: How To Charge Your Sv29 Solar Powered Phone
How to charge your SV29 solar powered phone 1. CHARGING YOUR PHONE Place the phone with keypad down and the solar charger fully exposed to the light in order to charge. In this moment, you can see a small Blue LED flashing from the Torch LED position. This means the phone is being charged by the sunlight. - Page 41 3. CHARGE WHENEVER Charging can happen in multiple instances, whenever you’re not using the phone. Even 5 minutes in the sun will add some charge to your battery. 4. CHARGE EVERY DAY Charge your phone in the sun daily to keep the battery at a good level instead of charging an empty battery back to full twice a week.
- Page 42 5. LOW BATTERY If the battery is low, indicating only one bar, place your phone in the light immediately to ensure continued use of the phone. 6. EMPTY BATTERY Should the phone be unused for a long time, the battery will shut down.
Need help?
Do you have a question about the SV29 and is the answer not in the manual?
Questions and answers