Table of Contents
Advertisement
Quick Links
Operating Instructions
CD Stereo System
SC-PM200
Model No.
Dear Customer
SUPPLIED ACCESSORIES
Thank you for purchasing this system.
Use numbers indicated in parentheses when
For optimum performance and safety,
asking for replacement parts. (Product numbers
read these instructions fully before
correct as of May 2011. These may be subject to
you connect, operate or adjust this
change.)
system.
Keep this manual for future reference.
1 x AC mains lead
1 x FM indoor antenna
(K2CZ3YY00005)
(RSAX0002)
These operating instructions are
applicable to the following system.
1 x Remote control
1 x Antenna plug adaptor
(N2QAYB000639)
(K1YZ02000013)
System
SC-PM200
1 x AM loop antenna
Main unit
SA-PM200
(N1DYYYY00010)
Speakers
SB-PM200
Your system and the illustrations can
look differently.
Do the procedures with the remote
control. You can also use the
buttons on the main unit if they are
the same.
Note:
"EB" on the packaging indicates the United Kingdom.
Panasonic Corporation
Web Site: http://panasonic.net
Pursuant to at the directive 2004/108/EC, article 9(2)
Panasonic Testing Centre
Panasonic Marketing Europe GmbH
RQT9548-1B
Winsbergring 15, 22525 Hamburg, Germany
Back of product
Inside of product
WARNING:
CAUTION!
TO REDUCE THE RISK OF FIRE,
THIS PRODUCT UTILIZES A LASER.
USE OF CONTROLS OR ADJUSTMENTS
ELECTRIC SHOCK OR PRODUCT
DAMAGE,
OR PERFORMANCE OF PROCEDURES
• DO NOT EXPOSE THIS APPARATUS
OTHER THAN THOSE SPECIFIED
HEREIN MAY RESULT IN HAZARDOUS
TO RAIN, MOISTURE, DRIPPING OR
SPLASHING AND THAT NO OBJECTS
RADIATION EXPOSURE.
FILLED WITH LIQUIDS, SUCH AS
DO NOT OPEN COVERS AND DO NOT
VASES, SHALL BE PLACED ON THE
REPAIR YOURSELF. REFER SERVICING
APPARATUS.
TO QUALIFIED PERSONNEL.
• USE ONLY THE RECOMMENDED
ACCESSORIES.
• DO NOT REMOVE THE COVER
The socket outlet shall be installed near the
equipment and easily accessible.
(OR BACK); THERE ARE NO USER
SERVICEABLE PARTS INSIDE. REFER
The mains plug of the power supply cord
SERVICING TO QUALIFIED SERVICE
shall remain readily operable.
To completely disconnect this apparatus
PERSONNEL.
from the AC Mains, disconnect the power
supply cord plug from AC receptacle.
CAUTION!
• DO NOT INSTALL OR PLACE THIS
This product may receive radio interference
UNIT IN A BOOKCASE, BUILT-IN
caused by mobile telephones during use.
CABINET OR IN ANOTHER CONFINED
If such interference is apparent, please
SPACE. ENSURE THE UNIT IS WELL
increase separation between the product
VENTILATED. TO PREVENT RISK OF
and the mobile telephone.
ELECTRIC SHOCK OR FIRE HAZARD
DUE TO OVERHEATING, ENSURE
THAT CURTAINS AND ANY OTHER
THIS UNIT IS INTENDED FOR USE IN
MATERIALS DO NOT OBSTRUCT THE
MODERATE CLIMATES.
VENTILATION VENTS.
• DO NOT OBSTRUCT THE UNIT'S
VENTILATION OPENINGS WITH
MPEG Layer-3 audio coding technology
NEWSPAPERS, TABLECLOTHS,
licensed from Fraunhofer IIS and Thomson.
CURTAINS, AND SIMILAR ITEMS.
• DO NOT PLACE SOURCES OF
NAKED FLAMES, SUCH AS LIGHTED
CANDLES, ON THE UNIT.
• DISPOSE OF BATTERIES IN AN
ENVIRONMENTALLY FRIENDLY
MANNER.
SAFETY PRECAUTIONS
Placement
Foreign matter
Set the system up on an even surface away
Do not let metal objects fall inside the system.
from direct sunlight, high temperatures, high
This can cause electric shock or malfunction.
humidity, and excessive vibration. These
Do not let liquids get into the system. This can
conditions can damage the cabinet and other
cause electric shock or malfunction. If this
components, thereby shortening the service
occurs, immediately disconnect the system
life of the system.
from the power supply and contact your
Place it at least 15 cm away from wall
dealer.
surfaces to avoid distortion and unwanted
Do not spray insecticides onto or into the
acoustical effects.
system. They contain flammable gases which
Do not place heavy items on the system.
can ignite if sprayed into the system.
Voltage
Service
Do not use high voltage power sources. This
Do not attempt to repair this system by
can overload the system and cause a fire.
yourself. If sound is interrupted, indicators fail
to light, smoke appears, or any other problem
Do not use a DC power source. Check the
that is not covered in these instructions
source carefully when setting the system up
occurs, disconnect the AC mains lead and
on a ship or other place where DC is used.
contact your dealer or an authorised service
centre. Electric shock or damage to the
AC mains lead protection
system can occur if the system is repaired,
disassembled or reconstructed by unqualified
Ensure the AC mains lead is connected
persons.
correctly and not damaged. Poor connection
Extend operating life by disconnecting the
and lead damage can cause fire or electric
system from the power source if it is not to be
shock. Do not pull, bend, or place heavy items
used for a long time.
on the lead.
Grasp the plug firmly when unplugging the
lead. Pulling the AC mains lead can cause
electric shock.
Do not handle the plug with wet hands. This
can cause electric shock.
CAUTION FOR AC MAINS LEAD
For your safety, please read the following text
WARNING: DO NOT CONNECT EITHER
carefully.
WIRE TO THE EARTH TERMINAL WHICH
IS MARKED WITH THE LETTER E, BY
This appliance is supplied with a moulded
THE EARTH SYMBOL
three pin mains plug for your safety and
GREEN OR GREEN/YELLOW.
convenience.
A 5-ampere fuse is fitted in this plug.
EB
En
THIS PLUG IS NOT WATERPROOF—KEEP
Should the fuse need to be replaced please
DRY.
ensure that the replacement fuse has a rating
Before use
of 5-ampere and that it is approved by ASTA
Remove the connector cover.
or BSI to BS1362.
How to replace the fuse
Check for the ASTA mark
or the BSI mark
The location of the fuse differ according to
on the body of the fuse.
L0511LL1061
the type of AC mains plug (figures A and B).
If the plug contains a removable fuse cover
Confirm the AC mains plug fitted and follow
you must ensure that it is refitted when the
the instructions below.
fuse is replaced.
Illustrations may differ from actual AC mains
If you lose the fuse cover the plug must not be
plug.
used until a replacement cover is obtained.
A replacement fuse cover can be purchased
from your local dealer.
1. Open the fuse cover with a screwdriver.
CAUTION!
Figure A
IF THE FITTED MOULDED PLUG IS
UNSUITABLE FOR THE SOCKET
OUTLET IN YOUR HOME THEN THE
FUSE SHOULD BE RE MOVED AND THE
PLUG CUT OFF AND DIS POSED OF
SAFELY.
THERE IS A DANGER OF SEVERE
ELECTRICAL SHOCK IF THE CUT
OFF PLUG IS IN SERTED INTO ANY
13-AMPERE SOCKET.
2. Replace the fuse and close or attach the
If a new plug is to be fitted please observe the
fuse cover.
wiring code as stated below.
If in any doubt please consult a qualified
Figure A
electrician.
IMPORTANT
The wires in this mains lead are coloured in
accordance with the following code:
Blue: Neutral, Brown: Live.
As these colours may not correspond with the
Fuse (5 ampere)
coloured markings identifying the terminals in
your plug, proceed as follows:
The wire which is coloured Blue must be
connected to the terminal which is marked
with the letter N or col oured Black or Blue.
The wire which is coloured Brown must be
connected to the terminal which is marked
with the letter L or coloured Brown or Red.
Sales and Support Information
Customer Care Centre
• For customers within the UK: 0844 844 3852
• For customers within Ireland: 01 289 8333
• Visit our website for product information
www.panasonic.co.uk
• E-mail: customer.care@panasonic.co.uk
Direct Sales at Panasonic UK
• For customers: 0844 844 3856
• Order accessory and consumable items for your product with ease and confidence by phoning
our Customer Care Centre Monday–Thursday 9:00 a.m.– 5:30 p.m., Friday 9:30 a.m.– 5:30 p.m.
(Excluding public holidays).
• Or go on line through our Internet Accessory ordering application at www.pas-europe.com.
• Most major credit and debit cards accepted.
• All enquiries transactions and distribution facilities are provided directly by Panasonic UK.
• It couldn't be simpler!
• Also available through our Internet is direct shopping for a wide range of finished products, take
a browse on our website for further details.
Information for Users on Collection and Disposal of Old Equipment and used Batteries
These symbols on the products,
packaging, and/or accompanying
documents mean that used
electrical and electronic products
and batteries should not be mixed
with general household waste.
For proper treatment, recovery
and recycling of old products and
used batteries, please take them
to applicable collection points,
in accordance with your national
legislation and the Directives
2002/96/EC and 2006/66/EC.
By disposing of these products
and batteries correctly, you will
help to save valuable resources
and prevent any potential
negative effects on human
health and the environment
which could otherwise arise from
inappropriate waste handling.
For more information about
collection and recycling of old
products and batteries, please
contact your local municipality,
your waste disposal service
or the point of sale where you
purchased the items.
Penalties may be applicable for
incorrect disposal of this waste,
in accordance with national
legislation.
1
PREPARING THE REMOTE CONTROL
OR COLOURED
CAUTION!
• Do not break open or short-circuit the battery.
• Do not charge the alkaline or manganese
battery.
• Do not use the battery if the cover has peeled
off.
• Do not heat or expose to flame.
R6/LR6, AA
• Do not leave the battery(ies) in an automobile
(not included)
exposed to direct sunlight for a long period of
time with doors and windows closed.
Use alkaline or manganese battery.
• Mishandling of battery can cause electrolyte
Install the battery so that the poles
leakage, which can cause a fire.
(+ and –) align with those in the remote
• Remove the battery if you do not use the
control.
remote control for a long period of time. Keep in
a cool, dark area.
Point the remote control at the remote
control sensor, away from obstacles, at a
maximum range of 7 m directly in front of
Figure B
the main unit.
Fuse cover
CAUTION!
Danger of explosion if battery is incorrectly replaced. Replace only with the same or
equivalent type recommended by the manufacturer. Dispose of used batteries according to
the manufacturer's instructions.
4
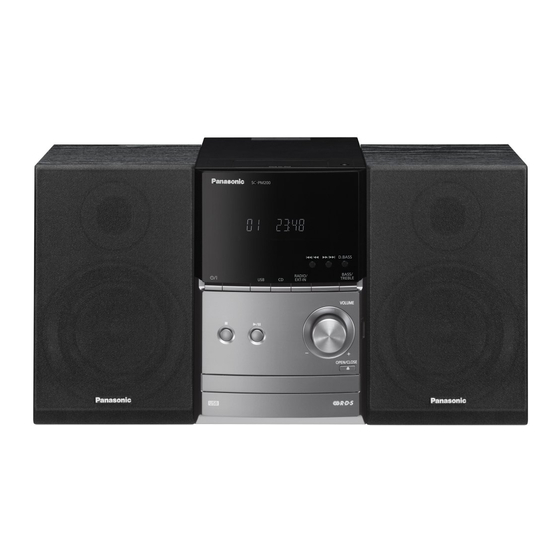
OVERVIEW OF CONTROLS
Figure B
Refer to the numbers in parentheses for chapter
references.
SLEEP
PLAY
I
A
Standby/on switch [`], [1] (8, 13)
A
Press to switch the unit from on to standby mode
J
or vice versa. In standby mode, the unit is still
Fuse (5 ampere)
consuming a small amount of power.
B
K
Numeric buttons [1 to 9, 0, ≧10]
B
To select a 2-digit number
Example: 16: [≧10] → [1] → [6]
C
L
EXT-IN
Delete a programmed track (5)
C
D
Select source
D
[USB]: Select USB (6)
E
[CD]: Select disc (5)
[RADIO, EXT-IN] / [RADIO/EXT-IN]:
Select radio, USB or music port (7, 10, 11)
SOUND
Basic operation
D.BASS
E
PRESET EQ
F
[4/9]: Playback or pause operation
[8]: Stop playback
M
[2], [6]: Skip track
G
N
[3], [5]: Search track
O
DISPLAY
[2/3], [5/6]:Skip and search track
DIMMER
AUTO OFF
P
H
Select the sound effects (9)
F
Auto preset the radio station (7)
G
View the information shown on the display panel
H
Decrease the brightness of the display panel
Press and hold the button to use this function.
To cancel, press and hold the button again.
2
PLACEMENT OF SPEAKERS
For business users in the
European Union
If you wish to discard electrical
and electronic equipment, please
contact your dealer or supplier for
further information.
[Information on Disposal in
other Countries outside the
European Union]
These symbols are only valid in
the European Union. If you wish
The right and left speakers are the same.
to discard these items, please
contact your local authorities or
You cannot remove the net of the speakers.
dealer and ask for the correct
method of disposal.
Use only the supplied speakers.
The combination of the main unit and
Note for the battery symbol
speakers give the best sound.
(bottom two symbol examples):
You can cause damage to the system and
This symbol might be used in
decrease the sound quality if you use other
combination with a chemical
speakers.
symbol. In this case it complies
with the requirement set by
CAUTION!
the Directive for the chemical
• Use the speakers only with the recommended system. If not, you can cause
involved.
damage to the amplifier and speakers and can cause a fire. Consult an approved
service personnel if damage occurs or if there is a sudden apparent change in
performance.
• Do the procedures included in these instructions when you attach the speakers.
3
MAKING THE CONNECTIONS
Conserving power
The system consumes approximately 0.2 W when it is in standby mode. Disconnect the power
supply if you do not use the system.
Some settings will be lost after you disconnect the system. You have to set them again.
1
2
3
B
B
A
A
To household
mains socket
Black
Red
Click!
1
Connect the speakers.
Be careful not to cross
(short-circuit) or reverse
the polarity of the
speaker wires as doing
so may damage the
speakers.
Set the sleep timer (8)
I
Set the clock and timer (8)
Set the program function (5, 7)
J
Adjust the volume of the system
K
Mute the sound of the system
L
Press the button again to cancel.
"MUTE" is also cancelled when you adjust the
volume or when you switch off the system.
Set the play menu item (5)
M
Set the radio menu item (7)
N
[R, T]: Skip album
O
Adjust clock setting
[Y, U]: Select the item in the menu
[OK]: Confirm the setting
Automatically switch off the system
P
This function switches off the system (except in
radio source) if you do not use the system for
approximately 30 minutes.
To cancel, press the button again.
Select preset radio station
Music port jack (10)
Q
Tune in to the radio station
Headphones jack ( ) (10)
R
Select preset radio station
Display panel
S
USB port (
) (6)
T
Open or close the disc tray
U
Disc tray
V
Remote control sensor
W
Note:
• Keep your speakers more than 10 mm
from the main unit for ventilation.
• Put the speakers on a flat safe surface.
• These speakers do not have magnetic
shielding. Do not put them near TVs, PCs
or other equipment easily influenced by
magnetism.
• When you play at high levels for a long
period, it can cause damage to the system
and decrease the life of the system.
• Decrease the volume in these conditions to
prevent damage:
– When you play distorted sound.
– When you adjust the sound quality.
2
Connect the FM indoor antenna.
Place the antenna where reception is
best.
Using an outdoor antenna (optional)
4
• Use FM outdoor antenna only if the
radio reception is poor.
• Use the included antenna plug adaptor
to connect the FM outdoor antenna.
• The antenna should be installed by a
competent technician.
• Do not use the outdoor antenna during
a lightning storm.
3
Connect the AM loop antenna.
4
Connect the AC mains lead.
READ THE CAUTION FOR AC MAINS
LEAD BEFORE CONNECTION.
Use the included AC mains lead with this
system only.
Do not use an AC mains lead from other
equipment.
Q
MUSIC P.
Top view
R
S
W
E
F
A
D
K
T
E
U
V
Advertisement
Table of Contents

Related Manuals for Panasonic SC-PM200


Summary of Contents for Panasonic SC-PM200
- Page 1 Remote control sensor ENVIRONMENTALLY FRIENDLY Press and hold the button to use this function. • All enquiries transactions and distribution facilities are provided directly by Panasonic UK. To cancel, press and hold the button again. MANNER. • It couldn’t be simpler! •...
-
Page 2: Troubleshooting
• This system can fail to play some CD-R/RW CLOCK AND TIMERS because of the condition of the recording. When other Panasonic equipment responds to the remote control of this system, change the 1- ALBUM Play all tracks in one remote control code for this system.
Need help?
Do you have a question about the SC-PM200 and is the answer not in the manual?
Questions and answers