Table of Contents
Advertisement
Quick Links
Advertisement
Table of Contents

Related Manuals for Mvix MvixPVR


Summary of Contents for Mvix MvixPVR
-
Page 1: User Guide
MVIX PVR Player Ver 2.0 User Guide www.mvix.net Unicorn Information System... -
Page 2: Safety Notes
Safety Notes Unicorn Information System... - Page 3 Safety Notes Unicorn Information System...
-
Page 4: Table Of Contents
Table of Contents Safety Notes About Product Notes Specifications Components Hardware Installation Connection Remote Controller Functions Chapter 1. PVR Setting 1) HDD Formatting 2) Language/ Resolution/ Time Setting in Wizard 3) Network Setting in Wizard Summary of Main Menus Chapter 2. Major Functions 1) MEDIAPLAY 1-1 Music 1-2 Photo... - Page 5 1-2 Delete Timer 1-3 Timer Status Change 1-4 Timer History 2) File Manager 2-1 Copy Function 3) Mvix Live Function Search Movies in You Tube Picasa Function 4) UPnP Server Function (LCD/ iPod Update) Chapter 4. Media Environment Setting 1) Language Setting...
-
Page 6: About Product
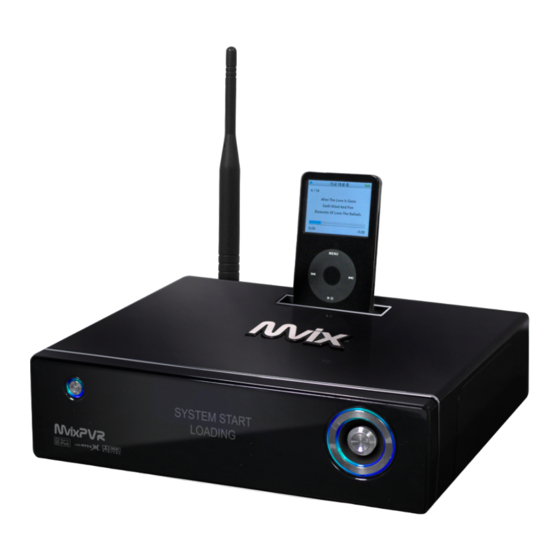
UPnP client. The built in iPod dock makes it possible to use your iPod on the MvixPVR. When using a iPod that that sup ports TV-OUT function you can easily display your iPod video content on your TV. Ipod recording and chargi ng functions are also supported. - Page 7 About Product Unicorn Information System...
-
Page 8: Notes
Do not leave product near highly magnetic objects. This may lead to data loss and breakdown of product. Connect all cables when power to MvixPVR and TV is turned off. Mvix can be used as a multimedia player and a mobile disk when connected to PC. -
Page 9: Specifications
Specifications Coaxial terminal Unicorn Information System... - Page 10 Specifications Specifications Product Name MvixPVR Operating System Linux Recording Partition : UDF (UNIX file system) File Format File Partition : FAT32 / NTFS Recording HQ, SP,LP,EP,SLP Mode Encoding Video MPEG II (PAL 720x576, 352x576 / NTSC 720x480, 352x480) (Recording) Audio...
-
Page 11: Components
Components MvixPVR R2 Remote Control 5dBi Antenna HDMI Cable A/V Cable Power Adaptor Power Cable USB Cable User Manual Driver CD HDD Guard HDD Fixing Screw AAA Battery Unicorn Information System... -
Page 12: Hardware Installation
3. Separate the HDD guard from the main body of 4. Connect the HDD guard and SATA HDD MvixPVR. as shown in the picture. Fasten screws. HDD connection terminal must be on the left. - Page 13 5. As shown above, slowly push the HDD guard togeth 6. Install power cable and SATA cable to the mounted er with the SATA HDD into the main body of MvixPVR. hardware. 7. When hardware mounting is completed, close the c 8.
-
Page 14: Connection
IPTV Set Top Box Input Device Connection Only composite connection input is possible. Therefore, composite input terminal must be connected to Mvix in the set top box. In set top box, connect yellow cable for video signal as well as red and white cables for audio signal output. - Page 15 HDMI and Composite Output Connection Composite Cable Connection Connect yellow cable for video signal to the terminal located at the back of side of TV. T hen, select external input of TV. Connect the remaining red and white terminal cables to the left/ right and audio output terminal at the back of the device. Th en, connect red and white cables to the left/ right terminal of DTV input or com ponent audio input located at the back of digital TV.
- Page 16 Coaxial Cable Connection You can enjoy high-quality sound 5.1CH if the audio device is an amplifier or a receiver with coaxial cable input terminal. Connect coaxial cable to Coaxial of Mvix as shown above. Then, connect amplifier or receiver to enjoy 5.1CH.
-
Page 17: Remote Controller Functions
Remote Controller Functions Unicorn Information System... - Page 18 Remote Controller Functions Button Function POWER: To turn on/ off power or stand-by mode LIBRARY: Shortcut to LIBRARY menu VIDEO IN: Shortcut to DIGITAL RECORDER menu NUMBER BUTTON: To press buttons for numbers 0 ~ 9 TVOUT: Shortcut to HOME (menu) screen when playing DVD file ...
- Page 19 Remote Controller Functions Button Function PREVIEW: To turn on/ off preview screen automatically displayed in media play file search mode Shuffle: To change play sequence to shuffle (for iPod only) SETUP: Function available when playing media file or using menu’s in VIDEO IN screen To display various setup screens MVIXLIVE: Shortcut to MVIXLIVE menu RECORDINGS: Shortcut to RECORDINGS menu...
-
Page 20: Chapter 1. Pvr Setting
Chapter 1. PVR Setting 1)HDD Formatting To use product, connect HDD and format it by using automatic format menu. (HDD formatted in Windows is formatted again.) After mounting HDD in PVR, move to SETUP->SYSTEM menu. Select “HDD Format” menu to display submenus. *Note: Formatting erases all files saved in HDD and the files cannot be restored. - Page 21 Chapter 1. PVR Setting 3. Adjust the second stage of multimedia and recording. Capacity allocated to multimedia is divided again in FAT32 and NTFS, the next stage of Windows file system. After setup, select ‘Next’. Default: 10% , Min.: 10% file system UNIX (UDF) A: Recording disc space B: Multimedia space 4.
- Page 22 Chapter 1. PVR Setting 5. When setup is finished, select ‘Format’ and press ‘Enter’ to proceed formatting. Do not turn off or adjust power of product while formatting is in progress. This may cause breakdown of HDD. 6. When message informing format completion is displayed, press ‘OK’. Rebooting is automatically carried out. When rebooting is completed, HDD initialization is completed.
-
Page 23: Language/ Resolution/ Time Setting In Wizard
Chapter 1. PVR Setting 2) Language/ Resolution/ Time Setting in Wizard 1. When HDD is formatted, initial setup screen is displayed as shown in the picture. Select the language used and press OK.. 2. Set current date and time by pressing up/ down button. -
Page 24: Network Setting In Wizard
Chapter 1. PVR Setting 3) Network Setting in Start Wizard 1. Select the method to connect wired LAN to network. DHCP IP automatically allocates IP address. 2. To set static IP address and allocated them, make and save input by using number keys in remote controller. -
Page 25: Summary Of Main Menus
Without the complication of having to copy files between storage devices by connecting them to your PC, you can copy files using USB/ HDD/ NET from PC to HDD, from USB storage device to HDD or from MvixPVR to network - connected PC. -
Page 26: Chapter 2. Major Functions
Chapter 2. Major Functions 1) MEDIA LIBRARY 1-1. Music Unicorn Information System... -
Page 27: Photo
Chapter 2. Major Functions 1-2. Photo Unicorn Information System... -
Page 28: Movie
Chapter 2. Major Functions 1-3. Movie Preview On/ Off Setup In video list, preview setting is turned on as default. This results in preview loading time due to automatic preview setup at moving of files. If you do not want this, make sure to turn off this setup. If not using preview function, file name can be written with as many as approximately 70 letters. - Page 29 Chapter 2. Major Functions 1-3. This menus displays only the movie files. Supporting quick preview function, this menus enables you to check before playing files. You can change and apply setup by entering setup menu while various files (media file, etc.) are being played.
-
Page 30: Network Share Folder And Mvixfts
Chapter 2. Major Functions 1-4. Network Share Folder and Using MvixFTS Unicorn Information System... - Page 31 Chapter 2. Major Functions “ “ Unicorn Information System...
- Page 32 Chapter 2. Major Functions Using MvixFTS program included in product, you can enjoy watching movies that are not supported by self-play, such as MKV/WMV/MOV and RMVB, etc. In case of MKV, self-play function is supported. However, in case of H D level (x.264) MKV CODEC, play is only possible by using MvixFTS.
-
Page 33: My List Function
2. Connect to UPNP Media Server and click My List button. Then, select the file to be added to My List. My List moved can be i mmediately checked in MvixPVR ※ Refer to UPnP Media Server connection in page 53... -
Page 34: Digital Recorder
Chapter 2. Major Functions 2) Digital Recorder 2-1. Video In Recording Select DIGITAL RECORDER menu to display the Video Input digital media. To record the desired part, press in remote con troller to start recording. Each time the button is pressed, recording time is designated as 30/ 60/ 90/ 120/180/ 240 min./ off. Wh en recording starts, image of REC button is displayed at the top left-hand corner of screen. -
Page 35: Simultaneous Use Of Recording And Media Play
Chapter 2. Major Functions 2-2. Simultaneous Use of Recording and Media Library To check recording status, press INFO in remote controlle r and check save position, quality setting status and recording progress. To stop recording, press ‘ST in remote controller. Press ‘HOME’... -
Page 36: Recordings Library
Chapter 2. Major Functions 3) Recordings Library 3-1. Play Recorded Title In Home screen, select RECORDINGS LIBRARY menu. RECORDINGS LIBRARY menu displays the recorded and saved titles. Select a title and select medium in the left screen to preview the title. Therefore, the saved screen can be checked instantly. In PLAY menu, press to play the selected title file. -
Page 37: Sort Recorded Title
Chapter 2. Major Functions 3-2. Sort Recorded Title Return To return to the previous screen Title Number To sort titles according to title number, the order of recording Recording Time To sort titles according to recording time Title Name To sort titles according to title name Recently Added Tit To sort titles according to the recently added files Unicorn Information System... -
Page 38: Change Name Of Recorded Title
Chapter 2. Major Functions 3-3. Change Name of Recorded Title Name Change Names of titles saved with input line and recording time as defau lt can be changed. Make selection by using buttons of remote controller. Then, press OK to change title name. - Page 39 Chapter 2. Major Functions Thumbnail Setting Set the parts displayed in preview screen. You must press PLAY button at start as it is in temporary stop status. Then, select Confirm and press in remote controller. Cut A-B Zone Set the desired points in the recorded file and delete the designated zone. Designate starting point as SET A and ending point as SET B.
- Page 40 Chapter 2. Major Functions Split A single recorded file is split into two. Move to the part for splitting by pressing PLAY or using forward function. Then, Press OK. The point of split can be accurately designated by using slow button ( Unicorn Information System...
- Page 41 Chapter 2. Major Functions Unicorn Information System...
-
Page 42: Delete Recorded Title
Chapter 2. Major Functions 3-5. Delete Recorded Title Unicorn Information System... -
Page 43: Chapter 3. For Advanced Users
Chapter 3. For Advanced Users 1) TIMER 1-1. Add Preset Recording Unicorn Information System... - Page 44 Chapter 3. For Advanced Users Unicorn Information System...
-
Page 45: Delete Timer
Chapter 3. For Advanced Users 1-2. 1-3. Timer Status Change ‘ ’ ‘ ’ Unicorn Information System... -
Page 46: Timer History
3 Chapter 3. For Advanced Users 1-3. Unicorn Information System... -
Page 47: File Manager
Chapter 3. For Advanced Users 2) FILE MANAGER 1-1. Copy Function Unicorn Information System... - Page 48 Chapter 3. For Advanced Users Unicorn Information System...
-
Page 49: Mvix Live Function
Chapter 3. For Advanced Users 3) MVIX LIVE How to Use You Tube Select You Tube in MvixLive. Search/ Recent contains 9 You Tube files, such as Added UCC/ Recommended UCC/ Favorite UCC/ Frequ ently Viewed UCC, etc. Connection may be disabled if link is not normal or blocked. MvixLIVE menu is subject to change according to manufacturer’s conditions. -
Page 50: Search Movies In You Tube
Chapter 3. For Advanced Users <Screen for Keyboard Input> <Screen for Pre-defined Keyword> Search Video in You Tube Select Search. When keyboard input window is displayed, search the desired file name. Or, the pre-defined contents can be searched by using Keyword. Currently, only English input is supported in MvixLIVE. However, you can search files conveniently as Keyword function processes inputs made in Korean and other languages. -
Page 51: Picasa Function
<Selecting Search Keyword or ID Search> 1. Select search keyword or Picasa ID search in the menu displayed after selecting Picasa menu. Select ID search and search MvixLive ID set as default to check the latest manual of MvixPVR. Unicorn Information System... - Page 52 Chapter 3. For Advanced Users <Screen for Search Keyword Input> <Screen Displaying the Searched Image> 2. Enter the words to be searched in the screen keyboard and select OK. Wait for the searched screen. <Image Screen Output> <Using Image Enlargement Function> Slide and enlarged view functions let you view the searched images and photos uploaded into your own account.
- Page 53 Activate Mvix PVR UPnP function through the above sequence. In SYSTEM SETUP -> NETWORK, enter the allocated IP address for connection to MvixPVR UPnP Server. By using the free DDNS of www.mvix.net, you can connect to the MvixPVR anywhere, anytime.
- Page 54 Chapter 3. For Advanced Users 4. You can directly connect to MvixUPnP in the Windows as the intrinsic function of UPnP. <Screen for Windows Vista Network> 5. Check in My Computer => network or click Network in the background screen to display the icon shown above.
-
Page 55: Upnp Server Function (Lcd/ Ipod Update)
7000 to 9999. Ex) Presuming MvixPVR IP: 192.168.123.37, Port No.: 8888 and DDNS: mvixpvr, activate setup by connecting to sharer setup and entering 9999 port applied in UPnP and the IP of MvixPVR to port forwarding function. When all setups are successfully completed, you can connect to the address of ‘... - Page 56 Also, you can use the WMP/GOM/VLC applications in UPnP itself. For stability of MvixPVR Media Player, maximum speed of up/ download must not exceed 1.4MB/s. Note that UPnP File Manager function can only be used in FAT32 disc. Unicorn Information System...
-
Page 57: Chapter 4. Media Environment Setting
Chapter 4. Media Environment Setting 1) Language Setting Unicorn Information System... -
Page 58: Audio Setting
Chapter 4. Media Environment Setting 2) Audio Setting 3) Video Setting Unicorn Information System... - Page 59 Chapter 4. Media Environment Setting Repeating TV – OUT with Remote Controller HDMI Connection: Repeating 480P (576P) -> 720P -> 1080i -> 480P… (automatic PAL/ NTSC recognition) Composite/ Component Connection: Repeating NTSC -> PAL -> 480P -> 576P -> 720P -> 1080i -> NTSC… Unicorn Information System...
-
Page 60: Rec Setting
Chapter 4. Media Environment Setting 4) REC Setting Average Resolution Resolution Bitrates Recording Mode Audio Format (PAL) (NTSC) (Video) High Quality 1,096 KB/s 720x576 720x480 48KHz stereo, 256Kbps Standard Play 549 KB/s 720x576 720x480 48KHz stereo, 256Kbps Long Play 355 KB/s 720x576 720x480 48KHz stereo, 256Kbps... - Page 61 Chapter 4. Media Environment Setting Unicorn Information System...
-
Page 62: Network Setting
Chapter 4. Media Environment Setting 5) Network Setting Unicorn Information System... -
Page 63: Wireless Network
Chapter 4. Media Environment Setting Unicorn Information System... -
Page 64: System Setting
Chapter 4. Media Environment Setting Unicorn Information System... - Page 65 Update is administered only when copying firmware to a root that is not located at the lower position of a folder in USB flash memory (Ex.: D:\). Visit our website (http://www.eunicorn.co.kr http://www.mvix.net ) for more details on firmware download and update. Cooling Fan Speed Control Cooling Fan Speed: Fan speed can be adjusted in 3 levels.
-
Page 66: Other Settings
Chapter 4. Media Environment Setting 7) Other Settings Unicorn Information System... - Page 67 Chapter 4. Media Environment Setting Play List: This function can be used by connecting to UPnP Media Server. M usic files listed as favorites in My List of Media Library are played t ogether with slide show. Unicorn Information System...
-
Page 68: Chapter 5. Mvixfts Use And Share
Chapter 5. MvixFTS Use and Share This function is limited to movie sources saved in PC r ather than H.264 files saved in HDD built ins ide MvixPVR. ‘Start Unicorn Information System... -
Page 69: Windows Xp Share Folder Setting
Chapter 5. MvixFTS Use and Share If the share folder added is not displayed, click Add and set the corresponding folder. In some virus vaccines, firewall function disables streaming. Make sure to clear firewall before use. 2) Windows XP Share Folder Setting Unicorn Information System... -
Page 70: Change/ Give Power For Windows Xp Share Folder (Copy Function)
Chapter 5. MvixFTS Use and Share 3) Change/ Give Power for Windows XP Share Folder ‘ ’ ‘ ’ ‘ ’ Note Unicorn Information System For operation test of MvixFTS program, we guarantee operation in operation system with the latest security patch of Win dows XP SP3 and Vista SP1. - Page 71 Chapter 5. MvixFTS Use and Share 4) Windows Vista Share Folder Setting ‘ ’ ‘ ’ Unicorn Information System...
- Page 72 Chapter 5. MvixFTS Use and Share ‘ ’ ‘ ’ ‘ ’ ‘ ’ ‘ ’ Unicorn Information System...
- Page 73 Chapter 5. MvixFTS Use and Share ‘ ’ ‘ ” Unicorn Information System...
- Page 74 Chapter 5. MvixFTS Use and Share 5) Change/ Give Power for Windows Vista Share Folder (Copy Function) ‘ ’ ‘ ’ ※ If file is not visible in Windows Vista, check setups as of the following. In Control Panel -> Network and Share Center, check setups for ‘Use File Sharing’ and ‘Not Using Share Protected with Encryption’ as of t he above.
- Page 75 Chapter 6. iPod Control ® ® ‘ ’ Unicorn Information System...
- Page 76 Or, keep the receipt of purchase and submit it together wit h service application. In case it is impossible to locate the date of purchase, warranty period is calculated from the day 2 months after the manufacturing date of this product. HD Multimedia Player Mvix (MvixPVR) Tel. Customer E-mail Details...
Need help?
Do you have a question about the MvixPVR and is the answer not in the manual?
Questions and answers