Table of Contents
Advertisement
About the Velocity Control Function
The MX-200's organ tones play at a set volume level, regardless of how forcefully the keys are pressed
(Velocity Control: OFF). This is the setting for normal use.
Switching the Velocity Control function on allows you to adjust the volume level so to obtain a balance in
volume between the organ's own tones and the MX-200's organ tones*.
* Tones in the Classic Organ Category (FLUE, REED, MIXTURE, CELESTE, PEDAL, THEATER, ENSEMBLE)
and E.ORGAN Category.
This function applies velocity (which changes the volume in response to the force used to press the keys)
to tones that are not natively velocity-responsive. Use of this function allows you to adjust the volume of
the selected tone using the Rodgers organ coupler function (Velocity Level).
Turning the MX-200's Velocity Control On and Off
1.
Hold down the [VOLUME] knob and press the [VALUE] knob to enter Edit mode.
The "EDIT" MODE indicator lights.
2.
Turn the [TONE CATEGORY] knob to select "CELESTE (SETUP MODE)."
The "SETUP" MODE indicator lights.
3.
Turn the [PART] knob to select "10 (VELOCITY CONTROL)."
4.
Turn the [VALUE] knob to select "ON."
5.
Press the [VALUE] knob to set (write) the value.
6.
Press the [VOLUME] knob to exit Edit mode.
Adjusting the Organ Velocity Level
The following is a description of this procedure using the Rodgers Model 795 organ. The procedure used
for other models is roughly the same.
Before you start, you will need to make the required MIDI coupler settings.
1.
Hold down the organ's [SET] piston and turn the [SELECT] knob to the right to display the following
screen.
MIDI ___
VEL: ___
2.
Turn the organ's [SELECT] knob to move the cursor to "VEL."
3.
Turn the organ's dial to adjust the volume.
The value set here (2–127) is transmitted to the MX-200 as the fixed velocity value used while performing.
4.
Press the organ's CANCEL (0) piston to quit the setting.
MX-200 LEAFLET
CH _
_____
As this procedure sets the volume at a fixed, constant level, regardless of the force used in
pressing the keys, the level of expressiveness in the sound is more controlled. Use this
function only when you find you cannot achieve a proper tone balance while performing.
03784967
1PD
Advertisement
Table of Contents

Subscribe to Our Youtube Channel
Related Manuals for Rodgers MX-200

Summary of Contents for Rodgers MX-200
- Page 1 About the Velocity Control Function The MX-200’s organ tones play at a set volume level, regardless of how forcefully the keys are pressed (Velocity Control: OFF). This is the setting for normal use. Switching the Velocity Control function on allows you to adjust the volume level so to obtain a balance in volume between the organ’s own tones and the MX-200’s organ tones*.
- Page 2 “Basic Operation” (p. 9) and “Advanced Ways to use” (p. 13). For instructions on connecting the MX-200 to your organ, please read from “Setting up your MX-200” on p. 17 and “Adjusting your Organ” on p. 22.
-
Page 3: Using The Unit Safely
For the U.K. IMPORTANT: THE WIRES IN THIS MAINS LEAD ARE COLOURED IN ACCORDANCE WITH THE FOLLOWING CODE. BLUE: NEUTRAL BROWN: LIVE As the colours of the wires in the mains lead of this apparatus may not correspond with the coloured markings identifying the terminals in your plug, proceed as follows: The wire which is coloured BLUE must be connected to the terminal which is marked with the letter N or coloured BLACK. - Page 4 101b • Do not allow any objects (e.g., flammable material, • The unit and the AC adaptor should be located so coins, pins); or liquids of any kind (water, soft their location or position does not interfere with drinks, etc.) to penetrate the unit. their proper ventilation.
-
Page 5: Important Notes
IMPORTANT NOTES Maintenance 291a In addition to the items listed under “USING THE UNIT SAFELY” on page 2, please read and observe the 401a • For everyday cleaning wipe the unit with a soft, dry cloth following: or one that has been slightly dampened with water. To remove stubborn dirt, use a cloth impregnated with a Power Supply mild, non-abrasive detergent. -
Page 6: Table Of Contents
Connecting to the Organ ......................... 18 When Connecting Only the MX-200 ..................18 When Using the MX-200 Connected to an MR-200..............19 When Using the MX-200 Connected to a PR-300S ..............20 Tuning the Power ON/OFF........................21 Turning On the MX-200 ....................... 21 Turning Off the MX-200 ....................... - Page 7 Making USB and MIDI Related Settings ................... 25 Checking the Program Version ....................25 Using the MX-200 as a General MIDI 2/GS Sound Module .............. 26 Entering GM2 Mode ........................26 Initializing the Sound Generator for General MIDI System Basic Settings ......26 Preventing the MX-200 From Switching to GM2 Mode ..............
-
Page 8: Main Features
Compatible with GM Level 2 System The MX-200 is compatible with the GM Level 2 tone map, meaning you can play back performance data from the original PR-300S without problems. Can Be Used in Combination with the MR-200 Sequencer The MR-200 is a sequencer for use with organs. -
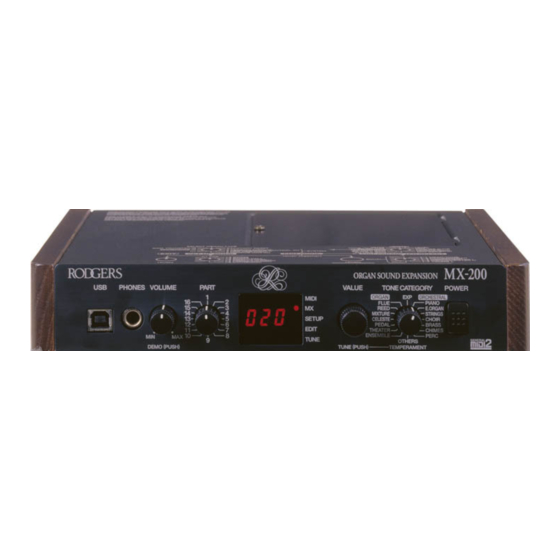
Page 9: Panel Descriptions
Pressed to switch the power on and off. fig.FrontPanel Rear Panel fig.RearPanel 1. USB Connector This connector is used for servicing of the MX-200. It is not used in ordinary operation. 2. PHONES Jack 1. AC Adaptor Jack This is the jack for connecting headphones (sold separately). -
Page 10: Basic Operation
Turning the Power ON/OFF Changing the Mode ■ Turning On the Power You can use the MX-200’s panel controls to switch among six modes. The modes have the following functions. * Once the connections have been completed (pp. 18–20), turn MX Mode on power to your various devices in the order specified. -
Page 11: Playing The Mx-200'S Sounds From The Organ
Example: If you are using a T797 organ, the MX-200’s Part 1 is played when the MIDI GT A piston is on. With Rodgers organs, MIDI Channels 12–16 are used to output the performance data from the organ itself. -
Page 12: Switching Tones With The Mx-200
Switching Tones with the Adjusting the Master tuning MX-200 on the MX-200 Now try using the MX-200 to switch the MIDI coupler tones. When adjusting the organ’s tuning, the MX-200’s tuning must also be changed to the same value. Matching the tuning fig. -
Page 13: Selecting Temperament On The Mx-200
MX-200. In such instances, you may would be performed in Equal temperament, and this find it better not to add much reverb to the MX-200’s sounds. temperament is used today for almost all keyboard instruments. -
Page 14: Advanced Ways To Use
200’s STRINGS category. To select the “MX Strings” tone, you will need to set PC: 113, MSB: 93, and LSB: 126 The tones contained in the MX-200 can be selected with the (alternatively, you can select this with PC: 50, MSB: 65, and numbers indicated in the tone map by means of Program LSB: 0). -
Page 15: Switching Tones From The Organ Keyboard
The MIDI coupler lamp flashes, and the selected tone is enabled. With the MX-200, tones in the Tone List (p. 28) appended Play a key on the keyboard. with (*1) are linked with the organ, so the tremulant effect... -
Page 16: Using Srx Wave Expansion Boards
Using SRX Wave Expansion Expansion Board Boards Before installing the Wave Expansion Board, The MX-200 is equipped with one “slot,” which accepts a switch off the power to the MX-200 and any Roland SRX Series Wave Expansion Board. Installing a Wave connected equipment. -
Page 17: Check To Make Sure The Board Has Been Installed Properly
→ When you have a Wave Expansion Board installed, “roland The MX-200 may not function as a GS/GM sound module MX-200” is displayed when you turn on the power, and then when RECEIVE GM2 ON (p. 25) is set to OFF. -
Page 18: Setting Up Your Mx-200
■ Attaching the Rubber feet Remove the four screws securing the side boards. Attach the rubber feet that were supplied with the MX-200, Place the supplied brackets between the side as shown in the figure. Use the small holes on the bottom as a boards and the instrument and secure with the guide for positioning the rubber feet when attaching them. -
Page 19: Connecting To The Organ
MX-200. This The MX-200’s headphone output allows you to hear only the feature allows you to turn on the power to the MX-200 and sounds made by the MX-200 itself. Use the organ’s the organ simultaneously. -
Page 20: When Using The Mx-200 Connected To An Mr-200
MR-200. external devices. You can use this to supply power to the MX-200. This feature allows you to turn on the power to the MX-200 and the MR-200 simultaneously. A Rodgers organ is capable of powering only one external device. -
Page 21: When Using The Mx-200 Connected To A Pr-300S
Set the MX-200’s Tuning (p. 11) to 440.0 Hz. • You cannot record performances in SMF format, nor can • Set the MX-200’s RECEIVE GM2 ON (p. 25) setting to OFF. → Preventing the MX-200 From Switching to you play back SMF data. •... -
Page 22: Tuning The Power On/Off
Restoring the Factory Settings (Factory Reset) ■ Turning On the MX-200 When using the MX-200 for the first time, reset the unit to its original factory settings. Once the connections have been completed (pp. 18–20), turn The following procedure resets all of the settings stored in on power to your various devices in the order specified. -
Page 23: Adjusting Your Organ
This procedure is used to fine-tune the frequency response of are using. the sounds output by the MX-200 in accordance with your setup. These are system-wide adjustments made to the entire MX- Making Original Settings 200. -
Page 24: Settings For Each Individual Part
This setting determines whether sounds in each part are muted (ON), or played (OFF). Rodgers organs feature 12 to 16 parts that are used in exchanging performance data. We recommend that these parts be muted to prevent their sounds from being played. -
Page 25: Storing The Settings Within The Mx-200 (Write Operation)
If the indicator does not flash, it may be due to a mistake in the connections or in the sequencer settings. This describes how to connect a sequencer to the MX-200 and * Play back the settings at the same tempo used during record the MX-200’s settings to the sequencer. -
Page 26: Other Settings
PR-300S. * With these parameters, changes in the settings are not reflected until the power is turned off and then on again. Furthermore, only the MX-200 can be used to make the settings. ■ Checking the Program Version... -
Page 27: Using The Mx-200 As A General Midi 2/Gs Sound Module
The unit switches from GM2 mode to MX mode. Press [VALUE]. * The MX-200 does not remember that it has been placed in The GS RESET, GM SYSTEM ON, and GM 2 SYSTEM GM2 mode. The instrument automatically reverts to MX ON MIDI messages will not be received. -
Page 28: Bank Select And Program Change Correspondence Chart
Bank Select and Program Change Correspondence Chart Bank Select Tone Group 0–63 – 001–128 GS Tones 001–128 Quick Key Map [Capitol Tones] 001–128 Quick Key Map [Variation 1] 001–128 Quick Key Map [Variation 2] 001–128 Quick Key Map [Variation 3] 001–128 Quick Key Map [Variation 4] –... -
Page 29: Tone List
Tone List Organ/Orchestral Tones FLUE PEDAL No. PC MSB LSB Tone Name MSB LSB No. PC MSB LSB Tone Name MSB LSB 93 126 32' Contre Geigen 93 126 32' Untersatz 93 126 16' Montre 93 126 32' Posaune 93 126 16' Pommer 93 126 32' Contra Violone... - Page 30 Tone List STRINGS 93 127 Mild Trombone 93 127 Trombone 93 127 MX Tuba No. PC MSB LSB Tone Name MSB LSB 93 127 Full Saxz 001 112 93 126 Expressimo 93 127 Sax Choir 002 113 93 126 MX Strings 93 127 Breathy Sax 003 114...
-
Page 31: Gm (General Midi) Tones
Tone List GM (General MIDI) Tones MSB: 121 Tone Name Tone Name Tone Name Tone Name Piano 1 Chorus Gt. French Horns Sitar Piano 1w Mid Tone GTR Fr.Horn 2 Sitar 2 European Pf Muted Gt. Brass 1 Banjo Piano 2 Funk Pop Brass 2 Shamisen... -
Page 32: Gs Tones
Tone List GS Tones PIANO ORGAN BASS ENSEMBLE PC MSB Tone Name PC MSB Tone Name PC MSB Tone Name PC MSB Tone Name Piano 1 Organ 1 Acoustic Bs Strings Piano 1w Detuned Or1 Fingered Bs Orchestra Piano 1d 60’s Organ1 Picked Bass SlowStrings... - Page 33 Tone List REED SYNTH LEAD ETHNIC, etc PC MSB Tone Name PC MSB Tone Name PC MSB Tone Name PC MSB Tone Name Soprano Sax Square Wave Sitar Gt.FretNoiz Alto Sax Square Sitar 2 Gt.CutNoise Tenor Sax Sine Wave Banjo String Slap BaritoneSax Saw Wave...
- Page 34 Tone List CM-64 (PCM) CM-64 (LA) PC MSB Tone Name PC MSB Tone Name PC MSB Tone Name Piano 2 Acou Piano1 Acou Bass 1 Piano 2 Acou Piano2 Acou Bass 2 Piano 2 Acou Piano3 Elec Bass 1 Honky-tonk Elec Piano1 Elec Bass 2 Piano 1...
-
Page 35: Other Tones
Tone List Other Tones PST-A PST-B MSB: 87, LSB: 64 MSB: 87, LSB: 65 Tone Name Tone Name Tone Name Tone Name Grand XV Warm Vibes Rezodrive Marcato RockPiano Ch Dyna Marimba Hurtin’Tubes String Ens Contemplate Ambient Wood R&R Chunk Marcato Str Hall Grand Nomad Perc... - Page 36 Tone List PST-C PST-D MSB: 87, LSB: 66 MSB: 87, LSB: 67 Tone Name Tone Name Tone Name Tone Name Voyager Brs Velo Tekno Dark Side Dimensional 3 Osc Brass Rezoid Dunes Jupiterings Poly Brass Booster Bips The Beast 3D Flanged Brass It! Mental Chord Ocean Floor...
-
Page 37: Rhythm Set List
Rhythm Set List Organ/Orchestral Group Preset Group (PC: 1) (PC: 2) (PC: 3) (PC: 1) (PC: 2) MX ORCHESTRA MX GS ASSIGN MX MANUAL PERCUSSION XV R&B KIT XV HOUSE KIT Note No. ----- Close HiHat2 ----- ----- ----- ----- Pedal HiHat2 ----- Dance Kick... - Page 38 Rhythm Set List Preset Group (PC: 3) (PC: 4) (PC: 1) (PC: 2) (PC: 3) (PC: 4) XV TECHNO KIT XV POP KIT XV ROCK KIT XV JAZZ KIT XV RUST KIT XV ORCHESTRA KIT Note No. ----- ----- ----- ----- ----- -----...
- Page 39 Rhythm Set List GM2/GS Group (PC: 1) (PC: 1) (PC: 9) (PC: 9) (PC: 17) (PC: 17) GM2 STANDARD GS STANDARD GM2 ROOM GS ROOM GM2 POWER GS POWER Note No. High-Q High Q High-Q High Q High-Q High Q Slap Slap Slap...
- Page 40 Rhythm Set List GM2/GS Group (PC: 25) (PC: 25) (PC: 26) (PC: 26) (PC: 33) (PC: 33) GM2 ELECTRIC GS ELECTRONIC GM2 ANALOG GS TR-808 GM2 JAZZ GS JAZZ Note No. High-Q High Q High-Q High Q High-Q High Q Slap Slap Slap...
- Page 41 Rhythm Set List GM2/GS Group (PC: 41) (PC: 41) (PC: 49) (PC: 49) (PC: 57) (PC: 57) GM2 BRUSH GS BRUSH GM2 ORCHESTRA GS ORCHESTRA GM2 SFX GS SFX Note No. High-Q High Q Close HiHat2 Closed Hi-hat ----- ----- Slap Slap Pedal HiHat2...
- Page 42 Rhythm Set List GM2/GS Group (PC: 128) Note No. GS CM64/32L CM Kick Drum CM Kick Drum CM Rim Shot CM Snare Drum CM Hand Clap CM Electronic Snare Drum CM Acoustic Low Tom CM Closed High Hat CM Acoustic Low Tom CM Open Hi-Hat2 CM Acoustic Middle Tom CM Open Hi-Hat1...
-
Page 43: Alphabetical Tone List
Alphabetical Tone List Organ/Orchestral Tones Tone Name PC MSB LSB Tone Name PC MSB LSB Tone Name PC MSB LSB 1' Sifflute Ceremonial My Orchestra 1' Tibia Fife Chamber Quartet New R&R Brass 1-3/5' Tibia Tierce Chamber Strings Nice Guitar 10-2/3' Gross Quint Chamber Woods Nylon Bass... -
Page 44: Gm (General Midi) Tones
Alphabetical Tone List GM (General MIDI) Tones Tone Name No. PC LSB Tone Name No. PC LSB Tone Name No. PC LSB Tone Name No. PC LSB 12-str.Gt Delayed Lead Laughing Slap Bass 2 2600 Sine Detuned EP 2 Machine Gun Slow Strings 5th Saw Wave Dist Rtm GTR... -
Page 45: Quick Key Map
Quick Key Map CHOIR (3 Manual) GREAT (2 Manual) Capital Tone (MSB: 65) Variation 1 (MSB: 66) Variation 2 (MSB: 67) Variation 3 (MSB: 68) Variation 4 (MSB: 69) Warm pF Mix Pop Piano MX Sparkle Piano Honky Tonk MX Grand MX Y2K Concerto Piano + Strings... - Page 46 Quick Key Map GREAT (3 Manual) SWELL (3 Manual) SWELL (2 Manual) PEDAL (2 Manual) Capital Tone (MSB: 65) Variation 1 (MSB: 66) Variation 2 (MSB: 67) Variation 3 (MSB: 68) Capital Tone (MSB: 65) New R&R Brass Fanfare Concert Bass Drum Orchestral Brass Snare Roll Massed Horns...
-
Page 47: Parameter List
CHOIR 001: Real Choir STRINGS 028: Bass Pizzicato STRINGS 001: Expressimo PIANO 001: Grand MX r01: Orch. Kit PIANO 001: Grand MX P01: ON P02: OFF For more on P01 and P02, refer to Selecting How the MX-200 is Used (p. 22). -
Page 48: Demo Song List
2. MX-200 Overture by Hector Olivera © 2003 Roland Corporation Another work composed for the MX-200, this is a rhythmically expressive ensemble piece. Enjoy the interplay of flowing strings entwined with brass and piano sounds. 3. Sinfonia No. 29 by Johann Sebastian Bach (Original Arrangement by Dan Miller) A typical Bach piece. -
Page 49: Error Messages
Correct the check sum value. an incorrect check sum value. The MX-200’s special expansion board is not in- Remove the MX-200’s top cover, then check to make stalled. sure that the special expansion board is firmly and properly installed in the MX-200. -
Page 50: Midi Implementation Chart
MIDI Implementation Chart ORGAN SOUND EXPANSION Date : August. 31, 2003 MIDI Implementation Chart Model MX-200 Version : 1.00 Transmitted Recognized Function... Remarks Basic Default 1–16 Channel Changed 1–16 Default Mode 3 Mode Messages Mode 3, 4 (M = 1) -
Page 51: Specifications
Specifications MX-200: ORGAN SOUND EXPANSION (conforms to General MIDI 2 System) Parts Dimensions 245 (W) x 237 (D) x 45 (H) mm 9-11/16 (W) x 9-3/8 (D) x 1-13/16 (H) inches Maximum Polyphony (excluding AC Adaptor and Organ Under Brackets) - Page 52 Specifications...
- Page 53 U. S. A. Roberoye Cerahe Mirdamad NORWAY ROLAND TAIWAN Asuncion PARAGUAY TEL: 2273 0074 Tehran, IRAN Rodgers Instrument LLC TEL: (021) 492-124 ENTERPRISE CO., LTD. TEL: (021) 285-4169 1300 N. E. 25th Avenue, Room 5, 9fl. No. 112 Chung Shan POLAND Hillsboro, Oregon 97124, N.Road Sec.2, Taipei, TAIWAN,...
- Page 54 For EU Countries This product complies with the requirements of European Directive 89/336/EEC. For the USA FEDERAL COMMUNICATIONS COMMISSION RADIO FREQUENCY INTERFERENCE STATEMENT This equipment has been tested and found to comply with the limits for a Class B digital device, pursuant to Part 15 of the FCC Rules.
-
Page 55: Control Guide
Control Guide 03341578 ’03-9-1TP...
Need help?
Do you have a question about the MX-200 and is the answer not in the manual?
Questions and answers