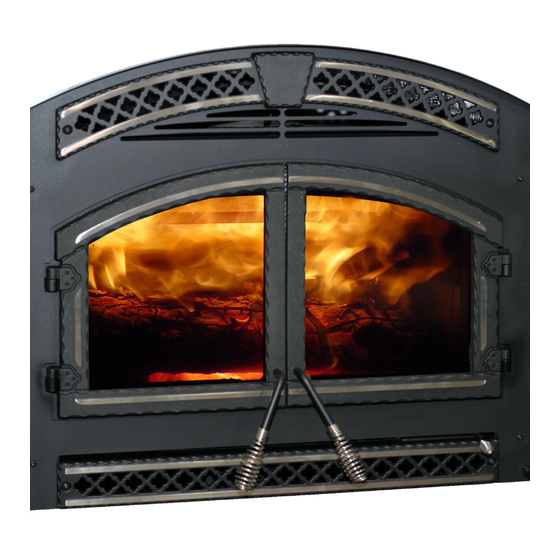
Heat & Glo NORTHSTAR-BK Owner's Manual
Epa certified woodburning fireplace
Hide thumbs
Also See for NORTHSTAR-BK:
- Owner's manual (73 pages) ,
- Installation manual (44 pages) ,
- Owner's manual (72 pages)
Table of Contents
Advertisement
INSTALLER: Leave this manual with party responsible for use and operation.
OWNER: Retain this manual for future reference.
NOTICE: DO NOT discard this manual!
Model(s):
EPA CERTIFIED WOODBURNING
FIREPLACE
Installation and service of this fireplace should be
performed by qualified personnel. Hearth & Home
Technologies recommends NFI certified profes-
sionals, or technicians supervised by an
NFI certified professional.
Owner's Manual
Care and Operation
O-T L
Portland
Tested and
Listed by
Oregon USA
C
US
OMNI-Test Laboratories, Inc.
Heat & Glo • NorthStar Owner's Manual • 480-2350 • Rev I • 11/6/14
WARNING: If the information in these
instructions is not followed exactly, a fire
or explosion may result causing property
damage, personal injury, or death.
• DO NOT store or use gasoline or other flam-
mable vapors and liquids in the vicinity of this
or any other appliance.
• DO NOT overfire. Overfiring will void your
warranty.
• Comply with all minimum clearances to com-
bustibles as specified. Failure to comply may
cause house fire.
WARNING
HOT SURFACES!
Glass and other surfaces are hot during
operation AND cool down.
Hot glass will cause burns.
• DO NOT touch glass until it is cooled
• NEVER allow children to touch glass
• Keep children away
• CAREFULLY SUPERVISE children in same room as
fireplace.
• Alert children and adults to hazards of high temperatures.
High temperatures may ignite clothing or other flammable
materials.
• Keep clothing, furniture, draperies and other flammable
materials away.
WARNING
Fire Risk.
For use with solid wood fuel only.
Other fuels may overfire and generate
poisonous gases (i.e. carbon monoxide).
Pour demander un exemplaire en
français de ce Manuel
du propriétaire, visitez www.
heatnglo.com/translations.
1
Advertisement
Table of Contents
Troubleshooting

Related Manuals for Heat & Glo NORTHSTAR-BK


Summary of Contents for Heat & Glo NORTHSTAR-BK
-
Page 1: Care And Operation
Owner’s Manual Pour demander un exemplaire en français de ce Manuel du propriétaire, visitez www. Care and Operation heatnglo.com/translations. INSTALLER: Leave this manual with party responsible for use and operation. OWNER: Retain this manual for future reference. NOTICE: DO NOT discard this manual! WARNING: If the information in these instructions is not followed exactly, a fire or explosion may result causing property... -
Page 2: Table Of Contents
Safety Alert Key: • DANGER! Indicates a hazardous situation which, if not avoided will result in death or serious injury. • WARNING! Indicates a hazardous situation which, if not avoided could result in death or serious injury. • CAUTION! Indicates a hazardous situation which, if not avoided, could result in minor or moderate injury. •... -
Page 3: Welcome
Welcome Read this manual before installing or operating this fireplace. Please retain this owner’s manual for future references. A. Congratulations Congratulations on selecting a Heat & Glo wood burning This Owner's Manual should be retained for future refer- fireplace. The Heat & Glo fireplace you have selected is ence. -
Page 4: Limited Lifetime Warranty
B. LIMITED LIFETIME WARRANTY Hearth & Home Technologies LIMITED LIFETIME WARRANTY Hearth & Home Technologies, on behalf of its hearth brands (”HHT”), extends the following warranty for HHT gas, wood, pellet, coal and electric hearth appliances that are purchased from an HHT authorized dealer. WARRANTY COVERAGE: HHT warrants to the original owner of the HHT appliance at the site of installation, and to any transferee taking ownership of the appliance at the site of installation within two years following the date of original purchase, that the HHT appliance... - Page 5 WARRANTY CONDITIONS: • This warranty only covers HHT appliances that are purchased through an HHT authorized dealer or distributor. A list of HHT authorized dealers is available on the HHT branded websites. • This warranty is only valid while the HHT appliance remains at the site of original installation. •...
-
Page 6: Product Specific Information
Product Specific Information A. Fireplace Certification Model: NorthStar EPA Certified Woodburning Fireplace Laboratory: OMNI Test Laboratories, Inc. Report No: 061-S-50-2 Type: Wood Fireplace Standard: UL 127 and ULC-S610-M87 and (UM) 84-HUD, Manufactured Home Approved Warning! Risk of Fire! For use with solid wood fuel only. Other fuels may overfire and generate poisonous gases (i.e. carbon monoxide). -
Page 7: Important Safety And Operating Information
Important Safety and Operating Information A. Fireplace Safety 1. Clear Space Combustible materials must not be stored on the hearth Most problems are caused by improper installation and op- extension. Room furnishings such as drapes, curtains, eration of the fireplace. To provide reasonable fire safety, chairs or other combustibles must be at least 4 ft the following should be given serious consideration: (1219 mm) from the open front of the fireplace. -
Page 8: Firebrick
2. Firebrick 4. Over-Firing Your Fireplace Your fireplace is lined with high quality firebrick, which has WARNING! Risk of Fire! Do not over-fire. exceptional insulating properties. Over-firing may ignite creosote or will damage the Do not operate the fireplace without bricks. Make sure fireplace and chimney. -
Page 9: General Operating Parts
WARNING HOT SURFACES! Glass and other surfaces are hot during operation AND cool down. Hot glass will cause burns. • DO NOT touch glass until it is cooled • NEVER allow children to touch glass • Keep children away • CAREFULLY SUPERVISE children in same room as fireplace. -
Page 10: Automatic Combustion Control (Acc)
1. Automatic Combustion Control (ACC) 2. ACC Override The lever located to the left of the combustion air con- The automatic combustion control system allows you to trol is the ACC OVERRIDE and may be used to over- set the fireplace to high (slide the combustion air control ride the setting of the automatic combustion air control. -
Page 11: Outside Air
3. Outside Air NOTICE: Use of outside air is required. A source of air (oxygen) is required in order for com- bustion to take place. Turning the outside air handle clockwise closes the out- side air inlet; turning counterclockwise will open it. This may be closed only when the fireplace is not in use to prevent cold air infiltration. -
Page 12: Glass Doors
4. Glass Doors An override switch and fan speed control have been installed on the wall in close proximity to the fireplace. This fireplace has been tested and is intended for use with doors as supplied with this fireplace. The speed of the fan can be regulated by the speed control knob. -
Page 13: Moisture Content
deciduous trees that are definitely not considered hard- 3. Seasoning woods such as poplar, aspen and alder. Hardwoods re- Seasoned firewood is nothing more than wood that is quire more time to season, burn slower and are usually cut to size, split and air dried to a moisture content of harder to ignite than softwoods. -
Page 14: Burning Process
7. Creosote Formation 5. Burning Process Fire requires fuel, air and heat. If heat is robbed from the When wood is burned slowly, it produces tar and other fireplace during the drying stage, the new load of wood organic vapors which combine with expelled moisture has reduced the chances for a good clean burn. -
Page 15: Lighting Instructions
E. Lighting Instructions NOTICE: Fireplace should be run full open for a minimum of 30 minutes a day during heating season to keep air To start a fire, light easily-ignitable tinder or paper, which passages clean. will ignite the fast burning kindling, which in turn will ignite the slow-burning firewood. -
Page 16: Maintenance And Service
Maintenance and Service WARNING! Hot Surfaces! Glass and other surfaces are hot during operation AND cool down. DO NOT clean fireplace until it is cooled. Task Frequency To be completed by 1. Chimney Inspection As needed Homeowner or Chimney Sweep 2. Chimney Cleaning As needed Chimney Sweep 3. Plated Surfaces Cleaning As needed Homeowner 4. Glass Doors Seasonally 5. -
Page 17: Creosote (Chimney) Cleaning
2. Creosote (Chimney) Cleaning Frequency: As needed; at least annually before light- ing, or once every two months during heating season. When creosote has accumulated it shall be removed to reduce the risk of a chimney fire. By: Chimney Sweep Tools Needed: Brush, allen wrench, Phillips screw- driver •... -
Page 18: Care And Cleaning Of Plated Surfaces
3. Care and Cleaning of Plated Surfaces 7. Ash Removal Frequency: Initially and as needed Frequency: As necessary By: Homeowner By: Homeowner Tools Needed: Vinegar or glass cleaner, soft towel Tools Needed: Covered metal container, metal shovel, fireplace broom CAUTION! Do not use a polish with abrasives. It will WARNING! Risk of Fire! DO NOT remove ashes until scratch plated surfaces. -
Page 19: Replacement Maintenance
B. Replacement Maintenance 1. Glass Replacement 2. Tighten or Adjust Door Latch • Ensure that the fire is out and the fireplace is cool to Remove the lock nut holding latch cam and four spac- the touch. ing washers on the right hand door as shown in Figure 5.2. -
Page 20: Firebrick Replacement
3 Firebrick Replacement The firebox of your fireplace is lined with high quality firebrick, which has exceptional insulating properties. There is no need to use a grate; simply build a fire on the firebox floor. Do not operate the fireplace without bricks. -
Page 21: Baffle Removal And Installation
4. Baffle Removal and Installation WARNING! Hot Surfaces! Glass and other surfaces are hot during operation AND cool down. DO NOT clean fireplace until it is cooled. • Remove all ash from firebox and place into a metal container. • Remove the baffle protection channel by turning it down and pulling it out of the firebox. See Figure 4.5. Figure 4.7 Removing Baffle (shown without ceramic blanket) 5. -
Page 22: Timer Assembly Replacement
6. Timer Assembly Replacement • Removing the fan Unplug the wire harness. CAUTION! Risk of Shock! Disconnect power by turning off circuit breaker BEFORE servicing. Lift fan from locating pins and remove (Figure 4.9). Repeat for second fan if necessary. • Remove both doors, outside air knobs, fascia, and Connect new fan wires to wire harness. - Page 23 Remove 2 screws Figure 4.17 Hand in Access Door Figure 4.14 Disconnect Air Chamber Cover Arm must be in this position Remove two screws from timer linkage upper arm. when re-installing Be careful NOT TO DROP arm in bottom of fireplace. See Figure 4.15 Be careful not to drop Linkage Arm...
-
Page 24: Timer Removal & Replacement
• After re-installing the timer assembly through the • Install new timer using same two screws. It is very firebox access door, re-attach the timer assembly to important that the D cut side of the timer shaft is the air chamber cover using a Phillips head screw facing the opposite side of the linkage timer arm. - Page 25 Figure 4.24 Exploded View of Entire Assembly for Point of Refer- ence only Item Description Door Linkage Linkage Control Arm Bushing Washer SAE #10 Screw 8-32 x 1/2 PH PHL TC Linkage Timer Arm Attachment Nut & Set Screw Screw 6-32 x 1/4 PH PHL TC Mounting Bracket Timer, Mechanical, 12 hours Heat &...
-
Page 26: Troubleshooting
Troubleshooting A. FAQs Hearth & Home Technologies assumes no responsibil- erating instructions, “Starting a Fire”. Be sure your flue ity for the improper performance of the fireplace sys- system is installed correctly and that it is the proper di- tem caused by inadequate draft due to environmental ameter and height. - Page 27 Overhanging tree? Bird's nest or leaves in termination cap? Structural changes in Another appliance in chimney area? home also exhausting air (furnace, fan, Unsealed dryer, etc.)? can lights? Overhead fan operating? Creosote buildup in flue? Air register from furnace near fireplace? Doors opening and closing?
-
Page 28: Troubleshooting Table
B. Troubleshooting Table Fire is difficult to start • Refer to section 4.C. Lighting Instructions • Open air controls • Establish draft: Hold a lighted, rolled up newspaper under the front of the baffle • Place DRY kindling over wadded up newspaper; leave air spaces between pieces of wood •... -
Page 29: Reference Materials
Service Parts Beginning Manufacturing Date: Mar 2002 Woodburning Fireplace Ending Manufacturing Date: Active Northstar-BK, Black (Feb 2003-Active), Northstar-NT, Nickel (July 2004- Active) Northstar-GD, Gold (May 2003 -Apr 2004), Northstar-GT, Gold Trim (July 2004-Sept 2007) Part number list on following page. 11/14... -
Page 30: Service Parts
NORTHSTAR Service Parts Beginning Manufacturing Date: Mar 2002 Ending Manufacturing Date: Active IMPORTANT: THIS IS DATED INFORMATION . Parts must be ordered from a dealer or Stocked Hearth and Home Technologies does not sell directly to consumers distributor. . Provide model number and serial number when requesting service parts from your dealer or distributor. - Page 31 NORTHSTAR Service Parts Beginning Manufacturing Date: Mar 2002 Ending Manufacturing Date: Active #8 Door Assembly IMPORTANT: THIS IS DATED INFORMATION . Parts must be ordered from a dealer or Stocked Hearth and Home Technologies does not sell directly to consumers distributor.
-
Page 32: Side View
NORTHSTAR Service Parts Beginning Manufacturing Date: Mar 2002 Ending Manufacturing Date: Active #9 Brick Set 9.1 9.1 IMPORTANT: THIS IS DATED INFORMATION . Parts must be ordered from a dealer or Stocked Hearth and Home Technologies does not sell directly to consumers distributor. - Page 33 NORTHSTAR Service Parts Beginning Manufacturing Date: Mar 2002 Ending Manufacturing Date: Active IMPORTANT: THIS IS DATED INFORMATION. Parts must be ordered from a dealer or distributor. Stocked Hearth and Home Technologies does not sell directly to consumers. Provide model number and serial number when requesting service parts from your dealer or distributor.
- Page 34 This page intentionally left blank. Heat & Glo • NorthStar Owner’s Manual • 480-2350 • Rev I • 11/6/14...
- Page 35 This page intentionally left blank. Heat & Glo • NorthStar Owner’s Manual • 480-2350 • Rev I • 11/6/14...
-
Page 36: Contact Information
C. Contact Information Heat & Glo, a brand of Hearth & Home Technologies 7571 215th Street West, Lakeville, MN 55044 www.heatnglo.com Please contact your Heat & Glo dealer with any questions or concerns. For the number of your nearest Heat & Glo dealer, please visit www.heatnglo.com. –...
Need help?
Do you have a question about the NORTHSTAR-BK and is the answer not in the manual?
Questions and answers
What is clearance needed between grate and sides/back of fireplace?