Table of Contents
Advertisement
Advertisement
Table of Contents

Related Manuals for Leica Rugby 670


Summary of Contents for Leica Rugby 670
- Page 1 Leica Rugby 670/680 User Manual Version 1.0 English...
- Page 2 Leica Geosystems authorised service work- shop. Type: _______________ Serial No.: _______________ Validity of this This manual applies to the Rugby 670/680 lasers. Differences between the models are manual marked and described. Available Name Description/Format documentation ...
- Page 3 Create new support requests for your products that will be answered by your local Leica Geosystems Support Team. View the complete history of your Support and view detailed information on each request in case you want to refer to previous support requests.
-
Page 4: Table Of Contents
Rod Eye Basic Receiver Applications Setting Forms Checking Grades Entering Grades Batteries Operating Principles Battery for Rugby Accuracy Adjustment Checking the Level Accuracy Adjusting the Level Accuracy Troubleshooting Care and Transport Transport Storage Cleaning and Drying Rugby 670/680, Table of Contents... -
Page 5: Rugby 670/680, Table Of Contents
Technical Data 10.1 Conformity to National Regulations 10.2 General Technical Data of the Laser Lifetime Manufacturer’s Warranty Accessories Index Rugby 670/680, Table of Contents... -
Page 6: Safety Directions
Important paragraphs which must be adhered to in practice as they enable the product to be used in a technically correct and efficient manner. Rugby 670/680, Safety Directions... -
Page 7: Definition Of Use
• To ensure that it is used in accordance with the instructions. • To be familiar with local regulations relating to safety and accident prevention. • To inform Leica Geosystems immediately if the product and the application becomes unsafe. • To ensure that the national laws, regulations and conditions for the operation of e.g. -
Page 8: Hazards Of Use
When transporting or shipping batteries, the person in charge of the product must ensure that the applicable national and international rules and regulations are observed. Before transportation or shipping contact your local passenger or freight transport company. Rugby 670/680, Safety Directions... - Page 9 • Using the product after incorrect attempts were made to carry out repairs Precautions: Do not open the product. Only Leica Geosystems authorised service workshops are entitled to repair these products. If the product is improperly disposed of, the following can happen: WARNING •...
-
Page 10: Laser Classification
635 nm ± 10 nm Rugby 680: Description Value Maximum peak radiant power 2.7 mW ± 5% Pulse duration (effective) 1.1 ms Pulse repetition frequency 10 rps Beam divergence < 1.5 mrad Wavelength 635 nm ± 10 nm Rugby 670/680, Safety Directions... -
Page 11: Electromagnetic Compatibility Emc
WARNING Although the product meets the strict regulations and standards which are in force in this respect, Leica Geosystems cannot completely exclude the possibility that other equipment may be disturbed. There is a risk that disturbances may be caused in other equipment if the product is... -
Page 12: Fcc Statement, Applicable In U
Precautions: Although the product meets the strict regulations and standards which are in force in this respect, Leica Geosystems cannot completely exclude the possibility that other equipment can be disturbed or that humans or animals can be affected. • Do not operate the product with radio or digital cellular phone devices in the vicinity of filling stations or chemical installations, or in other areas where an explosion hazard exists. - Page 13 Operation is subject to the following two conditions: (1) This device may not cause harmful interference, and (2) this device must accept any interference received, including interference that may cause undesired operation. Made in China 005664_001 Rugby 670/680, Safety Directions...
-
Page 14: Description Of The System
Rugby against changes in elevation caused by movement of the tripod to ensure accurate work. The Rugby 670 and Rugby 680 can also be used to create sloped planes for applica- tions such as: •... -
Page 15: Rugby Laser Components
Li-Ion battery pack or Alkaline battery pack d) 2x AA-cell battery e) User Manual/CD f) Second receiver (can be purchased separately) g) 4 x D-cell battery (for alkaline versions only) h) Charger (for Li-Ion versions only) Rugby 670/680, Description of the System... -
Page 16: Setup
• Always check the tripod or laser trailer before attaching the Rugby. Make sure all screws, bolts and nuts are tight. • If a tripod has chains, they should be slightly loose to allow for thermal expansion during the day. • Secure the tripod on extremely windy days. Rugby 670/680, Description of the System... - Page 17 • Always check the tripod or laser trailer before attaching the Rugby. Make sure all screws, bolts and nuts are tight. • If a tripod has chains, they should be slightly loose to allow for thermal expansion during the day. • Secure the tripod on extremely windy days. Rugby 670/680, Description of the System...
-
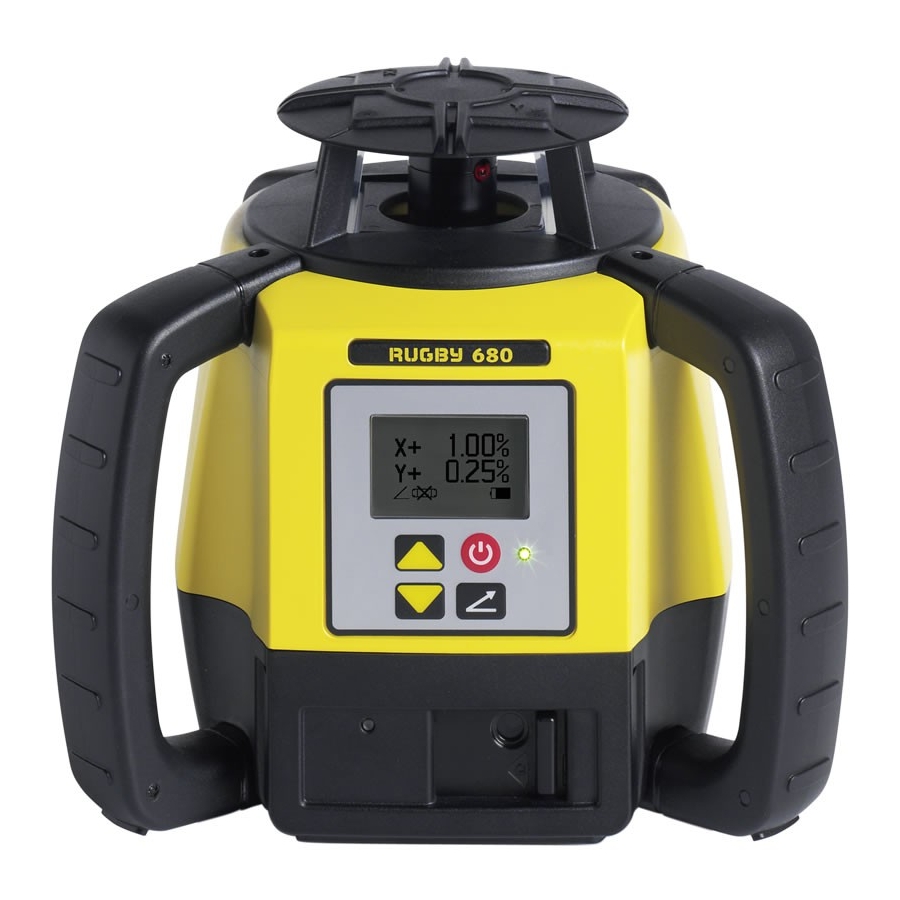
Page 18: Operation
Press to start grade entry process or accept settings in the Option Menu. LCD Display Information Start up screens When the Rugby is turned on, the Leica Start up screen is shown followed by the Rugby Information screen displaying the following information: •... - Page 19 006039_001 Rugby 680 Level mode screen The grade shown must be 0.00% to use the Rugby 670/680 in Level mode, for example for forms and footings. In Level mode, the Rugby 670/680 automati- cally levels to the horizontal plane. 006040_001...
-
Page 20: Grade Entry
Enter your desired grade in Grade mode. The Rugby 670/680 will check the level position and then adjust the plane of laser light to the grade input. In Grade mode, the Rugby 670/680 does not self-level, but is set to detect bumps and temperature changes. 006057_001... -
Page 21: Elevation (H.i.) Alert, Bump Alert And Smart Slope Functions
Level mode (0.00%) and in Grade mode when one of the axes remains at 0.00%. The Elevation (H.I.) Alert function turns on automatically every time the Rugby is turned on. It can be enabled/disabled in the Option Menu (enabled by default). Rugby 670/680, Operation... - Page 22 There are two settings for the Smart Slope 006048_001 Smart Slope screen: COARSE function: • FINE: 2°C temperature change • COARSE: 5°C temperature change The Smart Slope setting can be changed in the Option Menu (COARSE by default). Rugby 670/680, Operation...
-
Page 23: Rugby 670/680 Option Menu
Rugby 670/680 Option Menu Option Menu Press both the Up arrow button and Power button for 1.5 seconds to enter the Option Menu. There are five options available: • Smart Slope: FINE/COARSE/OFF • Bump Alert: FINE/COARSE/OFF • H.I. Alert: ON/OFF at start up... - Page 24 If changing from Percent to Per mil, confirmation for the change is neces- sary. 006145 001 Confirm Percent 006054_001 Percent The Percent and Per mil screens to the left are equal. 006055_001 Per mil Rugby 670/680, Operation...
-
Page 25: Receivers
Receivers Description The Rugby 670 and Rugby 680 are sold with the Rod Eye 140 Classic or Rod Eye Basic Receiver. Rod Eye 140, Classic Receiver Instrument components part 1 of 2 a) Level vial b) Audio Speaker c) LCD window... - Page 26 Access to the battery compartment. Description of the Buttons a) Power b) Audio 005149_001 c) Bandwidth Button Function Power Press once to turn on the Receiver. Audio Press to change the audio output. Bandwidth Press to change detection bandwidth. Rugby 670/680, Receivers...
-
Page 27: Menu - Rod Eye 140, Classic Receiver
Detects the laser beam. The reception windows must be directed window towards the laser. LCD window Front and rear LCD arrow indicate the detector’s position. Audio Speaker Indicates the detector’s position: • High - Fast beeping • On-grade - Solid tone • Low - Slow beeping Rugby 670/680, Receivers... - Page 28 Access to the battery compartment. Description of the buttons a) Audio b) Bandwidth c) Power 005667_001 Button Function Audio Press to change the audio output. Bandwidth Press to change detection bandwidth. Power Press once to turn on the Receiver. Rugby 670/680, Receivers...
-
Page 29: Applications
Set the rod with the attached receiver on top of the form. Adjust the height of the form until the on-grade position is again indicated. Continue to additional positions until the forms are levelled to the rotating plane of the Rugby. Rugby 670/680, Applications... -
Page 30: Checking Grades
Set the rod with the attached receiver on top of the excavation or concrete pour to check for correct elevation. Variances can be read in precise measurements with the digital receiver. • 7a: Position is too high. • 7b: Position is too low. • 7c: Position is on grade. Rugby 670/680, Applications... -
Page 31: Entering Grades
Press the Up or Down button to enter grade for the x-axis (single slope). • For Rugby 670: press the Grade button again to exit grade entry mode. • For Rugby 680: press the Grade button to enter grade for the y-axis. Press the Grade button again to exit grade entry mode. -
Page 32: Batteries
Batteries Description The Rugby 670 and Rugby 680 can be purchased with alkaline batteries or a recharge- able Li-Ion battery pack. The following information is appropriate only to the model you have purchased. Operating Principles Charging / • The battery must be charged prior to using it for the first time because it is deliv- first-time use ered with an energy content as low as possible. - Page 33 Remove the batteries from the battery compartment. To insert the batteries: Insert the batteries into the battery compartment. Close the cover of the battery compartment and slide the locking mecha- nism to the left centre position until it locks into position. Rugby 670/680, Batteries...
- Page 34 The correct polarity is displayed on the battery holder. Close the cover of the battery compartment and slide the locking mecha- nism to the left until it locks into position. Rugby 670/680, Batteries...
-
Page 35: Accuracy Adjustment
(approximately 1 minute after the Rugby begins to rotate). Mark the position of the beam. Rotate the laser 180° and allow it to self-level. Mark the opposite side of the first axis. 30 m (100 ft) 30 m (100 ft) Y— 005773_001 Rugby 670/680, Accuracy Adjustment... -
Page 36: Adjusting The Level Accuracy
Press the Power button. The X-axis calibration screen appears. The Rugby is now in Calibration mode. In Calibration mode, the LED does not blink and the laser head continues to rotate. An hour-glass indicates that the Rugby is levelling. Rugby 670/680, Accuracy Adjustment... - Page 37 Exiting Calibration Press and hold the Grade button for 3 seconds to save and exit Calibration mode. mode Pressing the Power button at any time while in Calibration mode will exit the mode without saving changes. Rugby 670/680, Accuracy Adjustment...
-
Page 38: Troubleshooting
This could be a result of 006142_001 heat from direct sunlight. Shade the Rugby from the sun. After two minutes in the alert condition, the unit will shut off automatically. Rugby 670/680, Troubleshooting... - Page 39 Contrast setting needs readjust- Adjust the contrast setting in dark/light. ment to lighting conditions. the Option Menu. The grade shows in Wrong setting chosen. Choose the desired setting in Percent (%) or Per the Option Menu. mil (‰). Rugby 670/680, Troubleshooting...
-
Page 40: Care And Transport
Always carry the product in its transport container and secure it. Shipping When transporting the product by rail, air or sea, always use the complete original Leica Geosystems packaging, transport container and cardboard box, or its equivalent, to protect against shock and vibration. Shipping, transport... -
Page 41: Cleaning And Drying
Do not repack until everything is completely dry. Always close the transport container when using in the field. Cables and plugs Keep plugs clean and dry. Blow away any dirt lodged in the plugs of the connecting cables. Rugby 670/680, Care and Transport... -
Page 42: Technical Data
Conformity to For products which do not fall under R&TTE directive: national regulations Hereby, Leica Geosystems AG, declares that the product/s is/are in compliance with the essential requirements and other relevant provi- sions of the applicable European Directives. The declaration of conformity can be consulted at http://www.leica-geosystems.com/ce. - Page 43 12 V DC Output current: 3.0 A Polarity: Shaft: negative, Tip: positive A600 Lithium-Ion Type: Li-Ion battery pack battery pack Input voltage: 12 V DC Input current: 2.5 A Charge time: 5 hours (maximum) at 20°C Rugby 670/680, Technical Data...
-
Page 44: Lifetime Manufacturer's Warranty
To receive the "three years no cost" period, the product must be registered at http://www.leica-geosystems.com/registration within 8 weeks of the purchase date. If the product is not registered, a two year warranty applies. -
Page 45: Accessories
It can also be purchased separately as an upgrade to the alkaline battery pack. It is necessary to also purchase the A100, Li-Ion battery charger to complete the Li-Ion battery solution. A100 A150 A130 A600 A140 005848_001 Rugby 670/680, Accessories... -
Page 46: Index
Laser .............. 43 Temperature, charging internal battery ....32 Troubleshooting ..........39 FCC Statement ........... 12 User Manual Grade range ............42 Validity of ............2 Instrument Warranty ............44 Technical Data ..........42 Weight Intended use ............7 Instrument .............42 Rugby 670/680, Index... - Page 47 Rugby 670/680, Index...
- Page 48 799794-1.0.0en Original text Published in Switzerland © 2013 Leica Geosystems AG, Heerbrugg, Switzerland Leica Geosystems AG Heinrich-Wild-Strasse CH-9435 Heerbrugg Switzerland Phone +41 71 727 31 31 www.leica-geosystems.com...
Need help?
Do you have a question about the Rugby 670 and is the answer not in the manual?
Questions and answers