Fishman PREFIX PREMIUM BLEND User Manual
Amplifiers
Hide thumbs
Also See for PREFIX PREMIUM BLEND:
- User manual (2 pages) ,
- User manual (12 pages) ,
- User manual
Advertisement
Advertisement
Table of Contents

Related Manuals for Fishman PREFIX PREMIUM BLEND


Summary of Contents for Fishman PREFIX PREMIUM BLEND
- Page 1 USER GUIDE PREFIX PREMIUM BLEND...
- Page 2 Welcome Thank you for making Fishman a part of your acoustic experience. We are proud to offer you the fi nest acoustic amplifi cation products available; high-quality professional-grade tools to empower you to sound your very best. We are confi dent Prefi x Premium Blend will both enhance and inspire your music making.
-
Page 3: Quick Start
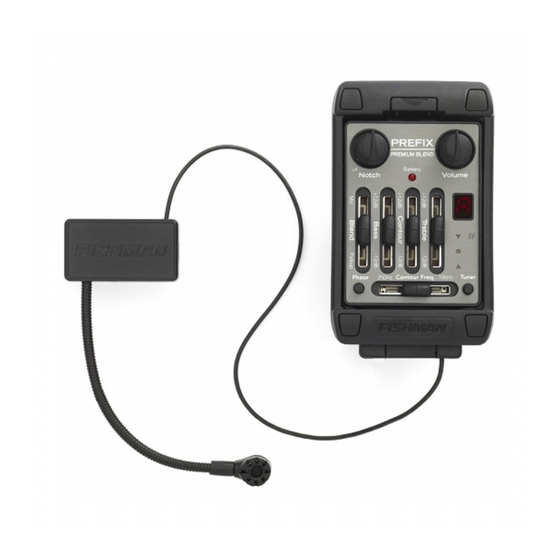
Quick Start Before you begin, set the controls as shown: 1. Plug in • Use a ¼-inch instrument cable. 2. T une up • Press the Tuner button. When engaged, Tuner mutes the output. Press again to exit Tuner. 3. Turn up • Raise the Volume and adjust the Blend control to your liking. - Page 4 Controls Volume • For the cleanest signal, set the Volume knob as high as possible, without causing distortion or feedback. Blend • Move the Blend slider to change the balance between the pickup and the microphone. Bass • Boost here to add depth and weight to the sound of the guitar. Note that this control only affects the pickup signal.
-
Page 5: Microphone Position
Phase • Use the Phase switch to improve bass response at low volume and suppress feedback at high volume. If feedback occurs, push the Phase switch. If feedback recurs when you change your location, press the switch again. Microphone Position Position the microphone to fi... - Page 6 Tuner Depress the Tuner button to turn the circuit on and off. This digital chromatic tuner accommodates all standard and alternate tunings and mutes the output when engaged. It can be activated without an instrument cable connected, in which case it will turn itself off after three minutes. Note that the tuner is calibrated to A = 440.
-
Page 7: Low Battery Indicator
Power Plug in the guitar, and the Prefi x Premium Blend switches on. The Battery LED will fl ash once at power-up to tell you the preamp is on. Low Battery Indicator When the Battery indicator lights steadily, it is time to change the battery. To conserve power, unplug the instrument and turn off the tuner when not in use. -
Page 8: Sample Settings
Sample Settings Fingerstyle “Scooped” Mid This will add fullness to the bass This setting emphasizes extreme bass and defi nition to the treble. and treble... -
Page 9: Stereo Operation
Stereo Operation A small switch, located on the side of the preamp, let’s you choose between mono and stereo operation. Factory preset to mono, you use the onboard controls to affect your mic and pickup sound and connect to your amplifi er or PA with a standard guitar cable If you wish to split the pickup and microphone signals for separate external processing, move this switch to stereo and connect to your amplifi... - Page 10 Microphone Trim Adjustment The microphone and pickup levels are preset at the factory and do not require adjustment. However, a microphone trim control may be adjusted to alter the microphone and pickup balance. Set the Blend slider to the center position and adjust the trim control as necessary.
-
Page 11: Electrical Specifications
Electrical Specifi cations Nominal Input Level: -20dBV Input Impedance: 20MOhm Output Impedance: Less than 3.5kOhm Nominal Output Level: -12dBV THD: Less than .04 %, -20dBV input Noise Floor: -97dB Dynamic Range: 102dB Battery Life: 100hrs. (tuner off) Notch Filter Range: 30Hz –... - Page 12 www.fi shman.com 513-000-001 Rev B 9-08...
- Page 13 Fishman Prefix Series Cutout Template 2.264" (57.51 mm) 1.024" (26.01 mm) .157" (4.00 mm) .757" (19.23 mm) For bezels with 6 holes .073" (1.58 mm) 2x D .089" (2.26 mm) 6x R 0.093" (2.36 mm) 3/16" Cutter 1.902" (48.3 mm) 0.230"...
-
Page 14: Read Me First
PREFIX SERIES PREAMP INSTALLATION GUIDE www.fishman.com Read Me First! 1. Choose the fl attest possible location for the pre- amp on the side of the instrument. The fl attest and most comfortable location for the player is often at Installation of this product is a simple procedure, the upper bout, just above the instrument’s waist but we recommend this job only if you are an and well below the shoulder. - Page 15 Jack connections for Onboard Aura and 3. Insert the hot pickup wire (inner conductor) in the left side of the terminal block, marked “IN,” the Prefi x Plus-T models pickup ground wire (shield) in the right side of the • Red wire to Tip (short terminal) terminal block, marked “GND,”...
Need help?
Do you have a question about the PREFIX PREMIUM BLEND and is the answer not in the manual?
Questions and answers