Fishman PREFIX PREMIUM BLEND - Onboard Preamp Manual
- User manual (2 pages) ,
- User manual (12 pages) ,
- User manual (16 pages)
Advertisement
INTRODUCTION
Our goal is to provide you with the finest acoustic amplification products available; products that will compliment your style and let you sound your very best onstage. You can feel confident that your Fishman gear will provide great sound and trouble free performance for years to come. Your satisfaction is very important to us.
If you have any questions, please contact us at tech@fishman.com.
QUICK START

Although the microphone in the Prefix Premium Blend has a high feedback threshold, it can be made to feedback at high volume levels. Before you go onstage with the Prefix Premium Blend, get familiar with the preamp's antifeedback features.
We recommend that you preset the system EQ to locate and eliminate microphone feedback before you mix in the under-saddle pickup.
- Set all controls as follows:
- Notch and Volume fully counter-clockwise
- All EQ sliders at center position
- Blend slider at full left position
- Turn off the Tuner
- Slowly increase the volume and play the notes from the open low E, up to the fourth fret G # until the instrument starts to rumble or howl with feedback on one or more of these notes. Adjust the Notch control until this feedback is eliminated (usually between one and two o'clock on the dial).
- Increase the volume some more and play (on the low E string) the fifth fret A and above. Flip the phase switch to the position that eliminates feedback in this region.
- Slowly increase the Volume again, until you start to hear a high squeal.
- Lower the Contour Slider (level) all the way down and adjust the Frequency slider until the squealy feedback is eliminated. Raise the Contour slider (if possible) to just below the threshold of feedback.
- Move the Blend slider to the right to mix in the pickup signal.
- Adjust the Bass and Treble controls as desired. Note that these controls do not affect the microphone signal.
- Play your guitar as loud as you like.
DESCRIPTION
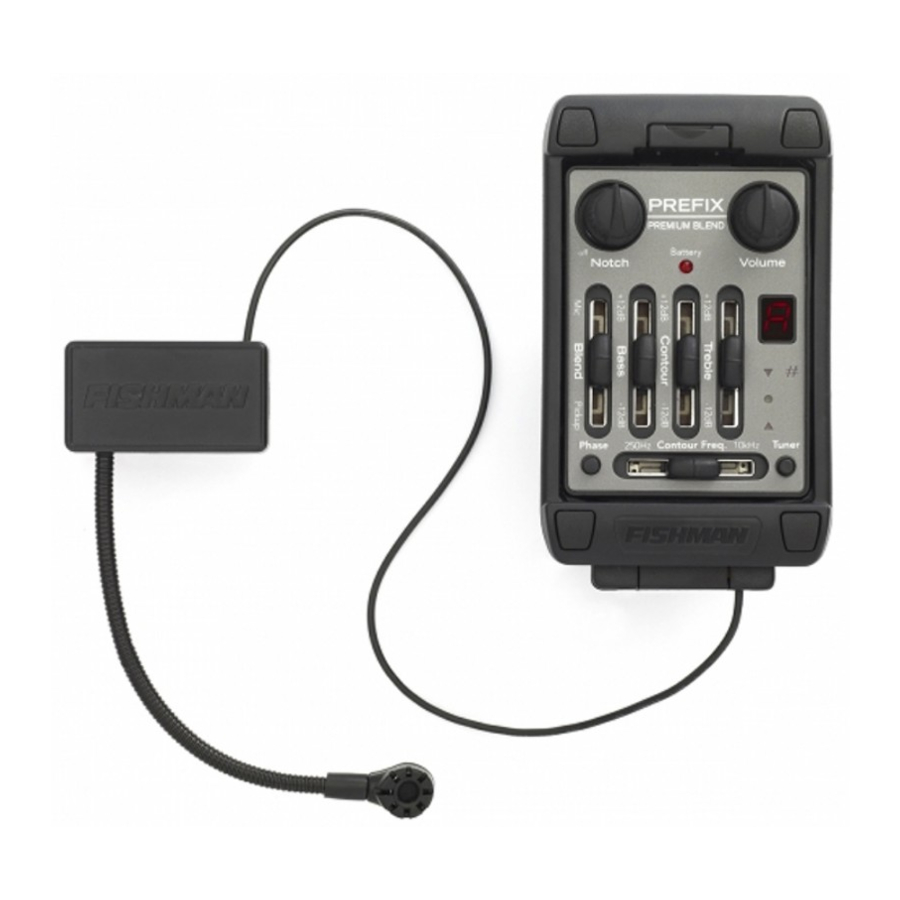
For the Prefix Premium Blend we have updated our top-of-the-line Stereo Blender preamp with an onboard chromatic tuner, a gooseneck style internal microphone and a streamlined new look. Standard on the Prefix Premium Blend is our acclaimed Acoustic Matrix™ undersaddle pickup. To compliment and contrast this pickup, our miniature gooseneck microphone captures the guitar's elusive natural ambience and sound chamber resonance. Blend the pickup and the microphone together for a powerful and cohesive acoustic guitar tone that is deeper and more "filled out", than the sound of either the microphone or pickup alone.
The Premium Blend's preamp module incorporates a unique flip-top battery compartment for easy access. Levels are set by the master volume and blend controls. Traditional shelving-style bass & treble, plus a semi-parametric "Contour" EQ are included so you can shape your guitar's tone exactly to taste. With the flick of a switch, you can choose between stereo or mono signal paths for the system's pickup and microphone. This feature expands your options for routing both signals.
To complete the package, we include a phase switch and an adjustable notch filter, both essential for fighting feedback.
THE PICKUP
The system's under-saddle pickup is the industry standard Fishman Acoustic Matrix™. It is made with our proprietary co-polymer sensing material which reproduces your acoustic guitar sound with a sensitivity and dynamic range that surpasses all other pickups.
At the heart of the pickup is a multi-layer stack of co-polymer strips that sense motion across the entire length of the saddle for unparalleled performance. The Acoustic Matrix's "unitary" co-polymer design provides a natural and balanced response, with sensitivity to both the strings and the soundboard. The transducer is fully enclosed in a shielded foil wrap for quiet performance and total EMI noise rejection.
THE MICROPHONE
This quality electret-condenser microphone will provide very high level sound reproduction before feedback when used in conjunction with the unit's Phase, Notch and Contour EQ (see pages 7-8). Conveniently mounted in the soundhole, the microphone's strategic position also isolates it from bleed-through with other instruments as well as the freedom to move around onstage.
SETUP
Battery Compartment
Pull the small tab at the top of the Prefix Premium Blend toward you. The body of the preamp will swing out, revealing the battery compartment. Observe the polarity marks on the battery clip and install a fresh 9V alkaline battery accordingly.


Microphone Position
The microphone can be positioned to find the "sweet spot" inside the instrument. Take the time to experiment with microphone placement until you find the position that works best in your instrument.
Move the Blend slider to the left for mic only. Start with the mic capsule so that it faces the back of the guitar. Move the mic closer to the sound hole for more bass Turn the capsule toward the sides of the instrument for less bass.

Microphone Trim Control
A small circular potentiometer is located on the underside of the preamp just below the battery compartment. This is a "set it and forget it" control. Use it to initially calibrate the microphone balance in relation to the pickup. Set the Blend slider to the center position and with a small slotted screwdriver, adjust the Trim Control until both the microphone and pickup levels are balanced to your taste.

Mono/Stereo Switch
A small slide switch, located on the underside of the preamp (across from the Notch control pot), lets you choose between mono and stereo operation. Leave the switch in the factory set Mono position when you use a standard instrument cable.
If you wish to split the pickup and microphone signals for separate external processing (such as with a Fishman Pocket Blender), move the switch to the Stereo position and use a stereo cable or a stereo "Y" cable to carry the two signals to separate destinations. In the stereo mode, the pickup goes to the tip output and the microphone goes to the ring output.
Note that the microphone signal at the ring output is affected only by the Volume, Blend and Phase controls.

Endpin Jack
When you plug into the endpin jack, the Prefix Premium Blend™ switches on. To conserve the battery, remove the instrument cable from the endpin jack when the system is not being used. It is a good idea to turn down your amp or mixer input before you plug into the endpin jack. Doing so will protect your speakers (and your ears) from loud pops.
Battery Low LED
Plug into the endpin jack and the Low Battery light will flash momentarily, indicating that the power is on. When the Low Battery light stays on, it is time to change the battery.
CONTROLS
Tuner
Depress the tuner button to turn the circuit on and off. This digital chromatic tuner accommodates all standard and alternate tunings. For your convenience, the tuner button also acts as a mute switch for the guitar when you are plugged in. The tuner circuit devours battery power, so turn it off when you finish tuning.
You can also turn on the tuner if the guitar is un-plugged. It will automatically shut down after about 30 seconds at idle to conserve battery power. The "in tune" indicator will flash several times before tuner shuts down. Note that the tuner is calibrated to A = 440.
 |  | Flashes when the note is below pitch |
 | Lights up when note is in tune | |
 | Flashes when the note is above pitch | |
| Lights up when tuner is on | |
 | Lights up when the note is raised 1/2 step |
Volume Control
Set this as high as possible (without causing your amp or mixer to distort) for the cleanest signal.

Notch and Phase
These controls work hand in hand to suppress two adjacent ranges of acoustic feedback. When you set them properly, you can play your instrument as loud as you like, feedback free.
Notch
Tune the Notch filter to scoop out the lowest range of feedback when you play bass notes between the open low E string and (up to and including) the fourth fret G sharp on the same string. Low frequency "cavity resonance" feedback can usually be squelched by setting the Notch control between one o'clock and two o'clock on the dial. Note that the notch can be defeated by moving the dial to the Off (seven o'clock) position.
NOTE: The Notch control only affects microphone and pickup signals at the tip output.
Phase Switch
Push the Phase switch in and out until you find the position that sounds best and subdues mid-bass feedback. Midbass feedback generally occurs when you play bass notes above the fourth fret G# on the low E string.
Bass
A Boost here will add depth and weight to the sound the instrument. This control does not affect the microphone!
Contour EQ
Two sliders (Contour and Frequency) make up this EQ. The Frequency slider lets you tune in on the specific range of sounds that you can boost/cut with the Contour (level) slider. The Contour control affects only the pickup and microphone signals at the tip output.
With the Contour EQ you can boost or cut a wide range of frequencies, from gutsy low midrange (250 Hz) to brilliant high treble (10 kHz). Often your instrument will benefit from a slight midrange cut.
To cut mids, boost the Contour control and then sweep the Frequency control until you find the band of frequencies that are brash and nasal sounding (usually around the center of the Frequency slider's travel).
Then move the Contour slider below its detent to taste.
Treble
A boost here will help to "cut through the mix". Conversely, cutting the Treble will mellow and subdue your amplified tone. This control does not affect the microphone!
Blend Control
Determines the balance between the pickup and microphone. Move the slider left to emphasize the Microphone. Move it right to hear more of the Pickup.
SUGGESTED EQ SETTINGS
Anti-feedback

Brilliance
If you are playing through a limited range amplifier (like an electric guitar amp) or have dead strings on the instrument, you can brighten up your sound by setting the Frequency slider to 10 kHz and raising the Contour level to taste. If you plan to play at high stage volume levels, dial in more pickup than microphone to avoid feedback.

Mid-Cut
You can scoop out harsh midrange by setting the Frequency slider slightly above center with the Contour (level) cut to taste below the center detent. Often the desired mid-cut will fall into the same frequency range as potential microphone feedback. You can also cut midrange (pickup only) by boosting the BASS and TREBLE sliders to realize an "implied" mid-cut at 800 Hz.

Fingerstyle
This setting will add fullness to the bass and definition to the treble.

SPECIFICATIONS
| Output Impedance (tip): | Less than 3.5 k Ohms | |
| Output Impedance (ring): | Less than 6.6 k Ohms | |
| Nominal Output Level (tip): | -12 dBV | |
| Output Level Range (ring): | Max: -12 dBV Min: -16dBV | |
| THD: | Less than.04%, -20 dBV input | |
| Signal to Noise Ratio: | 77 dB (A weighted referred to nominal -20 dBV input) | |
| Power Supply: | 9V alkaline battery | |
| Battery Life: | Preamp only, tuner off: 130 hrs. @ 3.8mA Tuner on, no signal: 33 hrs. @ 15mA, Tuner on, with signal: 20 hrs. @ 28mA,. | |
| Notch Filter Range: | 20Hz - 300 Hz (-15 dB) |  PICKUP ONLY PICKUP ONLY |
| Bass Control Range: | ± 12 dB at 60 Hz | |
| Treble Control Range: | ± 12 dB at 10 kHz | |
| Contour Control Range: | ± 12dB (adjustable from 250 Hz to 10 kHz), Q = 0.5 | |
FISHMAN TRANSDUCERS
340-D Fordham Road Wilmington MA 01887 USA
Phone 978-988-9199 • Fax 978-988-0770
www.fishman.com

Documents / Resources
References
Download manual
Here you can download full pdf version of manual, it may contain additional safety instructions, warranty information, FCC rules, etc.
Download Fishman PREFIX PREMIUM BLEND - Onboard Preamp Manual
Advertisement


Need help?
Do you have a question about the PREFIX PREMIUM BLEND and is the answer not in the manual?
Questions and answers