Advertisement
Table of Contents
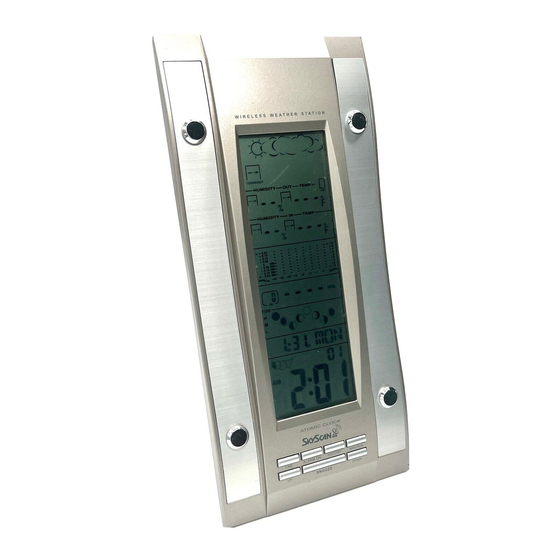
WIRELESS WEATHER STATION
Model 81690
USER'S INSTRUCTIONS
The multifunctional weather station is equipped with many functions providing thorough weather
information to you. The receiver unit has a clear, easy-to-read display that shows weather forecast,
indoor temperature, relative humidity, pressure, moon phase, time and date, as well as the
temperature and relative humidity measured and transmitted by the sensor. It is able to receive and
display readings from up to 3 remote sensors.
The receiver unit retains the minimum and maximum temperatures and relative humidity readings
measured at various locations. The 433 MHz technology means no wire installation is required and
you can place the sensors anywhere you like.
With radio controlled function, the current time and date are automatically synchronized with the
time signal transmitted from the atomic clock in FT. Collins, Colorado. The signal can cover a
distance of about 2,000 miles.
Advertisement
Table of Contents

Subscribe to Our Youtube Channel
Related Manuals for SkyScan 81690


Summary of Contents for SkyScan 81690
- Page 1 WIRELESS WEATHER STATION Model 81690 USER'S INSTRUCTIONS The multifunctional weather station is equipped with many functions providing thorough weather information to you. The receiver unit has a clear, easy-to-read display that shows weather forecast, indoor temperature, relative humidity, pressure, moon phase, time and date, as well as the temperature and relative humidity measured and transmitted by the sensor.
- Page 2 1. ALARM ON: Press it to turn the alarm and snooze on or off. In normal time mode, press and hold it for 2 seconds to enter the alarm and pre-alarm setting mode. 2. TIME: Press it once to view the Dew Point. ...
- Page 3 5. DOWN: Press and hold it for 2 seconds, release, then press it to choose the Time zone. Press it to switch between the following Time zone (if the clock you purchase is WWVB version): PA (Pacific) - MO (Mountain) - CE (Central) - EA (Eastern). 6.
- Page 4 Displays the current atmospheric pressure data and indicates the last 24 hours pressure history. 18. MOON PHASE WINDOW: Display the moon phase and the tide trend. 19. CALENDAR WINDOW: Displays the date, year, day of the week. 20.
- Page 5 Accommodates 2 AAA size batteries. 7. BATTERY DOOR 8. WALL MOUNT HOLDER: Supports the transmitter in wall mounting. 9. FOLDING TABLE STAND BEFORE YOU BEGIN TRANSMITTER: 1. Remove the transmitter from the stand and unscrew the battery door of the transmitter. 2.
-
Page 6: Reception Of Radio Controlled Time Signal
3. Press reset button to re-start the clock and it will synchronize the channels of the transmitter automatically. NOTE: 1. If extra transmitters are added in the future, press the reset button to re-start the clock and synchronize the channel. 2. -
Page 7: Select The Time Zone
SELECT THE TIME ZONE The default time Zone is PACIFIC. If your location is not in the Pacific time zone, set the time zone as follows: In normal time mode, press and release the DOWN button: P=Pacific M=Mountain C=Central E=Eastern MANUAL TIME SETTING If you are out of the reach of the Radio Controlled Transmitter or if the reception is not reachable, the time can be set manually. -
Page 8: Setting The Temperature Alarm
1. In normal time mode, press the ALARM ON key once, alarm on with the bell indicator displayed. Press ALARM ON key again to turn on SNOOZE with Zz displayed. Press ALARM ON key again to turn off Alarm and Snooze. 2. - Page 9 The default channel is channel 1. In normal time mode, press UP key to view the channel from 1 to HOW TO READ INDOOR AND OUTDOOR TEMPERATURE & HUMIDITY RECORDS Change the temperature reading to °C for Centigrade or °F for Fahrenheit by pressing the C/F button on the back of the weather station.
-
Page 10: Weather Trend
WEATHER TREND The temperature-trend, humidity-trend and pressure-trend indicators show the trends of changes for the last few minutes. Arrows indicate a rising, steady or falling trend. WEATHER FORECAST The built-in barometer can notice atmospheric pressure changes. Based on the data collected, it can predict the weather condition in the forthcoming 12-24 hours. - Page 11 PAST 24 HOURS PRESSURE RECORDS The current and historical barometric pressure is shown on the atmospheric pressure window. The atmospheric pressure can be displayed in mb/hPa or inHg by pressing the atmospheric button on the back of the clock. To check the pressure history for a particular hour during the past 24 hours, press the HISTORY button.
-
Page 12: Low Battery Indicator
LOW BATTERY INDICATOR When the battery does not have enough power to operate the unit, the low battery indicator will appear to remind you to replace with new batteries. Receiver low battery indicator NOTE: Attention! Please dispose of used batteries in an ecologically safe manner. USING THE TABLE STAND OR WALL MOUNTING The receiver has both the desk top and wall mounting structure. -
Page 13: Remote Sensor
SPECIFICATIONS MAIN UNIT Indoor temperature measuring range: -5 °C to +50 °C Recommended operating range: 0 °C to +45 °C Temperature resolution: 0.1°C/1°F (above0°C) 1 °C/ °F (below 0 °C) Indoor relative humidity measuring range: 20%RH to 90%RH Recommended operating range: 20%RH to 90%RH Resolution: 1%RH... - Page 14 Power: Main unit: 4.5V, use 3 x AA 1.5V alkaline battery Remote sensor: 3 V, use 2 x AAA 1.5V Weight Main unit: 1.15 lbs. Remote sensor: 1.87 oz. Dimension 6” W x 12”H x 1.18” D Main unit 2.5” W x 4” H x 1” D Remote sensor: Do not mix old &...
Need help?
Do you have a question about the 81690 and is the answer not in the manual?
Questions and answers
Can I get a new transmitter for the skyscanner 81690 ?????
Can you calibrate the atmospheric pressure reading Mine is off by .45 inHg