Table of Contents
Advertisement
Quick Links
GPS Unified Manuals
1. GPS WIP Manual [EN]
2. GPS WIP 3D Manual [EN]
3. GPS PC Com Manual [EN]
4. GPS Nomad Garmin Manual [EN]
Please check firstly the relevant GPS equipped with your vehicle,
then refer to one of the manuals.
If you are not sure about your equipped GPS,
please contact your sales representative or Peugeot staffs.
Advertisement
Chapters
Table of Contents

Related Manuals for PEUGEOT nüvi 205


Summary of Contents for PEUGEOT nüvi 205
- Page 1 1. GPS WIP Manual [EN] 2. GPS WIP 3D Manual [EN] 3. GPS PC Com Manual [EN] 4. GPS Nomad Garmin Manual [EN] Please check firstly the relevant GPS equipped with your vehicle, then refer to one of the manuals.
- Page 2 01. GPS WIP Manual [EN]...
-
Page 3: Table Of Contents
PEUGEOT Connect Navi g ati o n MULTIMEDIA AUDIO EQUIPMENT/BLUETOOTH TELEPHONE GPS EUROPE BY SD CARD CONTENTS 01 First steps The PEUGEOT Connect Navigation is protected in such 02 Steering mounted controls p . a way that it will only operate in your vehicle. If it is to be installed in another vehicle, contact a PEUGEOT dealer 03 General operation for con guration of the system. -
Page 4: First Steps
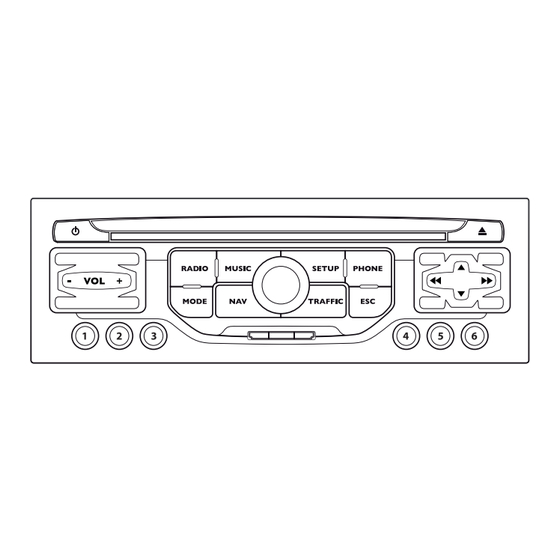
FIRST STEPS PEUGEOT Connect Navigation CONTROL PANEL Engine not running Access to the "Phone" Menu. Display the call list. 13. Selection of the previous/next radio station. - Short press: on/off. Selection of the previous/next CD or MP3 track. Access to the "MODE" Menu. - Long press: CD pause, mute for the radio. -
Page 5: Steering Mounted Controls P
02 STEERING MOUNTED CONTROLS RADIO: change to the next radio station on the list. Long press: automatic search for a higher frequency. CD/CD CHANGER: selection of the next track. CD/CD CHANGER: continuous press: fast forward play. RADIO: selection of the next stored station. CD CHANGER: selection of the next CD. -
Page 6: General Operation
03 GENERAL OPERATION Press the MODE button several times in succession for access to the following menus: RADIO /MUSIC MEDIA PLAYERS FULL SCREEN MAP TELEPHONE (If a conversation is in progress) NAVIGATION (If guidance is in progress) TRIP COMPUTER SETUP: system language * , date and time * , display, TRAFFIC: vehicle settings * , unit and system settings,... - Page 7 GENERAL OPERATION DISPLAY ACCORDING TO THE CONTEXT TELEPHONE: RADIO: A press on the OK dial gives access to END CALL IN FM MODE short-cut menus according to the display on the screen. HOLD CALL TRAFFIC INFO (TA) DIAL NAVIGATION (IF GUIDANCE IS IN PROGRESS): DTMF-TONES RADIOTEXT ABORT GUIDANCE...
-
Page 8: 04 Navigation - Guidance
04 NAVIGATION - GUIDANCE Insert the SD card in the front panel reader and leave it there to use the Navigation functions. SELECTING A DESTINATION The navigation SD card data must not be modi ed. Map data updates are available from PEUGEOT dealers. Select the "Address input"... - Page 9 NAVIGATION - GUIDANCE To clear a destination; from steps 1 to 3, select "Choose from last destinations". A long press on one of the destinations displays a list of actions from which you can select: Delete entry Delete list Turn the dial and select OK. Then select "Start route guidance"...
-
Page 10: Route Options
04 NAVIGATION - GUIDANCE The route selected by the PEUGEOT Connect Navigation audio/telephone depends directly on the ROUTE OPTIONS route options. Changing these options may change the route completely. Select the "Route dynamics" function. This function gives access to the Press the NAV button. - Page 11 NAVIGATION - GUIDANCE ADDING A STOPOVER Stopovers can be added to the route once the destination has been selected. Enter a new address, for example. Press the NAV button. ADDRESS INPUT Once the new address has been Press the NAV button again or select entered, select OK and press the dial the "Navigation"...
- Page 12 04 NAVIGATION - GUIDANCE SEARCHING FOR POINTS OF INTEREST The points of interest (POI) indicate all of the service locations in the vicinity (hotels, various businesses, airports...). (POI) Select the "POI in city" function to search for POIs in the city required. Select the country then enter the Press the NAV button.
- Page 13 04 NAVIGATION - GUIDANCE This icon appears when several POIs are grouped together in the same area. Zooming in on this icon shows details of the POIs. LIST OF PRINCIPAL POINTS OF INTEREST (POI) Airport Cinema Service station Railway station Camp site LPG station Bus station...
-
Page 14: Navigation Settings
NAVIGATION - GUIDANCE NAVIGATION SETTINGS The volume of the Risk Areas POIs alert can only be adjusted during this type of alert. Press the NAV button. Select the "POI categories on Map" function to select the POIs to be displayed on the map by default. Press the NAV button again or select the Navigation Menu function and POI CATEGORIES ON MAP... -
Page 15: Traffic Information
05 TRAFFIC INFORMATION TMC (Traf c Message Channel) messages contain information on traf c and weather conditions, received in real time and transmitted to the driver in the form of audible announcements and symbols on the navigation map. CONFIGURE THE FILTERING The navigation system can then suggest an alternative route to avoid a traf c problem. - Page 16 TRAFFIC INFORMATION PRINCIPAL TMC SYMBOLS RECEIVING TA MESSAGES Black and blue triangle: general information, for example: The TA (Traf c Announcement) function gives priority to TA alert messages. To operate, this function needs good reception of a radio station transmitting this type of message. When a traf c report is Weather reports Traf c reports transmitted, the current audio source (Radio, CD, Jukebox, ...) is...
-
Page 17: Radio
The external environment (hill, building, tunnel, underground car park...) may interfere with the RADIO reception, including in RDS following mode. This phenomenon is a normal result of the way in which radio waves are transmitted and does not in any way indicate a failure of the audio equipment. SELECTING A STATION RDS - REGIONAL MODE When the current radio station is... -
Page 18: 07 Music Media Players
07 MUSIC MEDIA PLAYERS CD, MP3/WMA CD INFORMATION AND ADVICE The PEUGEOT Connect Navigation will only play audio les with the The MP3 format, an abbreviation of MPEG 1, 2 & 2.5 Audio Layer 3 extension ".mp3" with a speed of between 8 Kbps and 320 Kbps and and the WMA format, an abbreviation of Windows Media Audio and the extension ".wma"... - Page 19 MUSIC MEDIA PLAYERS SELECTING/PLAYING MUSIC CD, MP3/WMA CD Select the music source required: CD, MP3/WMA CD. Press the dial to Press the MUSIC button. con rm. Play begins. Press the up or down button to select The list of tracks or MP3/WMA les appears under "Music" Menu. the next/previous folder.
- Page 20 MUSIC MEDIA PLAYERS USING THE EXTERNAL INPUT (AUX) CD CHANGER JACK/USB AUDIO CABLE NOT SUPPLIED PLAYING A CD (NOT MP3/WMA COMPATIBLE) Connect the portable equipment Insert one or more CDs in the (MP3/WMA player…) to the JACK changer. Press the MUSIC button. audio socket or to the USB port, using a suitable audio cable.
-
Page 21: Bluetooth Telephone
BLUETOOTH TELEPHONE * The services available depend on the network, the SIM card and the compatibility of the Bluetooth telephone used. Check the telephone manual and with your network provider for details of the CONNECTING A TELEPHONE services available to you. A list of mobile telephones with the best level of compatibility is available from the dealer network. -
Page 22: Making A Call
BLUETOOTH TELEPHONE RECEIVING A CALL MAKING A CALL An incoming call is announced by a ring and a superimposed display Press the PHONE button. on the multifunction screen. The list of the last 20 calls made and received in the vehicle appears under "Phone"... -
Page 23: Setting The Date And Time
09 CONFIGURATION The SETUP function gives access to the following options: System language, Date & Time, Display SETTING THE DATE AND TIME (Brightness, Colour, Map colour), Vehicle, Units, System. These settings must be re-entered if the battery has been disconnected. Select the "Date format"... -
Page 24: Trip Computer /Vehicle Parameters P
TRIP COMPUTER/VEHICLE PARAMETERS TRIP COMPUTER A FEW DEFINITIONS Press the MAIN button or press Range: displays the distance which can travelled with the remaining the MODE button several times in fuel detected in the tank, basd on the average consumption over the succession until the trip computer is last few miles (kilometres). -
Page 25: Screen Menu Map
SCREEN MENU MAP MAIN FUNCTION CHOICE A choice A1 "MUSIC" MENU "RADIO" MENU choice A2 CHOICE B... SELECT MUSIC WAVEBAND SOUND SETTINGS Balance/Fader "TRAFFIC" MENU Bass/Treble MANUAL TUNE MESSAGES ON ROUTE Equalizer SOUND SETTINGS ONLY WARNINGS ON ROUTE Linear Balance/Fader ALL WARNING MESSAGES Classic Bass/Treble... - Page 26 "NAVIGATION" MENU STOPOVERS ROUTE OPTIONS ABORT GUIDANCE/RESUME GUIDANCE Add stopover Route type DESTINATION INPUT Address input Fast route Address input Navigate HOME Short route Country Choose from address book Optimized route City Choose from last destinations Route dynamics Street Rearrange route Traf c independent House number Replace stopover...
- Page 27 "PHONE" MENU "SETUP" MENU Dark blue DIAL NUMBER SYSTEM LANGUAGE * MAP colour DIAL FROM ADDRESS BOOK Deutsch Day mode for MAP CALL LISTS English Night mode for MAP CONNECT PHONE Español Auto. Day/Night for MAP Search phone Français VEHICLE * Phones connected Italiano Vehicle information...
-
Page 28: Frequently Asked Questions
FREQUENTLY ASKED QUESTIONS QUESTION ANSWER SOLUTION There is a difference in For optimum sound quality, the audio settings (Volume, Bass, Treble, Check that the audio settings (Volume, Bass, sound quality between Ambience, Loudness) can be adapted to the different sound sources, Treble, Ambience, Loudness) are adapted to the different audio which may result in audible differences when changing source... - Page 29 QUESTION ANSWER SOLUTION The stored stations do An incorrect waveband is selected. Press the BAND AST button to return to the not function (no sound, waveband (AM, FM1, FM2, FMAST) on which the 87.5 Mhz is displayed...) stations are stored. The quality of reception The vehicle is too far from the transmitter used by the station listened to or Activate the RDS function to enable the system...
- Page 30 QUESTION ANSWER SOLUTION On starting, it is several minutes before the system begins to receive the The TA box is ticked. Wait until the traf c information is being received traf c information. However, certain traf c correctly (displaying of the traf c information jams along the route symbols on the map).
- Page 31 QUESTION ANSWER SOLUTION There is a long waiting When a new medium is inserted, the system reads a certain amount of This may take a few seconds. time after inserting a CD. data (directory, title, artist, etc.). This phenomenon is normal. I cannot connect my The telephone's Bluetooth function may be deactivated or the equipment - Check that your telephone's Bluetooth function...
- Page 32 02. GPS WIP 3D Manual [EN]...
- Page 33 Peugeot Connect Media ADDR TRAFFIC RADIO MEDIA SETUP BOOK MULTIMEDIA AUDIO EQUIPMENT/BLUETOOTH TELEPHONE PQRS WXYZ GPS EUROPE CONTENTS 01 First steps The PEUGEOT Connect Media is protected in such a way that it will only operate in your vehicle. If it is to be 02 Voice commands and installed in another vehicle, contact a PEUGEOT dealer for con guration of the system.
-
Page 34: First Steps
FIRST STEPS PEUGEOT Connect Media CONTROL PANEL PQRS Short press: clears the last character. ADDR RADIO MEDIA TRAFFIC SETUP BOOK Long press: activates voice recognition. PQRS WXYZ CD eject. ADDR BOOK: access to the "Address book" Menu (function Automatic search for a radio station on a higher frequency. described in detail in section 10). - Page 35 FIRST STEPS PEUGEOT Connect Media NAVIGATOR PQRS WXYZ 13. OK: con rmation of the highlighted item on the screen. - 4-direction navigator: press up/down. 14. Rotation of the ring: - 4-direction navigator: press to the left/right. When "RADIO" is displayed: selection of the previous/next When the "RADIO"...
-
Page 36: 02 Voice Commands And Steering Mounted Controls
02 VOICE COMMANDS AND STEERING MOUNTED CONTROLS Wiper stalk: display of "RADIO" and "MEDIA". STEERING MOUNTED CONTROLS Lighting stalk: activation of the voice command by means of a short press; indication of the current navigation instruction by means of a long press. RADIO: automatic search for a higher frequency. - Page 37 VOICE COMMANDS AND STEERING MOUNTED CONTROLS CONTEXT ACTION VOICE COMMANDS - VOICE RECO. INITIATION GENERAL Help address book Access to the address book help Help voice control Access to the voice reco help Help media Access to the media management help Help navigation Access to the guidance, navigation help Help telephone...
- Page 38 VOICE COMMANDS AND STEERING MOUNTED CONTROLS CONTEXT ACTION VOICE COMMANDS - VOICE RECO. INITIATION MEDIA Media Select the MEDIA source Select media Choose a source Single slot Select the CD player source Jukebox Select the Jukebox source Select the USB reader source External device Select the audio AUX input source SD-Card...
- Page 39 GENERAL OPERATION DISPLAY ACCORDING TO THE CONTEXT Press the MODE button several times in succession to gain access to the following displays: FULL SCREEN MAP RADIO / MUSIC MEDIA/VIDEO NAVIGATION TELEPHONE (If guidance is in progress) (If a conversation is in progress) TRAFFIC: TRAFFIC SETUP:...
-
Page 40: General Operation
GENERAL OPERATION DISPLAY ACCORDING TO THE CONTEXT MUSIC MEDIA PLAYERS: Avoid Pressing OK gives access to short-cut Satellites menus according to the display on the screen. PLAY OPTIONS Stopovers BROWSE ROUTE NORMAL ORDER NAVIGATION (IF GUIDANCE IS IN PROGRESS): ZOOM/SCROLL RANDOM TRACK ABORT GUIDANCE VOICE ADVICE... - Page 41 GENERAL OPERATION DISPLAY ACCORDING TO THE CONTEXT FULL SCREEN MAP: AUDIO DVD (LONG PRESS): ABORT GUIDANCE/RESUME GUIDANCE STOP DVD OPTIONS SET DESTINATION/ADD STOPOVER GROUP Audio POIS NEARBY Group 1 .2/n Subtitles POSITION INFO PLAY OPTIONS Angle OPTIONS Normal order/Random track/Scan Examples: Navigate to Dial...
- Page 42 PEUGEOT Connect Media IS: - the map setting which allows the map to be displayed at, in perspective or in 3D. Flat map Map in perspective Map in 3D - con guration of the system by means of voice commands. AP_3008_01_2010_anglais_cag_pdf_212 212 AP_3008_01_2010_anglais_cag_pdf_212 212 04/02/2010 14:31:14...
-
Page 43: Navigation - Guidance
NAVIGATION - GUIDANCE The "NAVIGATION" voice commands are listed in section 09. SELECTING A DESTINATION During guidance, a long press on the end of the lighting stalk repeats the last guidance instruction. Select the "Address input" function ADDR ADDR RADIO MEDIA TRAFFIC BOOK... - Page 44 NAVIGATION - GUIDANCE It is possible to scroll the map using the 4-direction navigator. It is possible to select its orientation via the short-cut menu of the "Full screen map". Press OK then select "Map Settings" and con rm. TRAFFIC ADDR RADIO MEDIA...
- Page 45 NAVIGATION - GUIDANCE When the map is displayed on the screen, you can select "Map Settings" then "2D Map/2.5D Map/ ROUTE OPTIONS 3D Map/North Up/Heading Up". The display of buildings in 3D mode depends on the progress in town mapping. Select the "Route dynamics"...
- Page 46 NAVIGATION - GUIDANCE ADDING A STOPOVER Stopovers can be added to or deleted from the route once the destination has been selected. Enter a new address, for example. RADIO MEDIA TRAFFIC ADDR SETUP BOOK RADIO MEDIA TRAFFIC ADDR SETUP BOOK Press the NAV button.
- Page 47 NAVIGATION - GUIDANCE SEARCHING FOR POINTS OF INTEREST The points of interest (POIs) indicate all of the service locations in the vicinity (hotels, various businesses, airports...). (POI) Select the "POI in city" function to search for POIs in the city required. TRAFFIC ADDR RADIO...
- Page 48 This icon appears when several POIs 04 NAVIGATION - GUIDANCE are grouped together in the same area. Zooming in on this icon shows details of the POIs. LIST OF PRINCIPAL POINTS OF INTEREST (POI) Airport Service station Cinema Railway station LPG station Camp site Bus station...
- Page 49 NAVIGATION - GUIDANCE UPDATING THE RISK AREAS POIs Press NAV, select Navigation Menu, then "Settings", then "Update personal POI". ADDR RADIO MEDIA TRAFFIC BOOK SETUP Download the "Risk areas POIs" update le onto an NAVIGATION MENU SD card or USB stick from the Internet. This service is PQRS available on www.peugeot.fr or www.peugeot.co.uk.
- Page 50 NAVIGATION - GUIDANCE SPOKEN INSTRUCTION SETTINGS When the navigation is displayed on the screen, press OK then select or Select the "Settings" function and deselect "Voice advice" to activate RADIO MEDIA TRAFFIC ADDR SETUP BOOK press OK to con rm. RADIO MEDIA TRAFFIC...
- Page 51 TRAFFIC INFORMATION The TMC (Traf c Message Channel) messages provide information relating to traf c and CONFIGURE THE FILTERING AND weather conditions, received in real time and transmitted to the driver audibly and visually on DISPLAYING OF THE TMC MESSAGES the navigation map.
- Page 52 TRAFFIC INFORMATION PRINCIPAL TMC SYMBOLS RECEIVING TA MESSAGES Black and blue triangle: general information, for example: The TA (Traf c Announcement) function gives priority to TA alert messages. To operate, this function needs good reception of a radio station transmitting this type of message. When a traf c report is Weather reports Traf c reports transmitted, the current audio source (Radio, CD, Jukebox, ...) is...
-
Page 53: Radio
The external environment (hill, building, tunnel, underground car park...) may interfere with RADIO the reception, including in RDS following mode. This phenomenon is a normal result of the way in which radio waves are transmitted and does not in any way indicate a failure of the audio equipment. -
Page 54: 07 Music Media Players
07 MUSIC MEDIA PLAYERS CD, MP3/WMA CD, MP3/WMA SD CARD/USB READER INFORMATION AND ADVICE The audio equipment will only play audio les with the extension The MP3 format, an abbreviation of MPEG 1, 2 & 2.5 Audio Layer 3 ".mp3" with a speed of between 8 Kbps and 320 Kbps and the and the WMA format, an abbreviation of Windows Media Audio and extension ".wma"... - Page 55 MUSIC MEDIA PLAYERS SELECTING/PLAYING CD, MP3/WMA CD, MP3/WMA SD CARD/ MP3 CDs, SD cards or USB peripherals are the compatible sources. USB READER Press the MEDIA button again or Insert the audio or MP3 CD in the player, ADDR RADIO MEDIA TRAFFIC BOOK...
- Page 56 MUSIC MEDIA PLAYERS JUKEBOX When copying is in progress, switching off the ignition will interrupt the process but it will resume COPYING A CD, A USB STICK OR directly when the ignition is switched on again. AN SD CARD ONTO THE HARD DISK Select the tracks required then ADDR RADIO...
- Page 57 MUSIC MEDIA PLAYERS JUKEBOX JUKEBOX LISTENING TO THE JUKEBOX RENAMING OR DELETING AN ALBUM Check that the active source is not the Jukebox in order to be able Press the MEDIA button. to rename or delete a track/folder. ADDR RADIO MEDIA MEDIA TRAFFIC...
- Page 58 MUSIC MEDIA PLAYERS USING AN EXTERNAL DEVICE (AUX) VIEWING A VIDEO DVD AUDIO/VIDEO/RCA CABLE NOT SUPPLIED Connect the portable equipment (MP3 player, camcorder, camera…) RADIO MEDIA TRAFFIC ADDR SETUP BOOK Insert the DVD in the player. Play begins to the RCA socket (white and red for audio; red and yellow for video) automatically.
-
Page 59: Using The Telephone
USING THE TELEPHONE CHOOSING BETWEEN THE BLUETOOTH TELEPHONE/INTERNAL TELEPHONE To activate the Bluetooth telephone RADIO MEDIA TRAFFIC ADDR SETUP BOOK or the internal telephone, press PICK PQRS WXYZ UP TEL. Select Phone menu, then "Select RADIO MEDIA TRAFFIC ADDR SETUP BOOK phone"... - Page 60 USING THE TELEPHONE * The services available via the telephone depend on the network, the SIM card and the compatibility CONNECTING A BLUETOOTH of the Bluetooth equipment used. Refer to your telephone's manual and your operator to check which services you have access to. A list of mobile telephones which offer the best range of services is TELEPHONE available from dealers.
- Page 61 USING THE TELEPHONE USING THE INTERNAL TELEPHONE WITH If you have declined to use the internal telephone for personal calls, you can still connect a Bluetooth telephone to receive your calls on the vehicle's audio system. SIM CARD Enter the PIN code on the keypad then select OK and con rm.
- Page 62 USING THE TELEPHONE RECEIVING A CALL MAKING A CALL ADDR RADIO MEDIA TRAFFIC BOOK SETUP An incoming call is announced by a ring and a superimposed display Press the PICK UP TEL button. on the screen. PQRS WXYZ Select the "Yes" tab to accept or "No" The list of the last 20 calls made and received in the vehicle appears ADDR RADIO...
- Page 63 This function provides access to the options in the SETUP menu. 09 CONFIGURATION Principle of the GPS synchro (GMT): 1. Con rm the "Synchronise with GPS" selection, the time is then set to GMT universal time, the date is also updated. 2.
-
Page 64: Screen Menu Map
SCREEN MENU MAP MAIN FUNCTION MEDIA CHOICE A choice A1 "MEDIA" MENU choice A2 VIDEO SETTINGS CHOICE B... SELECT MEDIA Aspect ratio Audio CD/MP3-Disc/ DVD-Audio /DVD-Video Menu language TRAFFIC "TRAFFIC" MENU Jukebox (Folders & Files) Display SELECT PREFERRED LIST SD-Card Brightness Messages on route Contrast... - Page 65 STOPOVERS Add stopover RADIO "RADIO" MENU Address input "NAVIGATION" MENU WAVEBAND Navigate HOME ABORT GUIDANCE/RESUME GUIDANCE Choose from address book DESTINATION INPUT Choose from last destinations Address input MANUAL TUNE Rearrange route Country SOUND SETTINGS Replace stopover City Refer to the " Sound settings " menu below. Delete stopover Street Recalculate...
- Page 66 "PHONE" MENU Optimized route Automatically accept call Subscr. service DIAL NUMBER Signal waiting call (?) SETTINGS DIAL FROM ADDRESS BOOK Show status Route dynamics CALL LISTS Activate waiting call Traf c independent MESSAGES Deactivate waiting call Semi-dynamic SELECT PHONE Call forward (?) Dynamic Telephone off Show status...
- Page 67 SETUP "SETUP" MENU DATE & TIME MAP colour LANGUAGE & SPEECH Set date & time Day mode for MAP Menu language Date format Night mode for MAP Deutsch Time format Auto. Day/Night for MAP English DISPLAY UNITS Español Brightness Temperature Français Colour Celsius...
-
Page 68: Frequently Asked Questions
FREQUENTLY ASKED QUESTIONS The table below groups together the answers to the most frequently asked questions concerning the PEUGEOT Connect Media. QUESTION ANSWER SOLUTION There is a difference in For optimum sound quality, the audio settings (Volume, Bass, Treble, Check that the audio settings (Volume, Bass, sound quality between Ambience, Loudness) can be adapted to the different sound sources, Treble, Ambience, Loudness) are adapted to... - Page 69 QUESTION ANSWER SOLUTION The stored stations do An incorrect waveband is selected. Press RADIO, select Radio Menu then not function (no sound, "Waveband" to return to the waveband on which 87.5 Mhz is displayed...) the stations are stored. The quality of reception The vehicle is too far from the transmitter used by the station listened to or Activate the "RDS"...
- Page 70 QUESTION ANSWER SOLUTION The "TA" box is ticked. On starting, it is several minutes before the system begins to receive the Wait until the traf c information is being received However, certain traf c traf c information. correctly (displaying of the traf c information jams along the route symbols on the map).
- Page 71 QUESTION ANSWER SOLUTION The route calculation is The exclusion criteria may con ict with the current location (exclusion of Check the exclusion criteria on the Navigation not successful. toll roads on a toll motorway). Menu ("Route options" - "Avoidance criteria"). When a new medium is inserted, the system reads a certain amount of There is a long waiting This phenomenon is normal.
- Page 72 QUESTION ANSWER SOLUTION The system does not The Bluetooth mode does not permit sending of the SMS to the system. Use your SIM card and the internal telephone. receive SMS. The SIM card used is a twin card. Use the original SIM card to receive the SMS. I cannot update the The Navigation Menu - "Update personal POI"...
- Page 73 03. GPS PC Com Manual [EN]...
- Page 74 PC Com MULTIMEDIA AUDIO EQUIPMENT/TELEPHONE JUKEBOX FUNCTION (10 GB)/GPS (EUROPE) CONTENTS 01 First steps pg. 122 The PC Com is coded in such a way that it will only 02 Display and General menu pg. 123 operate in your vehicle, contact your PEUGEOT dealer for con guration of the system.
-
Page 75: First Steps
FIRST STEPS On/Off and Volume adjustment. Ejection of the CD. Displaying of the general menu. Selection of the wavebands FM1, FM2, FMast, AM. SIM card slot. Deletion of the last character entered or of the entire line. Audio option adjustments: front/rear, left/right balance, Keypad for entering descriptions by successive presses. -
Page 76: Display And General Menu
DISPLAY AND GENERAL MENU > COLOUR SCREEN This displays the following information, via the audio control panel: ° - time, - date, Telephone - ambient temperature (if there is a risk of ice, you are warned by a message), Orange - audio source displays (radio, CD, jukebox, ...), - telematic system displays (telephone, services, ...), - check of openings (doors, boot, ...),... -
Page 77: General Menu
GENERAL MENU For maintenance of the TRAFFIC INFORMATION: display, the use of a TMC information, soft, non-abrasive cloth messages. (spectacles cloth) is recommended without any additional product. MAP: AUDIO FUNCTIONS: orientation, details, display. radio, CD, Jukebox, options. TELEMATIC: NAVIGATION GUIDANCE: telephone, directory, SMS. - Page 78 02 DISPLAY AND GENERAL MENU DISPLAY ACCORDING TO THE CONTEXT INTERNAL TELEPHONE: RADIO: Press the OK dial to access short-cut menus according to the display on the call list enter a frequency screen. dial activate/deactivate RDS phone book activate/deactivate REG mode NAVIGATION (IF NAVIGATION IS IN PROGRESS): voice mail hide/display "Radio Text"...
-
Page 79: Gps
Tip: for a detailed global view of the menus available, refer to the "Display ow charts" part of this SELECTING A DESTINATION PC Com section. Press the MENU button. Press the dial to con rm the selection. Turn the dial and select the Turn the dial and select the NAVIGATION GUIDANCE function. - Page 80 Press the dial to con rm the selection. Press the dial to con rm the selection. Repeat steps 8 to 12 for the ROAD and N° functions. Turn the dial and select the letters of the town one by one con rming each time by pressing the dial.
-
Page 81: Guidance Options
The route chosen by the audio equipment depends directly on the guidance GUIDANCE OPTIONS options. Changing these options may completely change the route. Press the MENU button. Press the dial to con rm the selection. Turn the dial and select the Turn the dial and select the DEFINE NAVIGATION GUIDANCE function. - Page 82 SETTING HAZARDOUS AREAS ALERT PARAMETERS Repeat steps 1 to 5 of the guidance option. Press the dial to con rm the selection. Turn the dial and select the SET HAZARDOUS AREAS Turn the dial and select the TRAFFIC PARAMETERS function, then press INFO function if it is not ticked.
- Page 83 GUIDANCE SPEECH SYNTHESIS During announcements, the volume of each speech synthesis Press the dial to con rm the selection. function (guidance, traf c information...) can be adjusted directly using the volume button. Select the ADJUST SPEECH Press the MENU button. SYNTHESIS function and press the dial to con rm.
-
Page 84: Map Orientation
ACTIONS ON THE MAP MAP ORIENTATION For improved visibility, beyond the scale of 6 miles (10 km), the map automatically switches to North Orientation. Press the MENU button. Repeat steps 1 to 3 then turn the dial and select the MAP ORIENTATION function. - Page 85 DISPLAYING THE MAP IN A WINDOW OR IN FULL SCREEN MODE Press the MENU button. Press the dial to con rm the selection. Turn the dial and select the MAP function. Turn the dial and select the MAP IN WINDOW or FULL SCREEN MAP tab.
- Page 86 List of POI Flying club Station Covered parking Airport Dock station Skating rink Lay-by Bus station Ports Bowling alley Hospitals Restaurant Casino Hotels Shopping Business park Vehicle hire Show/Exhibition Sports centre Town halls Winter sports centre Town centre Historical monuments Service station Cinema Tourist information...
- Page 87 ADDING A STAGE Select the ADD A STAGE function During guidance, press the MENU (9 stages maximum) and press the button. dial to con rm. ADD A STAGE Turn the dial and select the NAVIGATION GUIDANCE function. Enter for example a new address. ENTER AN ADDRESS When the new address has been Press the dial to con rm the selection.
- Page 88 TRAFFIC INFORMATION We recommend a lter on the route and a lter around the vehicle of: - 3 miles (5 km) or 6 miles (10 km) for a region with heavy traf c, ACTIVATING THE FILTER ON THE ROUTE - 12 miles (20 km) for a region with a normal level of traf c, - 60 miles (100 km) for long journeys (motorway).
- Page 89 TRAFFIC INFORMATION CONFIGURING THE TMC MESSAGE We recommend that you do not tick the NEW MESSAGE DISPLAY tab for regions with heavy traf c. ANNOUNCEMENTS Press the MENU button. Select the READ MESSAGES tab. Turn the dial and select the TRAFFIC INFORMATION function.
-
Page 90: Audio/Video
The external environment (hills, buildings, tunnels, basement car parks, ...) may block reception, AUDIO/VIDEO including in RDS mode. This is a normal effect of the way in which radio waves are transmitted and does not indicate any failure of the audio equipment. RADIO SELECTING A STATION Press the SOURCE button several... - Page 91 AUDIO/VIDEO MP3 CD INFORMATION AND ADVICE PLAYING A CD OR AN MP3 COMPILATION The MP3 format, an abbreviation of MPEG 1.2 & 2.5 Audio Layer Insert circular compact discs only. Some anti-pirating 3, is an audio compression standard which permits the recording of systems, on original discs or CDs copied using several tens of music les on a single disc.
- Page 92 JUKEBOX FUNCTION COPYING A CD ONTO THE HARD DISC The AUTO CREATION tab automatically copies the CD by default Insert a CD or an MP3 compilation into an album of the type "album n°...". and press the MENU button. Select the letters one by one and select Select AUDIO FUNCTIONS and press OK to con rm.
- Page 93 JUKEBOX FUNCTION JUKEBOX FUNCTION PLAYING AN MP3 USB STICK COPYING AN MP3 USB STICK ONTO THE HARD DISC Insert a USB stick in the space provided. If another source is being played, press the SOURCE Insert a USB stick in the space provided button several times in succession and select USB to and press the MENU button.
- Page 94 JUKEBOX FUNCTION RENAMING AN ALBUM Select the album to be renamed and Press the MENU button. press the dial to con rm. Select AUDIO FUNCTIONS and press the dial to con rm. Select the RENAME tab and press the dial to con rm. AUDIO FUNCTIONS RENAME Select the JUKEBOX function and...
- Page 95 JUKEBOX FUNCTION LISTENING TO THE JUKEBOX Press the SOURCE button several Select OK and press the dial to times in succession and select the con rm. JUKEBOX function. JUKEBOX Press the LIST button. To rename the tracks of an album, follow the same procedure, selecting the tracks to be renamed.
- Page 96 USING THE AUXILIARY INPUT (AUX) AUDIO/RCA CABLE NOT SUPPLIED Press the MENU button then select the CONFIGURATION function, then SOUNDS, then ACTIVATE AUXILIARY SOURCE to activate the audio/telephone auxiliary input. Connect the portable equipment (MP3 player…) to the JACK socket or to the audio sockets (white and red, RCA type) located in the glove box using a suitable cable.
- Page 97 You can connect video equipment (camcorder, digital camera, DVD player...) to the three audio/video VIDEO MENU sockets, located in the glove box. After connecting the video equipment, press the MENU button. Turn the dial and select the VIDEO PARAMETERS function to set the display format, the brightness, the contrast and the colours.
-
Page 98: Entering The Pin Code
INTERNAL TELEPHONE INSTALLING YOUR SIM CARD ENTERING THE PIN CODE (NOT SUPPLIED) Enter the PIN code on the keypad. Open the slot by pressing the button using the tip of a pen. PIN CODE Install the SIM card Con rm the PIN code by pressing in the holder and then insert it in the button #. - Page 99 BLUETOOTH TELEPHONE The services offered by the telephone depend on the network, the SIM card and the compatibility of CONNECTING A BLUETOOTH the Bluetooth equipment used. Refer to your telephone’s manual and your operator to check which services you have access to. A list of mobile telephones which offer the best range of services is TELEPHONE available from dealers.
- Page 100 BLUETOOTH TELEPHONE CONNECTING A BLUETOOTH TELEPHONE Once the telephone has been connected, the system can synchronise the address book and the call list. Repeat step 2 then select PHONE BOOK SYNCHRONISATION MODE. Select the To change the authentication code, repeat step 2 then select synchronisation of your choice and press the dial to con rm.
-
Page 101: Telephone
TELEPHONE To select the telephone used, press MENU, then select TELEMATICS, then BLUETOOTH FUNCTIONS, then BLUETOOTH ACTIVATION MODE. Then select: - DEACTIVATED: to use the internal telephone, - ACTIVATED AND VISIBLE: to use the bluetooth telephone, visible to all telephones, - ACTIVATED AND NOT VISIBLE: to use the bluetooth telephone, not visible to other telephones, CALLING A CONTACT it is not possible to match a new telephone. - Page 102 EMERGENCY CALL CONSULTING THE SERVICES In order for an emergency call to be made, a valid SIM card must be inserted. Press this button to gain access to the PEUGEOT services * . In an emergency, press the SOS button until a CONFIRMATION/CANCELLATION screen is displayed.
- Page 103 04. GPS Nomad Garmin Manual [EN]...
- Page 104 nüvi 205 and 205W series ® owner’s manual for use with these nüvi models: 205, 205W, 215, 215W, 255, 255W, 265, 265W, 275, and 285W...
- Page 105 Garmin. Garmin hereby grants permission to download a single copy of this manual onto a hard drive or other electronic storage medium to be viewed and to print one copy of...
- Page 106 • To quickly return to the Menu by phone at (913) 397-8200 or (800) 800-1020. page, touch and hold Back. In the UK, contact Garmin (Europe) Ltd. • Touch to see by phone at 0808 2380000. more choices. Touch and hold In Europe, go to www.garmin...
- Page 107 Tips and Shortcuts..Places ........9 ™ myGarmin ......Favorites .......9 Contact Garmin ..... Finding a Place Using the Getting Started ............10 Step 1: Mount Your nüvi ..2 Entering Coordinates ..Step 2: Configure Your nüvi Using Photo Navigation ..
-
Page 108: Introduction
Introduction Phone Menu .......16 Severity Color Code ...30 Traffic on Your Route ..30 Managing Files ....Viewing the Traffic Map ..31 Supported File Types..19 Viewing Traffic Delays ..31 Loading Files ......19 Traffic Subscriptions ...32 Loading Pictures for Photo Navigation Customizing the nüvi .........20 Deleting Files Changing the System... - Page 109 Signals ....37 ........45 Viewing Traffic Subscription Extras and Optional Information ......37 Accessories ......46 Restoring All Settings ..39 Garmin Travel Guide ..47 Specifications .....48 Appendix ......Declaration of Conformity ...50 Caring for Your nüvi ...40 Software License Locking Your nüvi ....41 Agreement ......50...
-
Page 110: Getting Started
Getting Started Getting Started See the Important Safety and Product Information guide in the product box for product warnings and other important information. Power key: Slide to the left to turn the nüvi on/off; slide to the right to lock the screen. Mini-USB connector Memory card... -
Page 111: Step 1: Mount Your Nüvi
Getting Started Before mounting the nüvi, see the Important Safety and Product Information guide for information about laws pertaining to windshield mounting. Step 1: Mount Your nüvi 1. Plug the vehicle power cable into the back of your nüvi. 2. Snap the cradle onto the suction cup arm. Suction cup mount Suction cup mount 3. -
Page 112: Step 2: Configure Your Nüvi
Getting Started Step 2: Configure Your Step 4: Use Your nüvi nüvi ➊ ➋ ➌ ➍ To turn your nüvi on, slide the ➎ ➏ Power key to the left. Follow the on-screen instructions. To turn your ➐ ➑ ➒ nüvi off, slide the Power key to... -
Page 113: Finding Your Destination
Getting Started Finding Your Your Destination The Where to? menu provides several different categories for you to use when searching for addresses, cities, and other locations. The 3. Select a subcategory. detailed maps loaded in your nüvi contain millions of points of interest, such as restaurants, hotels, and auto services. -
Page 114: Adding A Stop
Getting Started Adding a Stop Stopping the Route 1. With a route active, touch Menu. You can add a stop (called a Via Point) to your route. The nüvi gives 2. Touch Stop. you directions to the Via Point and then to your final destination. -
Page 115: Where To
Where to? 4. Enter the number of the address, Where to? and touch Done. The Where to? menu provides 5. Enter the street name, and touch several different categories you can Done. use to search for locations. To learn 6. Select the correct street in the list, how to perform a simple search, see if necessary. -
Page 116: Go! Page Options
Where to? Changing Your Home Go! Page Options Location To set a different home location: 1. Touch Tools > My Data > ➊ ➋ Home Location. 2. Select an option: ➌ ➍ • Enter your address. ➊ Touch to view the route on the •... -
Page 117: Finding A Place By Spelling The Name
Where to? Finding a Place by Spelling the Name If you know the name of the destination you are looking for, you can spell it using the on-screen keyboard. You can also enter letters Touch to add a space. Touch contained in the name to narrow the to move the cursor. -
Page 118: Finding Recently Found Places
Where to? • My Current Route—search Favorites vorites along your active route. You can save places in your so you can quickly find • Destination—search near Favorites your current destination. them and create routes to them. Your home location is also stored in Finding Recently Found Favorites. -
Page 119: Finding A Place Using The Map
Where to? Editing Saved Places Finding a Place Using 1. Touch Where to? > Favorites. the Map 2. Select the category and the Use the Browse Map page to view location you want to edit. different parts of the map. Touch 3. -
Page 120: Entering Coordinates
Where to? Entering Coordinates routes to them. Go to http://connect .garmin.com/photos to download If you know the geographic pictures with location information. coordinates of your destination, you page 20 for more information. can use your nüvi to navigate to your destination using the latitude and 1. -
Page 121: Using The Map
Using the Map Using the Map Your route is marked with a magenta line. As you travel, your nüvi guides you to your destination ➊ Touch to view the next turn. with voice prompts, arrows on the map, and directions at the top of the map. -
Page 122: Trip Computer
Using the Map Trip Computer Turn List The trip computer displays your When you are navigating a route, current speed and provides helpful the turn list displays turn-by-turn statistics about your trip. instructions for your entire route and the distance between turns. To view the trip computer, touch the field on the map. -
Page 123: Making Hands-Free Phone Calls
To determine whether your mobile phone with Bluetooth Initiate pairing from your nüvi or technology is compatible with the from your phone. Refer to your nüvi, go to www.garmin.com phone instructions. /bluetooth. To pair using your phone Bluetooth wireless technology settings: establishes a wireless link between 1. -
Page 124: Receiving A Call
Making Hands-Free Phone Calls 4. Initiate a search for Bluetooth When you turn on the nüvi, it tries to devices. connect to the last phone to which it was connected. 5. Select the nüvi from the list of devices. note: Not all phones support all 6. -
Page 125: Using Call Waiting
Making Hands-Free Phone Calls In a Call Using Call Waiting When you are on a call and you During a call, the in Call icon receive a second call (call waiting), appears. Touch > end Call the Incoming Call window appears. hang up. -
Page 126: Dialing A Number
Making Hands-Free Phone Calls Using Your Phone Book Viewing Your Call History Each time your phone connects Each time your phone connects with the nüvi, the phone book is to the nüvi, your call history is automatically loaded into the nüvi. automatically transferred to the nüvi. - Page 127 Making Hands-Free Phone Calls To enter your phone number: Placing Calls Using Voice 1. Touch Phone > Call Home. Dial 2. Touch Enter Phone Number You can place calls by speaking the use the keypad page or Select contact’s name. (only available From Phonebook 1.
-
Page 128: Managing Files
MapSource : see page 45 computers. GPI custom POI files from • Garmin’s POI Loader: see page note: Some operating systems or computers with multiple network drives can not display the nüvi drives. See your operating system Help file to learn how to map the drives. -
Page 129: Loading Pictures For Photo Navigation
2. Highlight the file, and click 4. Follow the on-screen instructions. Edit > Copy. page 11 and go to 3. Open the “Garmin” or memory http://connect.garmin.com/photos card drive/volume. more information. > Paste. The file 4. Click Edit appears in the list of files in the Deleting Files nüvi memory or on the memory... -
Page 130: Using The Tools
® Direct You can only access MSN Direct content with an optional MSN Direct receiver. For more information, visit http://garmin.msndirect.com or www.garmin.com/traffic. To Settings purchase an accessory, visit For information about the settings, http://buy.garmin.com. pages 33–39. Where Am I? -
Page 131: Ecoroute
Using the Tools ™ ecoRoute View the Fuel Report If you have entered your vehicle The ecoRoute feature calculates profile and the current fuel price, your vehicle’s fuel economy, your nüvi calculates your vehicle’s carbon footprint, and fuel price of average fuel economy, your carbon navigating to a destination and offers tools for improving fuel efficiency. - Page 132 Using the Tools Calibrate the Fuel Adjust the Fuel Price Economy Touch tools > ecoroute > Fuel Price and enter the current fuel price. Calibrate the fuel economy to receive This information is used to calculate more accurate fuel reports for your specific vehicle and driving habits.
- Page 133 Using the Tools Adjust Your Vehicle Profile acceleration score—gain points for You will create a vehicle profile gradual acceleration; lose points for the first time you touch rapid acceleration. tools > ecoroute. To adjust the vehicle Deceleration score—gain points for profile, touch tools >...
-
Page 134: Picture Viewer
Using the Tools View Driving Tips Picture Viewer Your nüvi provides driving tips to Use the picture viewer to view help you save fuel. Touch tools > pictures that you have stored in your ecoroute > tips. nüvi or on a memory card. 1. -
Page 135: My Data
Using the Tools Navigating to a Picture 6. Touch World Map to view a map. Nighttime hours are shown in the If a picture contains location shaded area. information, touch info, and then 7. Touch World Clock to view the touch to create a route to it. -
Page 136: Unit Converter
Using the Tools Unit Converter 1. Touch Tools > Unit Converter > Conversion. Select Currency. 1. Touch Tools > Unit Converter. 2. Touch the currency buttons and 2. Touch Conversion, select a type select the currencies you want to of measurement, and touch OK. update. - Page 137 Using the Tools the screen, touch the advertisement to search for the nearest location related to that advertisement. If the advertisement includes a coupon icon, touch the coupon icon on the Go! page to receive a coupon code. Write down this code and present it when you arrive at the location.
-
Page 138: Using Fm Traffic
Garmin is not responsible for the accuracy of the traffic does not require a subscription. information. The FM traffic receiver Traffic information is not available receives signals from the traffic in all markets. -
Page 139: Traffic In Your Area
Using FM Traffic Traffic in Your Area Severity Color Code When you are receiving traffic The color of the traffic icon indicates information, a traffic icon appears the severity of the traffic delay. in the upper-left corner of the Map page. -
Page 140: Viewing The Traffic Map
Using FM Traffic Viewing the Traffic Map You might still be routed through traffic if no better alternative routes The traffic map shows color-coded traffic flow and delays on nearby exist. roads. If a non-severe traffic delay occurs on your route, touch the traffic icon 1. -
Page 141: Traffic Subscriptions
> Settings > Traffic. For more information, see page 37 and go to www.garmin .com/fmtraffic. note: You do not need to activate the subscription included with your FM traffic receiver (if it came with one). The subscription activates automatically after your nüvi acquires satellite signals while... -
Page 142: Customizing The Nüvi
Customizing the nüvi Customizing the nüvi Units—change units of measure to Kilometers or Miles. 1. Touch Tools > Settings. Keyboard—touch QWertY for a layout similar to a computer keyboard, or touch for an alphabetical layout. This option is only available on widescreen models. about—display the nüvi software 2. -
Page 143: Adjusting The Display Settings
Customizing the nüvi • Faster time—to calculate routes Color Mode—select Daytime that are faster to drive but can be a light background, nighttime longer in distance. for a dark background, or auto automatically switch between the • Shorter Distance—to calculate two. -
Page 144: Setting The Languages
Customizing the nüvi Current time—manually set the restore—restore the original time on your nüvi. Select automatic language settings. to have the nüvi set the time based on your location. Changing the Map Settings restore—restore the original time Touch tools > Settings >... -
Page 145: Trip Log
Touch a map to enable (check security settings. Note that restoring mark) or disable (no check mark) the security settings will not clear that map. your Garmin Lock PIN or security location. restore—restore the original map settings. Setting the Bluetooth... -
Page 146: Changing The Proximity Points Settings
Customizing the nüvi wireless technology. See pages Changing the Proximity 14–18. Touch Change to connect Points Settings with a different phone. You must have proximity points (such as custom POIs or a safety • Drop—select the phone you want camera database) loaded to adjust to disconnect, and touch Yes. -
Page 147: Adding A Subscription
You can purchase additional expiration dates are listed. Touch subscriptions or a renewal if your to add a subscription. subscription expires. Go to www.garmin.com/fmtraffic. European Options Current—select which provider note: You do not need to activate the subscription included with to use. -
Page 148: Restoring All Settings
Customizing the nüvi 5. Touch Next on the nüvi, enter the code, and touch Done. The traffic subscription code cannot be reused. You must obtain a new code each time you renew your service. If you own multiple FM traffic receivers, you must obtain a new code for each receiver. -
Page 149: Appendix
Appendix Appendix Cleaning the Touch Screen Clean the touch screen with a soft, clean, lint-free cloth. Use water, Caring for Your nüvi isopropyl alcohol, or eyeglass Your nüvi contains sensitive cleaner, if needed. Apply the liquid electronic components that can be to the cloth, and then gently wipe the permanently damaged if exposed touch screen. -
Page 150: Avoiding Theft
Use the Garmin Lock feature. See note: If you forget your PIN and below for more information. your security location, you must send your nüvi to Garmin to get Locking Your nüvi it unlocked. You must also send a valid product registration or proof of Garmin Lock is a theft-deterrent purchase. -
Page 151: Resetting Your Nüvi
3. Touch to clear all user data. All original settings are restored. Updating the Software Any items that you have saved are www.garmin.com/products 1. Go to erased. /webupdater, and download WebUpdater to your computer. nüvi 205 and 205W series owner’s manual... -
Page 152: Battery Information
Appendix Battery Information • Connect your nüvi to a computer using a USB cable. The USB To maximize the lifetime of the cable is included with some nüvi battery, do not leave your nüvi in 205 and 205W packages. The direct sunlight, and avoid prolonged computer must be on for the nüvi exposure to excessive heat. -
Page 153: Removing The Nüvi And Mount
Appendix 2. Remove the fuse (glass and silver Mounting on Your cylinder), and replace it with a 3 A Dashboard fast-blow fuse. Use the enclosed mounting disk to 3. Ensure that the silver tip is placed mount your unit to the dashboard and in the black end piece. -
Page 154: Nümaps Guarantee
To receive one free map update Signals (if available), register your nüvi Your nüvi must acquire GPS at http://my.garmin.com within (Global Positioning System) satellite 60 days of acquiring satellites and signals in order to navigate. If you driving with your nüvi. You are not... -
Page 155: Custom Points Of Interest
Use the POI Loader to load custom your nüvi, connect your nüvi to points of interest (POIs) onto your your computer. Open the Garmin\ nüvi. POI databases are available poi folder in the nüvi drive or the from various companies on the memory card drive. -
Page 156: Garmin Travel Guide
POI or safety camera database. Garmin Travel Guide Much like a paper travel guide, the Garmin Travel Guide provides detailed information about places, such as restaurants and hotels. To purchase an accessory, go to http://buy.garmin.com... -
Page 157: Specifications
Data storage: Internal memory and *Average acquisition times for a optional removable microSD card. Data stored indefinitely. stationary receiver with a clear view of the sky. Computer interface: USB 2.0 full speed mass storage operating system: Garmin nüvi 205 and 205W series owner’s manual... - Page 158 Data storage: Internal memory and of the sky. optional removable SD card. Data stored indefinitely. Computer interface: USB 2.0 full speed mass storage operating system: Garmin Charge time: Approximately 4 hours Power input: Vehicle power using nüvi 205 and 205W series owner’s manual...
-
Page 159: Declaration Of Conformity
Conformity and code of the Software are valuable trade Hereby, Garmin declares that this nüvi secrets of Garmin and that the Software in product is in compliance with the essential source code form remains a valuable trade requirements and other relevant provisions secret of Garmin. -
Page 160: Troubleshooting
Appendix Troubleshooting Problem/Question Solution/Answer My nüvi never gets Take your nüvi out of parking garages and away from tall satellite signals. buildings and trees. Remain stationary for several minutes. Clean the suction cup and windshield with rubbing alcohol. The suction cup will not stay on my windshield. - Page 161 Touch Tools > Settings Bluetooth field is set to Enabled. Ensure your phone is turned on and is less than 10 meters (about 33 feet) away from your nüvi. www.garmin.com/bluetooth for more help. nüvi 205 and 205W series owner’s manual...
-
Page 162: Index
Index Index charging your nüvi 43, 51 computer connection background color configuring battery 43, 51 Symbols converting status 2-D, 3-D map view currency battery information units bicycle navigation coordinates Bluetooth technology acceleration score current location, save 14–18 accessories customizing the nüvi deleting a phone additional maps 33–38... - Page 163 JPEG image files tips fuse, changing vehicle profile extras 46–47 keyboard Garmin Lock 36, 41 language mode 8, 35 Garmin Travel Guide layout Favorites geocaching files kilometers 19–20 Go! page options deleting go home supported types language settings...
- Page 164 11–12 MapSource 19, 45 next turn loading pictures max speed, reset nüMaps Guarantee measurements, converting nüvi Bluetooth case Garmin Lock memory card charging points of interest Menu page cleaning custom microSD card mounting 2, 44 POI loader mileage report...
- Page 165 Index places you find settings speed score your current location storing the nüvi supported file types 9, 10, 21 QWERTY keyboard school zone database system settings screen brightness recently found locations text language lock registering time settings screen shots removing the mount time zone SD card resetting...
- Page 166 Index turn-by-turn directions WebUpdater turn list Where Am I? Where to? world clock unit converter unit ID updating zoom maps software usage mode eject mass-storage mode user data, delete vehicle icon vehicle profile via point, adding voice dial voice language voice mail walking route 11, 33...
- Page 167 For the latest free software updates (excluding map data) throughout the life of your Garmin products, go to the Garmin Web site at www.garmin.com. © 2008–2009 Garmin Ltd. or its subsidiaries Garmin International, Inc. Street, Olathe, Kansas 66062, USA 1200 East 151 Garmin (Europe) Ltd.
Need help?
Do you have a question about the nüvi 205 and is the answer not in the manual?
Questions and answers