Table of Contents
Advertisement
Quick Links
MS, Microsoft and NetMeeting are registered trade marks of Microsoft Corporation. Windows is a trade mark of Microsoft Corporation.
The information contained in this document is the property of Aethra Telecomunicazioni s.r . l., it is subject to change without notice and
it shall in no way be binding for Aethra Telecomunicazioni s.r . l.
© Copyright Aethra Telecomunicazioni Srl 2003.
All rights reserved.
April 2003
Aethra
Vega Star Gold
User's and installation
manual
Advertisement
Table of Contents

Related Manuals for Aethra Vega Star Gold


Summary of Contents for Aethra Vega Star Gold
- Page 1 MS, Microsoft and NetMeeting are registered trade marks of Microsoft Corporation. Windows is a trade mark of Microsoft Corporation. The information contained in this document is the property of Aethra Telecomunicazioni s.r . l., it is subject to change without notice and it shall in no way be binding for Aethra Telecomunicazioni s.r .
-
Page 2: Table Of Contents
SAFETY INSTRUCTIONS ..............5 SAFETY WARNINGS................7 The User’s Guide................8 Overview ..................8 Symbols and syntax ..............8 The Vega Star Gold unit ............11 Setting up and installing the unit..........12 Using the unit................13 Switching the unit on..............13 Making a call................13 Calling from the phonebook............14 Making an audio/video call ............15... - Page 3 Video Privacy ................22 Audio settings................23 Configuring the Vega Star Gold ...........23 Password .................24 Licenses ................24 Advance Use .................25 Terminal settings ..............25 Network interface ..............26 ISDN ..................27 Access configuration (ISDN BRI Euro) ........28 Access configuration (ISDN BRI National) ......29 Access configuration (ISDN PRI Euro/National) ......30 Advanced configuration (ISDN PRI National) ......30...
- Page 4 Audio Test................58 Video Test ................59 Connection status..............60 ISDN ..................60 IP ..................61 Hardware .................61 Release Software ..............62 Connecting a PC ................63 Connecting a PC to Vega Star Gold without a LAN ....63 Connecting a PC to Vega Star with LAN ........63...
- Page 5 Microsoft NetMeeting 3.0x with Data Conference ....68 Downloading Data Conference ..........68 Managing Data Conferencing ..........70 Modem emulation for Internet connection ........70 Vega Star Gold Internet configuration ........71 Vega Star Gold-PC connection ..........72 Technical specifications ..............74 Operating and storage conditions..........74 Standard references (CE marking and reliability tests)....74...
-
Page 6: Safety Instructions
SAFETY INSTRUCTIONS CLASS I PRODUCTS Always connect the product to a grounded socket. Connect the ISDN port (ISDN or Network interface connector) to a network termination only (NT1). It is absolutely forbidden to connect the system to an public telecommunications line. The batteries contained in this product must be disposed of by a recycling company, a qualified dangerous materials disposal company or by placing them in provided used battery containers. - Page 7 When serviced always make sure the product is unplugged. In case of fire, do not extinguish with water. This is a Class a product. In residential areas the product may cause radio disturbance. The user may therefore be requested to take suitable measures.
-
Page 8: Safety Warnings
SAFETY WARNINGS WARNING: Many of the components contained in this product are sensitive to electrostatic charge. If the connection cables must be handled, make sure that the power supply is disconnected and avoid direct contact with plugs and sockets. When handling electronic components, discharge any possible static electricity by touching a grounded surface. -
Page 9: The User's Guide
The User’s Guide Overview Ideal for medium-sized videoconference sessions, Aethra’s Vega Star Gold set-top is light, easy to carry, compatible with ISDN and IP networks and compliant with H.320/H.323 standards. The built-in multistandard (IP, ISDN or Mixed) MCU (Multipoint Conferencing Unit) delivers multiple audio and video connections with Continuous Presence. - Page 10 To insert numbers or letters use the Vega Star Gold virtual keyboard or the remote control alphanumeric keypad. For example: Pressed once = 1 Pressed twice = A Pressed three times = B Pressed once = * Pressed twice = .
-
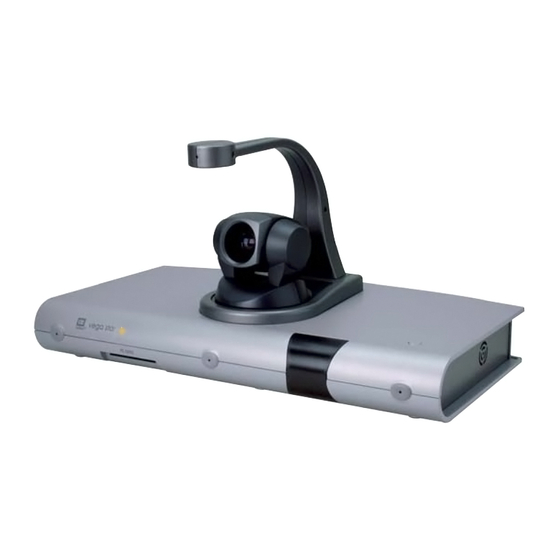
Page 12: The Vega Star Gold Unit
The Vega Star Gold unit The Vega Star Gold unit is composed of: The base unit that includes: Codec H.320/H323 Interfaces to connect a TV (not included) and an auxiliary camera Interfaces to connect auxiliary audio-video equipment and a PC... -
Page 13: Setting Up And Installing The Unit
Connect the power supply unit to the Vega Star Gold and plug it in to the mains supply. Switch ON the Vega Star Gold on/off switch. -
Page 14: Using The Unit
When switching the unit on for the first time, the following page will appear: The user can now select the desired language Making a call Once the Vega Star Gold unit has been switched on, the main user interface is displayed. There are three ways to make a call •... -
Page 15: Calling From The Phonebook
Calling from the phonebook To select a number quickly, a Phonebook is available where data about frequently called terminals can be stored. To carry out a call to a memorized address, simply select the required name from the list. Use the arrow keys on the remote control to select the PHONEBOOK icon and press Scan the Phonebook to find the initial required Choose the name using the arrow keys on the remote control. -
Page 16: Making An Audio/Video Call
Making an audio/video call Use the arrow keys on the remote control to select the VIDEO icon in the main menu and press OK. Select the type of call (ISDN or IP or MCU) and press OK. Select the call rate and press OK. If necessary, access the configuration menu with the OK button after selecting the CONFIGURE icon. -
Page 17: Making An Audio Call
Making an audio call You can use Vega Star Gold as a standard telephone to make an audio call. To do this, select the AUDIO ONLY icon on the main menu and press OK. Dial the number using the numeric keypad on the remote control. -
Page 18: Dual Video Mode
and a call is received, a window appears on screen displaying the caller’s number If the automatic answer function is not active (described later), the user can choose to accept or reject the call If you are not on the main page when the call is received, the user is asked whether to accept or reject the call, regardless of the automatic answer function. -
Page 19: Disconnecting Dual Video
Once the second call has been established, a terminal with two monitors can display both video inputs contemporarily: if the terminal has only one monitor, the video inputs can be displayed alternately by pressing the button SELF. Note: The terminal making and the terminal receiving the Audio-Video call are both able to establish a second call and the call can be bi-directional (with both terminals in Dual Video). -
Page 20: Using The Phonebook
Using the Phonebook Adding names to the phonebook Select the icon PHONEBOOK on the main menu and press OK. Use the arrow keys to select INSERT and press OK. Now you can enter information about the new user by using the keypad. Enter NAME and COMPANY. -
Page 21: Modifying An Entry
Audio and video settings Vega Star Gold enables high-quality videoconference session management thanks to a wide range of audio and video settings. Vega Star Gold can manage 3 video inputs by selecting from main camera, document camera and VCR input. Main camera selection... -
Page 22: Framing And Zoom
Framing and zoom These buttons are used to set the framing position and camera zoom to obtain the best picture possible Select the video window using the infrared remote control and press OK. Now adjust the camera framing and press OK on the remote control. Audio Autotracking This button activates the autotracking function for automatic framing of the speaker. -
Page 23: Camera Preset
Very small movements are not taken into consideration by the system. The system is able to manage a situation in which two speakers alternate in rapid sequence. In this case, an intermediate point for camera positioning and zoom is taken to ensure the best framing. The system has been tested for max. -
Page 24: Audio Settings
Configuring the Vega Star Gold This chapter explains the configuration procedures for the Vega Star Gold unit. Some of the configuration parameters can only be modified when the terminal is disconnected. -
Page 25: Password
Password The password is required to access the INSTALLATION menu. Enter the password and press OK. To personalize the password, go to ‘EDIT’ and press OK. Enter the old password Enter the new password. Enter the new password again to confirm it Now the following page appears: Licenses This page is used to activate some supplementary functions, such as a built-in... -
Page 26: Advance Use
Use the cursor to go to LICENCES and press OK to display the following window: Enter the code and press “ENABLE”. Advance Use Terminal settings To access the TERMINAL SETTINGS sub-menu, select the TERMINAL SETTINGS icon and press OK. The following parameters can be set in this section: ISDN / IP settings Rate from 2 x 64K to 12 x 64K (ISDN BRI), from 64K to 1920K (ISDN PRI), from 64K to 1920K (IP). -
Page 27: Network Interface
Video coding Auto H.261 H.263+ Note: in Auto mode the system selects the most suitable coding for the rate used Bonding YES – Bonding NO (ISDN only) If a functioning rate 128…512K is required, selecting the Bonding mode, the data channels (Nx64 or Nx56 Kbit/s) obtained by making N ISDN calls are aggregated into a single data channel. -
Page 28: Isdn
ISDN To access the interface configuration menu, select the icon and press OK. In this area you can: Select BRI or PRI mode Select the “Euro” or “National” protocol. Activate/deactivate the CLIR and COLR functions (to avoid displaying your own number on the remote monitor). -
Page 29: Access Configuration (Isdn Bri Euro)
Access configuration (ISDN BRI Euro) Select the Configure Accesses icon and press OK to display the following window. Activate/deactivate the access Choose whether to activate the "MULTINUMBER" function by selecting the corresponding key. Specify the access number. Enter the access number omitting the “0”. For example, for the number 06123456, then 6123456 must be dialed. -
Page 30: Access Configuration (Isdn Bri National)
When TEI FIXED is selected the number must be entered manually. If the box is left blank the AUTOMATIC TEI parameter is selected. In this case, the TEI number is automatically assigned by the exchange and no additional operations must be performed in this menu. -
Page 31: Access Configuration (Isdn Pri Euro/National)
The configuration is the same as for BRI with the exception that there is no TEI field Advanced configuration (ISDN PRI National) This setup depends on the length of the cable that connects the CSU T1/E1 to the Vega Star Gold codec T1/E1 The other parameters can be used following agreement with Service Providers. -
Page 32: Nic (Model L)
NIC (model L) Select NIC and press OK to access the NIC interface configuration. This section enables the user to personalize the NIC interface. The type of network (X.21, V.35, etc.) is automatically recognized by the system. Select AUTOMATIC CALL to make the call automatically no alarms Select the rate (56-768Kbps) in the RATE field. -
Page 33: G.703
Select RS366 ADVANCED in the NIC menu to display the following window: G.703 This section contains the configuration options required to use the system with the G.703 interface. You can: Activate/Deactivate the Automatic Call function (the call is automatically made in case of no alarms) Enable/Disable the CRC4 function (contact your network administrator) Enable/Disable alarms (when the function is enabled, the connection is closed in... -
Page 34: Ip Configuration
IP Configuration In the NETWORK INTERFACES menu, select IP and press OK. The following options are displayed: IP configuration H.323 Settings Services IP configuration with LAN network card Select IP CONFIGURATION to access the window where it is possible: To select the type of network card to use (Integrated LAN card or wireless LAN card) and which card to use for default. -
Page 35: Ip Configuration With Wireless Network Card
Insert an IP address, the Sub-net mask, Gateway IP address and the DNS server. For the configuration of this page contact the network administrator. IP Configuration with Wireless network card In this case it is possible to activate the automatic search for an IP address, or insert an IP address, the sub-net mask, the gateway IP address and the IP address of the DNS server for a wireless network. -
Page 36: H.323 Settings
By selecting ADVANCED it is possible to insert a series of configuration parameters. SSID: wireless network identification Ad-Hoc: all the terminals present on the network communicate Managed: all the terminals present on the network communicate with an access point. Encryption mode: activate/deactivate the encrypted mode, and set the required length of the key Key active: select one of the 4 possible keys For the configuration of this page contact the network administrator. - Page 37 To select this function, select “Use NetMeeting” and enter the IP address of the server that hosts the application. Select “ADVANCED” to access the “H.323 Settings – Advanced” page (to configure these parameters contact your network administrator). In the presence of a firewall, select the fixed port management mode between “TCP ports ”...
-
Page 38: Services
SERVICES Finally, the SERVICES area can be used to configure the parameters for web management, SNMP management and Streaming. Web Management - Telnet In this section you may decide whether or not to: manage the device from the web and via Telnet, make the notebook available, enable one IP address or all the IP addresses available in the network, change the default password. -
Page 39: Snmp Management
SNMP Management For the configuration of these parameters contact the network administrator. Streaming Management Streaming Management: activate/deactivate the streaming function. Activating all addresses: selecting this option enables all terminals to connect (via WEB) and use the streaming function. When not selected this option enables addresses (or range of addresses) for enabled terminals to be activated selectively. -
Page 40: Streaming Activation
Download the Quick Time player V.6.0.to ensure the terminal operates correctly, Quick Time can be downloaded from the “Streaming Activation” page by clicking on the button QUICKTIME. Once the language has been selected and the Vega Star Gold network address typed in, the following page will appear... - Page 41 Using the mouse, double click over the window “Live Video Streaming”. The Vega Star Gold will then receive the message “Streaming activation request from 192.168….” (as illustrated in the following slide). The web terminal will then display the following Audio Video Streaming page For a problem free use of the Streaming function follow the instructions displayed on the web page carefully.
-
Page 42: Location
The Vega Star Gold will display the following message: Location Select the LOCATION icon in the INSTALLATION menu and press OK. This section is used to enter terminal location data, such as: Terminal Name: go to the dialog box, press OK to display the virtual keyboard and enter the terminal name. -
Page 43: Loading Default Values
Language − Italian − English − French − Spanish − German − Portuguese − Norwegian − Swedish − Chinese Select the required language and press OK. Loading default values In this menu it is possible to reset all default parameters. Go to the Load default values icon and press OK Follow the on-screen instructions carefully User settings... -
Page 44: Control Panel
Adjust the VIDEO QUALITY-SPEED cursor to select the parameter with video priority between “SPEED” and “QUALITY”. Select “SPEED” for a better reproduction of moving images. Select “QUALITY” for a better definition of the image details. From this section it is also possible to access the following menus: Control panel Call Answer mode Control panel... -
Page 45: Time And Date Settings
Time and Date Settings The CONTROL PANEL menu also allows for setting date & time as well as the status bar composition. Go to all the boxes and press OK to change the values. Status bar composition For the composition of the status bar, deactivate the non-required parameters, which have been enabled by default. -
Page 46: Call Answer Mode
Call Answer mode In the USER SETTINGS menu select the CALL ANSWER MODE icon and press OK. This section is used to select options for the following functions: Audio number – Video number: activation/deactivation of audio/video calls; Mute: activation/deactivation of transmitted audio Confirm disconnection: activation/deactivation disconnection confirmation request. - Page 47 Data channel rate: Off, from 6400 to 40K Audio Coding: A Law F Mu Law F G.722 m2 G.722 m3 G.728 Video Coding: H.261 H.261 QCIF: H.263 H.263 QCIF Frames/sec: Bonding YES – Bonding NO If a functioning rate 128…512K is required, selecting the Bonding mode, the data channels (Nx64 or Nx56 Kbit/s) obtained by making N ISDN calls are aggregated into a single data channel.
-
Page 48: Audio - Video - Data
Audio - Video - Data In the SETTINGS menu select AUDIO VIDEO DATA and press OK. On this page it is possible to synchronize the audio delay with the video delay (measured in msec). For perfect audio-video synchronization, this parameter must be adjusted to the type of connection. - Page 49 the system: compatible external cameras are Sony EVI D30/31, Sony EVI D100 and Canon VCC3 MONITOR NUMBER allows the number of monitors connected to the Vega Star Gold to be selected. In auto-select (the default mode) the system is able to automatically select the correct number Return to previous page Return to main page.
-
Page 50: Data Channel
Data channel In the AUDIO VIDEO DATA menu select the DATA CHANNEL icon and press OK. This section can be used to: Enable/disable data transmission and transfer rate; Enable/disable modem emulation; Select the transfer protocol from: Owner T.120 Internet Go to the field required and press OK on the remote control. -
Page 51: Integrated Multiconference Unit
Integrated multiconference unit Overview This section describes the Vega Star Gold’s integrated MCU functions. To activate the MCU and use the multiconference functions, enter the activation code provided by the supplier. The intuitive user interface enables easy interaction with the system from the beginning to the end of the conference session. -
Page 52: Ip, Isdn Or Mixed
IP, ISDN or mixed Conference type: Allows the number of participants and desired rate to be selected Preferred audio coding G.728 G.722 G.711 Preferred video coding H.261 H.263 Conference type over ISDN: Conference type over IP:... - Page 53 Conference type mixed: Automatic adaptation Enable/Disable automatic adaptation: the system automatically adapts to the audio/video coding of the connected terminals. Continuous Presence Enable/Disable Continuous Presence transmission: when the MCU is used with a minimum of 2 participants, all terminals can simultaneously view all participants. Mode 64K or 56K (ISDN);...
-
Page 54: Activating A Multiconference Session
Activating a multiconference session To activate a multiconference session proceed as follows: Select Video from the main menu. Select: MCU connection the Activate Conference button The local video is shown in full screen mode. To add participants, press the CALL button on the remote control. - Page 55 Or press the “HOME” button to display the Multiconference management interface. The local active video is displayed in the center of the screen. The window (5) provides information on the local terminal, which can also refer to the other four terminals.
-
Page 56: Continuous Presence
Press OK to start the call procedure for terminal 1. Select the number of terminal 1 from the Phonebook or enter it in the Audio Video Call window. Press Call to activate the connection. Repeat the procedure described in item 3, 4 and 5 for the other terminals to be connected until the maximum number of terminals is reached. -
Page 57: Managing The Conference
Managing the conference The window below shows an example of a multiconference session connecting three remote terminals (terminal 1, 3 and 5). The red symbol indicates the position of the active speaker and therefore the transmission of his video signal to the other terminals. The system automatically recognizes the active speaker among the participants and automatically sends the correct video signal to the connected terminals. -
Page 58: Diagnostics
Diagnostics Vega Star Gold includes a Diagnostics menu, which can be used to check the correct installation of the system and to perform tests and checks. In the main menu select Settings → Diagnostics to display the following window: On this page the various diagnostics menus can be accessed to check connection status, interfaces utilized, audio, video and hardware components. -
Page 59: Interfaces
Interfaces By selecting the Interfaces option the page displays the following test options: Audio Video Network Audio Test Select Audio and press OK: This section contains the tests for the audio components of the system. Data such as peak value, noise and status of peripheral devices corresponding to the microphone and external microphone can be displayed. -
Page 60: Video Test
During a connection with TX Tone the system will generate a tone which can be heard by the remote system. Select the required component and press OK: Video Test Select Video from the Interfaces menu and press OK: This section contains the tests for the video components of the system. Data about camera type, selected video standard and active video input (Main/Auxiliary) can be displayed. -
Page 61: Connection Status
Connection status From the Diagnostics menu select Connection Status. This area contains information about call status and describes some parameters, such as audio and video input and output rates during the call as well as protocols used. ISDN The window displayed above shows the status of the B channels during connection. -
Page 62: Hardware
A number of Audio and Video connection parameters can be checked (bit rate, type of coding, number of lost packets). Hardware In the Diagnostics menu select Hardware to display the following window: This page displays information about the general conditions of the system, such as internal temperature. -
Page 63: Release Software
Release Software Selecting the Release Software icon, a window is displayed containing information on the installed modules, versions, dates, etc. -
Page 64: Connecting A Pc
Connecting a PC Vega Star Gold can be directly connected to a PC or LAN in order to carry out software upgrades, remote settings or diagnostics tests. Connecting a PC to Vega Star Gold without a LAN To connect Vega Star Gold to a PC which is not connected to a LAN: Connect the Ethernet cable to the Vega Star Gold connector and to the network board of your PC. -
Page 65: Remote Management
IP address, the sub-net mask and the gateway address supplied by the system administrator manually. Reboot Vega Star Gold Start the program Internet Explorer on the PC. Enter the Vega Star Gold IP address in the browser address field. The web management page will then appear. - Page 66 The following window will appear: Select the language. A window similar to the first page of the Vega Star Gold user interface will appear. This window can be used to make a call as described earlier. The management, configuration and diagnostics menus are the same. The Phonebook function is excluded from the web management.
-
Page 67: Presentation Manager
Presentation Manager This chapter describes how to use Vega Star Gold to make a remote presentation with a PC and Microsoft PowerPoint. The AePPTManager software allows you to select the presentation and download it onto Vega Star Gold over LAN. - Page 68 The program asks you to enter the Vega Star Gold IP address and choose the presentation or presentations to transfer. Press SLIDE on the remote control to access the presentation page. Select SHOW SLIDES and press OK. The first nine slides of the presentation are displayed.
-
Page 69: Microsoft Netmeeting 3.0X With Data Conference
The Data Conference software allows the Vega Star Gold to be linked to a PC hosting NetMeeting (compatible with Microsoft NetMeeting 3.0x) over LAN. This allows users in a local network to use Vega Star Gold to manage data traffic in T.120 mode over ISDN and LAN Videoconference connections. - Page 70 Use the remote control to go to SETTINGS, AUDIO-VIDEO-DATA. Configure the “Data Channel” section of the Vega Star Gold software as shown in the figure below (for ISDN video calls only). Data Enable: YES Modem: NO MLP: T.120 Rate: 115200 Use the remote control to go to SETTINGS, INSTALLATION, NETWORK INTERFACES, IP.
-
Page 71: Managing Data Conferencing
To change the Vega Star Gold IP address, disconnect, press “Options” and enter the new address. Modem emulation for Internet connection Using the serial port available, Vega Star Gold can be connected to a PC and configured as a modem for Internet access. -
Page 72: Vega Star Gold Internet Configuration
Vega Star Gold Internet configuration To configure Vega Star Gold for Internet access, use the remote control to select SETTINGS, AUDIO-VIDEO-DATA and set the "data channel" parameters as described in the window below. -
Page 73: Vega Star Gold-Pc Connection
Vega Star Gold-PC connection Set the PC COM port with parameters suitable for the Vega Star Gold serial port (8N1, HW flow control, data transfer rate = RS232 Rate). Connect the PC RS-232 serial port to the Vega Star Gold SERIAL PORT connector. - Page 74 Set the serial port as indicated below. When accessing this configuration window again, you may notice that some parameters have been modified by the system (this is a commonly reported problem with NetMeeting). For this reason, every time you access this configuration page, enter the correct parameters and press OK to exit.
-
Page 75: Technical Specifications
Technical specifications Operating and storage conditions Operating temperature +5°C ÷ +45 °C Operating humidity 10% ÷ 93 % (non condensing) Storage temperature -40 ÷ +70 °C Standard references (CE marking and reliability tests) STORAGE EN 60068-2-1 Test Ab (IEC 60068-2-1) EN 60068-2-2 Test Bb (IEC 60068-2-2) TRANSPORT IEC 60068-2-32 Test Ed - Method 1...
Need help?
Do you have a question about the Vega Star Gold and is the answer not in the manual?
Questions and answers