Table of Contents
Advertisement
Quick Links
VIDEO CD PLAYER
XL-MV558GD
VCD POWER
DISC 1
DISC 2
DISC 3
TV POWER
1
2
3
4
5
6
7
8
9
10
+10
ON SCREEN
PROGRAM
CANCEL
V.REPLACE
MPX
VIDEO
HIGHLIGHT
REPEAT
SURROUND
INTRO
RANDOM
B.MARK
ON/STANDBY
SELECT
POWER
STOP
TV
TV VOL+
TV
TV/VIDEO
PROG
PROG
–
+
KARAOKE
NORMAL
SHIFT
DIGITAL ECHO
TV VOL–
KEY CONTROL
RM-SXMV558U
MIN
MULTI BRAND REMOTE CONTROL
PHONES
XL-MV558
VIDEO CD PLAYER
KEY CONTROL
DOWN
NORMAL
UP
STANDBY
WIRELESS MIC
PBC OFF
PlayBack Control
MIC 1
MIC 2
MIC 3
BOOKMARK
SURROUND
MAX
MIN
MAX
MIN
MAX
MIN
MAX
VOCAL
REPLACE
KEY CONTROL
PlayBack
Control
INSTRUCTIONS
TRIPLE TRAY
SELECT
VIDEO
INTRO
RETURN
PREV
NTSC/PAL COMPATIBILITY
VIDEO CD
COMPACT
DIGITAL VIDEO
For Customer Use:
Enter below the Model No. and Serial No.
which are located either on the rear, bottom or
side of the cabinet. Retain this information for
the future reference.
Model No.
Serial No.
VIDEO CD VERSION 2.0
VIDEO CD VERSION 2.0
JAPAN
DESIGNED BY JVC
DESIGNED BY JVC
1
2
3
4
5
6
7
8
9
10
11
12
13
14
15
NEXT
16
17
18
19
20
STILL
+20
PROGRAM
'
'
GRAPHICS
LET0089-001A
[UF]
Advertisement
Table of Contents

Related Manuals for JVC LET0089-001A


Summary of Contents for JVC LET0089-001A
- Page 1 MIC 3 BOOKMARK SURROUND VOCAL REPLACE NTSC/PAL COMPATIBILITY VIDEO CD PlayBack Control INSTRUCTIONS VIDEO CD VERSION 2.0 VIDEO CD VERSION 2.0 JAPAN DESIGNED BY JVC DESIGNED BY JVC TRIPLE TRAY SELECT VIDEO INTRO RETURN PREV NEXT STILL PROGRAM COMPACT GRAPHICS...
- Page 2 IMPORTANT for the U.K. DO NOT cut off the plug for this equipment. If the plug fitted is not suitable for the power points in your home or the cable is too short to reach a power point, then obtain an appropriate safety- approved extension lead or consult your dealer.
-
Page 3: Laser Product
IMPORTANT FOR LASER PRODUCTS LABELS 1 CLASSIFICATION LABEL PLACED ON REAR ENCLOSURE CLASS LASER PRODUCT 1. CLASS 1 LASER PRODUCT 2. DANGER: Invisible laser radiation when open and interlock failed or defeated. Avoid direct exposure to beam. 3. CAUTION: Do not open the top cover. There are no user service- able parts inside the Unit;... -
Page 4: General Information
GENERAL INFORMATION Care and handling of compact discs How to handle CDs When handling a compact disc, do not touch the surface of the disc (reflective silver side –– the side without the label). Since compact discs are made of plastic, they are easily damaged. If a disc gets dirty, dusty, scratched or warped, the sound will not be picked up correctly and, in addition, such a disc may cause the CD player to malfunction. -
Page 5: Before Using For The First Time
BEFORE USING FOR THE FIRST TIME Basic Connections The Video CD Player must be connected directly to a television set or an amplifier that is connected to a television or monitor. The television set or the amplifier must have audio input jacks for right and left channels and a video input jack. -
Page 6: Installing Batteries
Installing batteries Putting batteries in the remote control The battery compartment is located on the back of the remote control. 1. Insert a finger in the recess under the battery compartment cover, and pull off the cover. 2. Place the two accessory R6P(SUM-3)AA(15F) batteries in the remote control according to the polarity markings (“+”... -
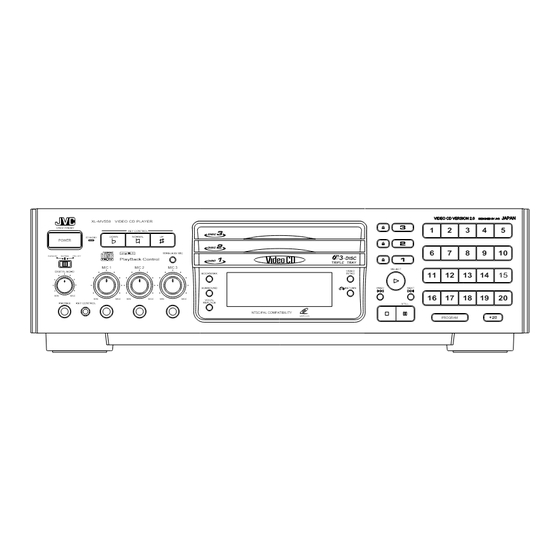
Page 7: Overview Of Controls
OVERVIEW OF CONTROLS Here the basic function of controls on the front panel of the Player and the remote control are explained. The function of some controls may be restricted in actual use depending on the on-going operations. The remote XL-MV558 VIDEO CD PLAYER ON/STANDBY... -
Page 8: On The Remote Control Unit
Activates the multiplex function, which switches to NORMAL (ste- reo), L-ch monaural and R-ch monaural. JAPAN DESIGNED BY JVC HIGHLIGHT button Applies to a video CD to see highlights of a track. Displays the first (5) seconds of each of nine (9) equal-time segments of the track. -
Page 9: Basic Operations
BASIC OPERATIONS Now you can play a variety of video CDs!! Overview of the three modes This Player has three (3) modes called KARAOKE, NORMAL, and PBC OFF mode. These are selected by the MODE switch. This enables various ways of playing a video CD. KARAOKE NORMAL PBC OFF... -
Page 10: Preparation For Playing
Preparation for playing Turn on the television set, amplifier or receiver to which the Player is connected, and then select the proper channel and mode to operate the Player, and set the sound volume to a reasonable level. Press the POWER button on the front panel or remote control. ON/STANDBY STANDBY POWER... -
Page 11: Stopping Play
BASIC OPERATIONS Stopping play Press the 7 7 7 7 7 (STOP) button to stop play at any time. STILL Pausing play Press the 8 8 8 8 8 STILL (PAUSE) button to temporarily suspend play. STILL Notes • When the 8 STILL (PAUSE) button is pressed once, “PAUSE” appears on the television screen, the video motion freezes and the sound is turned off. -
Page 12: Using The Remote Control
Notes • Before the remote control unit leaves the factory, the brand code number is set as No. 01 (JVC). • Depending on your television set’s age and other factors, brand code numbers may be different from those shown in the table. -
Page 13: Preset Code Table
BASIC OPERATIONS Preset code table Television Manufacturer PANASONIC SONY SHARP TOSHIBA/BEIJING/CHANGHONG MITSUBISHI/CHANGHONG HITACHI SANYO FUNAI AIWA DAEWOO SAMSUNG LG (GOLDSTAR) THOMSON FERGUSON PHILIPS/TCL/CHANGHONG GRUNDIG MIVER FINLUX NOKIA JINXING/PEONY1 PEONY2 PEONY3/CHANGHONG KONKA PEIJIN/NOBLEX Page 10... -
Page 14: Various Unique Functions
VARIOUS UNIQUE FUNCTIONS Various functions can enhance your enjoyment Display of operations status Preparation This function is controlled by the remote control. Operation Press the ON SCREEN button on the remote control. By pressing the ON SCREEN button, the following information may be easily and quickly displayed or erased on the television screen. -
Page 15: Clearing A Program
VARIOUS UNIQUE FUNCTIONS Clearing a program To delete all programmed tracks you have entered, press the 7 7 7 7 7 STOP button and then the PROGRAM button. “PROG OFF” will be displayed on the television screen. STILL Note The Player does not cancel the track program even if the 7 (STOP) button is pressed. -
Page 16: Viewing The Video Intro Of A Video Cd
Viewing the VIDEO INTRO of a video CD Preparation When you play a video CD with the Playback Control function, the mode switch is recommended to be in the PBC OFF mode or KARAOKE mode. Operation 1. Play the disc you want to see a digest of. 2. -
Page 17: Selecting The Surround Mode
VARIOUS UNIQUE FUNCTIONS Selecting the surround mode You can change the sound ambiance using the Surround function. Operation 1. Choose from among the following three surround modes to change the disc mood. CLUB: A more intimate sound with greater resonance and bass. -
Page 18: Using A Microphone
Using a microphone Using a wired microphone Operation 1. Insert the connector cable to the end of the microphone. 2. Up to three (3) microphones can be connected to the MIC jacks on the front panel. MIC 1 MIC 2 MIC 3 3. -
Page 19: If There Is Interference When Using The Wireless Microphone
VARIOUS UNIQUE FUNCTIONS 3. Set the MIC SELECT switch to “WIRELESS”. 4. When the indicator turns green, the wireless microphone has been accepted. If the tuning is not proper (noise or no voice output from the speaker because of interference from TV signals etc.), the indicator turns red. -
Page 20: Vocal Replace
Vocal replace Preparation This function is used for multiplex sound discs. Operation 1. Press the VOCAL REPLACE button during play or stop. RE- PLACE will appear on the display window and VO.REPLACE will appear on the television screen. When you start singing, the disc vocal is removed and your voice is inserted into the music. -
Page 21: Operation Of Playback Control Function
OPERATION OF PLAYBACK CONTROL FUNCTION Playing Video CDs with Playback Control function This Player provides a Playback Control function which utilizes a procedure (menu selection) programmed in a video CD. The playback operation procedure may differ depending on the disc you use. The Playback Control function is described below and in the figure. -
Page 22: Video Cd With Playback Control Function
Video CD with Playback Control function What is Playback Control function? The Playback Control function, ushering a new video CD age, allows you to enjoy menu-driven operation and high-resolution still images having a resolution four times greater than moving pictures. Example of playback by the Playback Control function Moving Moving... -
Page 23: Graphic/Digital Audio Cds
GRAPHIC/DIGITAL AUDIO CDs Playing CD Graphics/ digital audio CDs Playing CD Graphics Basic video CD-playing procedures apply although the pictures are still. A CD Graphics is identified by “CD-G” shown on the display. Notes • The following operations may distort the image on the screen. Searching for starting point of music Fast forwarding/reversing Stop/pause... -
Page 24: Specifications
SPECIFICATIONS Main specifications XL-MV558GD Model Video CD player Playback disc Video CD (with/without Playback Control function) CD Graphics Digital Audio CD Total harmonic 0.01% (1kHz) distortion S/N ratio 93 dB Frequency 20Hz – 20kHz response Input terminal Microphone 2 mV (9.1 k ) Output Line output 2.0 Vrms (full scale) -
Page 25: Troubleshooting
TROUBLESHOOTING Troubleshooting What appears to be a malfunction may not always be serious. Please go through the following list before requesting service. Symptom Power does not come on. Power plug is disconnected from AC outlet. Battery is exhausted. Remote control does not work. The tip of the remote controller is not pointed at the right receiving part of the player. -
Page 26: Table Of Contents
We would like to thank you for purchasing one of our JVC products. Before connecting this unit to the wall outlet, please read the instruc- tions carefully to ensure that you obtain the best possible performance. If you have any questions, please consult your JVC dealer. - Page 27 Main (AC) Line Instruction (not applicable for Europe, U.S.A., Canada, Australia and U.K.) IMPORTANT for main (AC) line BEFORE PLUGGING IN, do check that your main (AC) line voltage corresponds with the position of the voltage selector switch provided on the outside of this equipment and, if different, reset voltage selector switch, to prevent damage or risk of fire/electric shock.
Need help?
Do you have a question about the LET0089-001A and is the answer not in the manual?
Questions and answers