
Related Manuals for JSR Ultrasonics DPR500


Summary of Contents for JSR Ultrasonics DPR500
-
Page 1: Dpr500 Dual Pulser-Receiver
DPR500 Dual Pulser-Receiver Operator Manual Manual Version 2.2.0 February, 2011 www.JSRUltrasonics.com Copyright © 2006-2011 Imaginant Inc. All Rights Reserved 000001000006E... -
Page 2: Table Of Contents
General Description ....................6 Description ................................6 Physical..................................6 Theory of Operation....................7 DPR500 System Blocks and Their Functions.....................7 JSR Control Panel Software ..........................7 Digital Control Logic and RS-232 Interface ......................8 High Voltage Power Supply..........................8 Pulser (Impedance / Energy / Damping) ......................8 Pulser Trigger Control............................8... - Page 3 Operation ......................14 Pulse-Echo Mode Operation..........................14 Transmission Mode Operation..........................15 Operating the DPR500 ............................16 Remote Operation of the DPR500..............17 Overview of Remote Operation.........................17 JSR Control Panel graphical user interface.....................18 JSR Common SDK (Software Development Kit) ....................19 JSR Simple ActiveX object ..........................20 Remote PC control via serial port commands ....................20...
-
Page 4: Fuse, Safety, And Technical Support Information
Section 8 of this manual. Safety There are no user serviceable parts in the DPR500, other than the fuse. DPR500 units should be returned to the manufacturer for any repair. If the DPR500 is not used as prescribed by the manufacturer, the overall safety may be impaired. -
Page 5: Warranty Agreement
DPR500 Dual Pulser-Receiver Warranty Agreement Instrument Limited Warranty Imaginant Inc. warrants that its instruments will be free from defects in materials and workmanship for a period of one year from the date of purchase. IMAGINANT will, at its option, repair or replace any of its products, which prove to be defective during the warranty period without charge for parts and labor. -
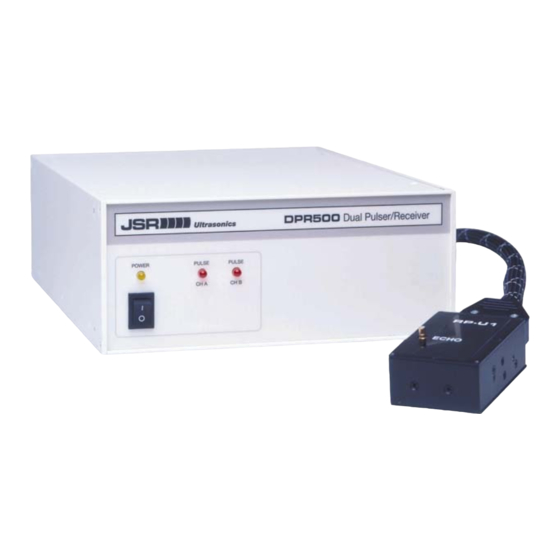
Page 6: General Description
ECHO connector via a short length of 50Ω coaxial cable, and the transducer converts energy from the electrical excitation pulse into an ultrasonic pulse that is propagated into a test material or medium. Four discrete damping levels in the DPR500 allow the transducer response to be fine-tuned. -
Page 7: Theory Of Operation
Theory of Operation DPR500 System Blocks and Their Functions The DPR500 dual Pulser-Receiver is composed of the functional blocks shown in the figure below. The main unit includes the digital control logic and RS-232 interface, high voltage power supply(s), pulser trigger select, PRF oscillator, receiver amplifier(s), receiver low pass filters, and receiver high pass filters. -
Page 8: Digital Control Logic And Rs-232 Interface
DPR500 Dual Pulser-Receiver Digital Control Logic and RS-232 Interface The interface and control logic enables the control of the DPR500 from software running on the host computer. Communication is via an RS-232 interface such as the COM1 or COM2 ports on the remote computer. -
Page 9: Power Switch, Indicators, And Connectors
This toggle switch is used for turning on/off power to the DPR500. Power Indicator LED (Power) This amber-colored LED illuminates to indicate that power is applied to the DPR500. This LED can also be made to blink at a controlled rate by the ‘Blink’ command described in Section 7. -
Page 10: Dpr500 Rear Panel Connectors
In this mode, the signal line should be terminated with a 50Ω load. If the DPR500 pulser is in external trigger mode, then the Trig / Sync connector is used for receiving a positive-going 3-5 V external trigger pulse. Triggering will occur on the rising edge of the trigger pulse. -
Page 11: Rs-232 Interface Connectors
RJ45 cable and the DB-9 to RJ45 adapter supplied with the DPR500. When control of other DPR500 instruments is desired, they may be added in a daisy-chain fashion by connecting a reversing RJ45 cable from the RS-232 Output connector on one instrument to the RS-232 Input connector of the next instrument. -
Page 12: Instrument Setup
A PC or compatible computer with an available COM1, COM2 or RS-232 serial port can control the DPR500. Ventilation To help maintain adequate instrument cooling, the cooling vents in the rear of the DPR500 should not be blocked. Mains Disconnect The power cord is the mains disconnect device. -
Page 13: System Configuration
DPR500 rear connector labeled RS-232 Input. 4. Plug the power cord into the power receptacle on the rear of the DPR500, and plug the other end into a power outlet of the correct voltage. If the power cord that was supplied with the instrument is not available, then a power cord that is rated to 40 W must be used. -
Page 14: Operation
In the pulse-echo mode of operation, a single transducer is used for both pulse transmission and echo receiving. To configure the DPR500 for pulse-echo operation, the transmit/receive transducer is connected to the Remote Pulser connector labeled ECHO, typically via of a 50Ω coaxial cable. -
Page 15: Transmission Mode Operation
Transmission Mode Operation For transmission mode operation, separate transmitting and receiving transducers are employed. The transmitting transducer is connected to the DPR500 ECHO connector and the receiving transducer is connected to the THROUGH SMB connector. The DPR500 transmission mode configuration is shown below. -
Page 16: Operating The Dpr500
Section 7. 4. Set the pulse trigger control to INT if the DPR500 pulser is to be triggered by the internal PRF oscillator, and connect the DPR500 Trig/Sync connector to the external trigger input of the monitoring oscilloscope. -
Page 17: Remote Operation Of The Dpr500
A command sent by the computer will be received by all instruments in the daisy chain, and acted upon by only the addressed instrument(s). If a DPR500 in the daisy chain is turned off, it will not impede communication between the computer and other instruments. Up to 255 instruments may be connected to one serial port. -
Page 18: Jsr Control Panel Graphical User Interface
• Query button allows refresh of all values from front panel changes • Controls any number and mix of DPR500, DPR300, or PRC50 instruments • Operates on 32 and 64-bit versions of Windows XP, Windows Vista, or Windows 7 systems. -
Page 19: Jsr Common Sdk (Software Development Kit)
JSR Common SDK (Software Development Kit) The JSR Common SDK provides the tools for a programmer to write application-level programs to control DPR500, DPR300, and PRC50 instruments without having to learn the intricacies of the command protocol, features, or control ranges of the instruments. -
Page 20: Jsr Simple Activex Object
PC to an RJ45 receptacle. An RJ45 reversing eight-conductor cable is then used to connect from the serial port to the RS-232 input connector on the DPR500. The pin assignment of the DPR500 rear panel RS-232 interface connectors is shown below. -
Page 21: Dpr500 Service
DPR500 Dual Pulser-Receiver DPR500 Service Serviceable Parts There are no user serviceable parts in the DPR500. The DPR500 units should be returned to the manufacturer for any repair. Fusing “CAUTION: Double Pole/Neutral Fusing”. Both +AC and Neutral power supply lines are fused. -
Page 22: Voltage Selection
DPR500 Dual Pulser-Receiver Voltage Selection 1. Turn off the power switch and remove the power cord from the back of the DPR500. 2. Using a small screwdriver, gently unlatch the fuse holder door from the power inlet module on the back of the DPR500, as shown above. -
Page 23: Dpr500 Specifications
3-5V positive going pulse. Triggering will occur on leading edge. TTL and CMOS compatible. Sync Output +4V into 50 Ohms, tr < 10ns, TW = 40ns min. Receiver The DPR500 can be configured with any combination of one or two of the following receivers: 500 MHz 300 MHz 50 MHz Gain... -
Page 24: Pc Or Compatible Control Computer
DPR500 Dual Pulser-Receiver PC or Compatible Control Computer Interface Bi-directional communication via RS-232 serial link using RJ45 type 8- conductor cable. Ships with a standard 6’ cable. Other lengths are available. Software Windows based GUI control program and SDK are provided free. -
Page 25: Pulser-Receiver Configuration File Specification
Pulser-Receiver Configuration File Specification Introduction The DPR500 may be populated with a variety of receivers, and can be connected to a variety of remote pulsers. A generic control approach was adopted to enable the creation of control software that allows for the differences between existing pulsers and receivers as well as to provide for receivers and pulsers developed in the future. - Page 26 DPR500 Dual Pulser-Receiver 8) The eighth field indicates the number of bits in the command data byte(s) that are assigned a value by this function. In the case of a receiver, this is usually a full byte, or 8 bits.
-
Page 27: Example Configuration Files
DPR500 Dual Pulser-Receiver Example Configuration Files Example Pulser Configuration File ; This file contains the Pulser File Format used for Pulser 01 of type L PL01 ; number of bytes required for formatting ; function | cmd. |read| | init. | inc. | name | char |only|min |max | value | dec. -
Page 28: General Configuration File Arrangement
DPR500 Dual Pulser-Receiver General Configuration File Arrangement The general layout of a configuration file is shown below. Filename byte count function name 1, cmd char, read only, min, max, init value , incr, bit count, bit start, values function name N…...
Need help?
Do you have a question about the DPR500 and is the answer not in the manual?
Questions and answers