Table of Contents
Advertisement
Quick Links
Download this manual
See also:
Service Manual
Advertisement
Table of Contents

Related Manuals for JVC KS-F345


Summary of Contents for JVC KS-F345
- Page 1 CASSETTE RECEIVER KS-F345 S.BASS DISP For installation and connections, refer to the separate manual. INSTRUCTIONS ИНСТРУКЦИЯ ПО ЭКСПЛУАТАЦИИ GET0112-001A [EE]...
-
Page 2: Table Of Contents
Thank you for purchasing a JVC product. Please read all instructions carefully before operation, to ensure your complete understanding and to obtain the best possible performance from the unit. CONTENTS How to reset your unit ... LOCATION OF THE BUTTONS ... 3 Control panel ... -
Page 3: Location Of The Buttons
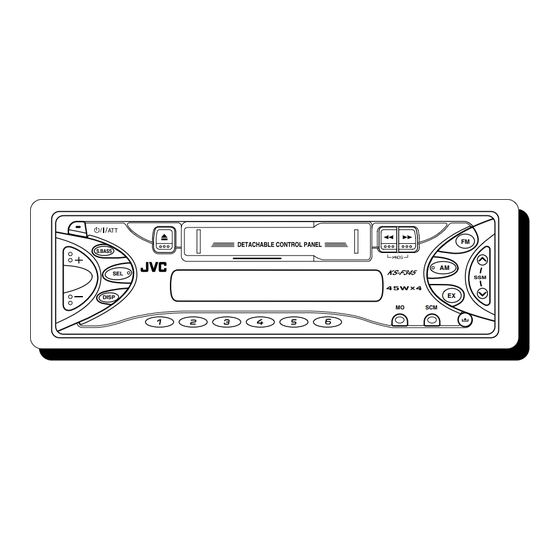
LOCATION OF THE BUTTONS Control panel Display window S.BASS DISP (standby/on/attenuator) button 2 S.BASS (super bass) button 3 0 (eject) button 4 Display window 5 Cassette compartment 6 1/¡ (PROG:program) buttons 7 AM button 8 EX (extra) button 9 FM button buttons •... -
Page 4: Basic Operations
BASIC OPERATIONS Turning on the power Turn on the power. Notes on One-Touch Operation: • When you select a source in step 2 below, the power automatically comes on. You do not have to press this button to turn on the power. •... -
Page 5: Setting The Clock
S.BASS DISP Setting the clock Press and hold SEL (select) for more than 2 seconds. “CLOCK H” or “CLOCK M” appears on the display. Set the hour. 1 Select “CLOCK H” (hour) if not shown on the display. CLOCK H 2 Adjust the hour. -
Page 6: Radio Operations
RADIO OPERATIONS S.BASS Listening to the radio You can use either automatic searching or manual searching to tune in to a particular station. Note: When a cassette is in the cassette compartment, you cannot select the tuner. Be sure to eject the cassette from the cassette compartment to listen to the radio. -
Page 7: Storing Stations In Memory
Press and hold (manual) starts flashing on the display. Tune in to a station you want while “M” (manual) is flashing. To tune in to stations of higher frequencies To tune in to stations of lower frequencies • If you release your finger from the button, the manual mode will automatically turns off after 5 seconds. -
Page 8: Manual Preset
Manual preset You can preset up to 6 stations in each band (FM1, FM2, FM3, and AM) manually into the number buttons (1 – 6). • You can also preset an FM or AM station (such as your favorite station or traffic announcement station) into the EX (extra) button, and recall it by one-touch operation even if the unit is turned off. -
Page 9: Note
S.BASS DISP Listening to a cassette You can play back type I (normal) tapes. Turn on the power. Note on One-Touch Operation: If a cassette is already in the cassette compartment, tape play starts automatically. However, it is not recommended to leave the cassette in the compartment when turning off the power. -
Page 10: Sound Adjustments
SOUND ADJUSTMENTS Adjusting the sound You can adjust the sound characteristics to your preference. Select the item you want to adjust. Each time you press the button, the adjustable items change as follows: (bass) (treble) (volume) Indication To do: Adjust the bass. Adjust the treble. -
Page 11: Selecting Preset Sound Modes
Selecting preset sound modes You can select a preset sound adjustment suitable to the music genre. Select the sound mode you want. Each time you press the button, the sound mode changes as follows: SCM OFF (BEAT) (SOFT) Ex.: When you select “BEAT” Indication For: Preset values... -
Page 12: Detaching The Control Panel
DETACHING THE CONTROL PANEL You can detach the control panel when leaving the car. When detaching or attaching the control panel, be careful not to damage the connectors on the back of the control panel and on the panel holder. Detaching the control panel Before detaching the control panel, be sure to turn off the power. -
Page 13: Troubleshooting
What appears to be trouble is not always serious. Check the following points before calling a service center. Symptoms • Sound is sometimes interrupted. • Sound cannot be heard from the speakers. • The unit does not work at all. •... -
Page 14: Maintenance
MAINTENANCE This unit requires very little attention, but you will be able to extend the life of the unit if you follow the instructions below. To clean the head • Clean the heads after every 10 hours of use using a wet-type head cleaning tape (available at an audio store). -
Page 15: Specifications
AUDIO AMPLIFIER SECTION Maximum Power Output: Front: 45 W per channel Rear: 45 W per channel Continuous Power Output (RMS): 17 W per channel into 4 Ω, 40 Hz Front: to 20 000 Hz at no more than 0.8% total harmonic distortion. 17 W per channel into 4 Ω, 40 Hz Rear: to 20 000 Hz at no more than... - Page 16 Having TROUBLE with operation? Please reset your unit Refer to page of How to reset your unit EN, RU 1202KKSMDTJEIN © 2002 VICTOR COMPANY OF JAPAN, LIMITED...
-
Page 17: Installation (In-Dash Mounting)
• The following illustration shows a typical installation. However, you should make adjustments corresponding to your specific car. If you have any questions or require information regarding installation kits, consult your JVC IN-CAR ENTERTAINMENT dealer or a company supplying kits. Before mounting: Press (control panel release button) to detach the control panel if already attached. - Page 18 • When using the optional stay • Washer Dashboard Sleeve Removing the unit • Before removing the unit, release the rear section. Remove the control panel. Remove the trim plate. Insert the 2 handles into the slots, as shown. Then, while gently pulling the handles away from each other, slide out the unit.
-
Page 19: Electrical Connections
This unit is designed to operate on 12 V DC, NEGATIVE ground electrical systems. If your vehicle does not have this system, a voltage inverter is required, which can be purchased at JVC IN-CAR ENTERTAINMENT dealers. • Replace the fuse with one of the specified rating. If the fuse blows frequently, consult your JVC IN-CAR ENTERTAINMENT dealer. - Page 20 Connections Adding Other Equipment / Amplifier / You can connect an amplifier to upgrade your car stereo system. • Connect the remote lead (blue with white stripe) to the remote lead of the other equipment so that it can be controlled through this unit.
Need help?
Do you have a question about the KS-F345 and is the answer not in the manual?
Questions and answers