Zippie VOYAGE Owner's Manual
Hide thumbs
Also See for VOYAGE:
- Owner's manual (90 pages) ,
- Owner's manual (160 pages) ,
- Quick manual (36 pages)
Table of Contents
Advertisement
Quick Links
Advertisement
Table of Contents

Subscribe to Our Youtube Channel
Related Manuals for Zippie VOYAGE


Summary of Contents for Zippie VOYAGE
- Page 1 VOYAGE Zippie ® VOYAGE with transit option without transit option Supplier: This manual must be given to the user of O w n e r ’ s M a n u a l this wheelchair. User: Before using this wheelchair read this entire...
- Page 2 E NGLISH I. IN TRODUCTION SUNRISE LISTENS Thank you for choosing a Zippie product. We want to hear your questions or comments about this manual, the safety and reliability of your device, and the service you receive from your supplier.
-
Page 3: Table Of Contents
E NGLI SH II. TABLE OF CONT ENTS III. YOUR DEVICE AND ITS PARTS........4 E. SEATING SHELL INSTALLATION ......12 IV. NOTICE– READ BEFORE USE ........5 F. SEATING SHELL REMOVAL........12 GENERAL WARNINGS............5 G.TILT IN SPACE ANGLE ADJUSTMENT....12 A. WEIGHT LIMIT..............5 H.RECLINE ADJUSTMENT (OPTIONAL) ....13 B. -
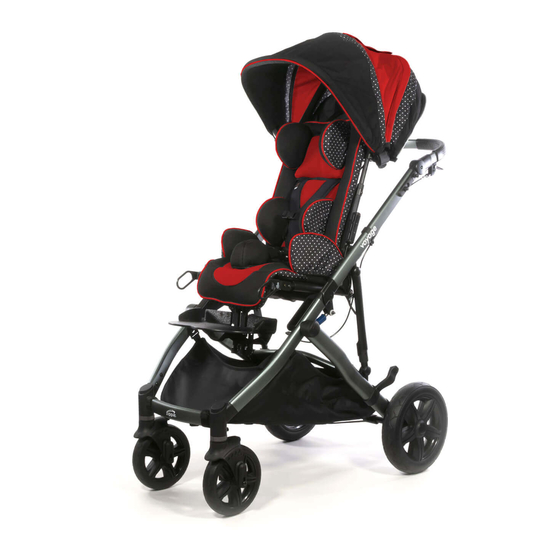
Page 4: Your Device And Its Parts
12. Seating Shell 13. Adjustable Laterals (optional) 14. Backrest Pad 15. Tilt Lever 16. Handle Extension Trigger 17. Recline Lever ZIPPIE VOYAGE Lower Leg / Footrest Adjustment Range Adjustment Ranges: Lower leg/foot: 1.5” -12” Tilt Footrest angle Adjustment 60° to 260°... -
Page 5: Notice- Read Before Use
E NGLISH IV. NOTICE – READ BEFORE USE A. CHOOSE THE RIGHT DEVICE & SAFETY C. WARNINGS OPTIONS The word “WARNING” refers to a hazard or unsafe practice that may cause severe injury or death to you or to other persons. The Sunrise provides a choice of many wheelchair styles to meet the “Warnings”... -
Page 6: G.street Use
E NGLISH G. STREET USE 6. NEVER transport this mobility device in the front seat of a vehicle. This action could risk serious injury or death to the WARNING dependent rider and driver. 1. When using this device, avoid street use whenever possible. 7. -
Page 7: Ramps, Slopes And Sidehills
E NGLISH E. RAMPS, SLOPES AND SIDEHILLS 6. Keep the mobility device in balance and take small steps backward. Turn the mobility device around and gently lower WARNING front casters to the ground. Pushing the mobility device on a slope, including ramps or hills, will To climb a step or curb going FORWARD: change the center of balance. -
Page 8: Warnings- Components And Options
E NGLISH VII. WARN IN GS– COMPONENT S AN D OPTIONS F. PARKING BRAKE VII. WARNINGS: COMPONENTS AND OPTIONS WARNING WARNING Never engage the parking brake to slow or stop this product when This early intervention device has been tested and approved using it is moving. -
Page 9: M.tilt And Recline
N. TRANSIT OPTION AND USE NOTE– The Zippie Voyage has passed transit testing and is considered to be WC-19 compliant for a 60 lb dependent child secured in a 5 point harness, with a transit strap attached to the rear frame. -
Page 10: Set-Up And Adjustments
A. UNFOLDING AND FOLDING BASE FRAME WARNING Zippie dependent mobility devices are designed for stability and perform- ance. When unfolded, the device must be fully open and locked to avoid injury to the dependent rider. Follow the instructions for unfolding the device carefully, and double-check that the device is fully locked before adding the seating shell and rider. -
Page 11: Caster Wheels
B. CASTER WHEELS Installing and Removing the Caster Wheels 1. Locate the caster stem guide hole location on the bottom of the Voyage frame. Line up the caster stem (A) with the hole and insert, push until the caster stem clicks into place. -
Page 12: Seating Shell Installation
E NGLI SH VIII E. SEATING SHELL INSTALLATION WARNING BEFORE installing the seating shell, always check that the mobility device is completely unfolded and in the locked position, and that all four wheels are locked in place. The seating shell should never be installed with a seated occupant. Always remember to stabilize the mobility device before performing this action. -
Page 13: H.recline Adjustment (Optional)
E NGLI SH VIII H. RECLINE ADJUSTMENT (OPTIONAL) WARNING BEFORE using the recline adjustment, always check that the mobility device is com- pletely unfolded and in the locked position, and that all four wheels are locked in place. Be careful to avoid pulling or crimping any life support tubing that may be attached to the child. -
Page 14: Canopy Installation And Adjustment
E NGLI SH VIII K. CANOPY INSTALLATION AND ADJUSTMENT WARNING It is always best to make sure the dependent is not seated in the mobility device during the installation of accessories. 20 21 Canopy installation 1. From behind your mobility device, attach the canopy to the seating shell receivers (A). 2. -
Page 15: Positioning And Growth Adjustments
TOOLS YOU WILL NEED To set-up, adjust and maintain your device you will need the following tools: 1. 4mm hex key for most growth adjustments on the Voyage. 2. 5/32 hex key (for headrest collar adjustments) 3. 10mm open end wrench 4. -
Page 16: Adjustable Contour Cushion Adjustments
E NGLI SH Cushion types 1. Standard (A), ledge (B), and wedge (C) 2. Each type of cushion effects the child’s posture in a different and specific way. 3. Be sure to consult your health care advisor before changing the type of cushion. D. -
Page 17: G.back Cushion Height Adjustment
E NGLI SH G. BACK CUSHION HEIGHT ADJUSTMENT 1. Fit the back cushion to the positioning plate at proper height. 2. Exchange appropriate back cushion inserts if a gap is present at the bottom of the back cushion. H. FOOTREST ADJUSTMENTS Height Adjustment The height adjustment for the footrest consists of two telescoping tube sections which lock the footrest height. -
Page 18: Anterior Trunk Butterfly Support
E NGLI SH ANTERIOR TRUNK BUTTERFLY SUPPORT WARNING To avoid serious injury or issues with eating or breathing, the pelvic positioning belt is required to be used in combination with the butterfly harness. Double-check all adjust- ments to ensure there is no possibility of obstructing the airway or any other unde- sired constrictions. -
Page 19: Choosing Anterior Supports
E NGLI SH L. CHOOSING ANTERIOR SUPPORTS When deciding if you should use Anterior supports, always consult your healthcare advisor. Some children, due to their disability level or physical condition, may need anterior supports to help maintain proper posture or body position. Such devices include head straps, shoulder straps, thoracic strap systems, pelvic supports, and belts. -
Page 20: N.lateral Hip Blocks
E NGLI SH Forehead Strap Adjustment 1. Using an Allen wrench: Loosen the guide rods adjustment screws (A) and slide both guide rods evenly to desired diameter. 2. Locate neoprene strap in desired position on forehead. 3. Slide guide rods through clamp until front of neoprene strap is approximately 1/2” from plastic guide support. -
Page 21: Tray Arm Height Adjustment
1. Booster base is height adjustable 2. The booster base uses the same type of latch blocks to attach the seating shell as the Voyage base frame. 3. Please refer to accessory instruction sheet for setup, specific warnings, and how to maintain your Folding Booster Base. -
Page 22: U.vent/Battery Trays
15lbs, and an underframe vent tray (B) which has a weight capacity of 50lbs. 2. The vent platforms attach easily to the Voyage base frame. 3. Please refer to the accessory instruction sheet for setup, specific warn- ings, and how to maintain your Vent mounting platforms. -
Page 23: Maintenance
4. At least every four months, check all screws and knobs for tightness. If parts are missing, broken, damaged or worn, then Sunrise Medical warrants the Zippie Voyage frame against defects in discontinue use of the product until repairs are made, using materials and workmanship for the lifetime of the product. - Page 24 ©2013 Sunrise Medical (US) LLC 4.2013 124267 Rev. B...
Need help?
Do you have a question about the VOYAGE and is the answer not in the manual?
Questions and answers