Advertisement
Table of Contents
- 1 Scope of Supply
- 2 For Your Safety
- 3 Function Keys
- 4 Lcd Screen and Settings
- 5 Manual Setting
- 6 Manual Time Setting
- 7 Calendar Setting
- 8 12/24 Hour Time Display Setting
- 9 Time Zone Setting
- 10 Time Reception On/Off Setting
- 11 C/°F Temperature Unit Setting
- 12 Outdoor Transmitter
- 13 868 Mhz RECEPTION
- 14 Care and Maintenance
- 15 Waste Disposal
- 16 Specifications
- Download this manual
WIRELESS 868 MHz TEMPERATURE STATION
Instruction Manual
Cat. No. 30.3016.01.IT / 30.3016.13.IT
Thank you for choosing this wireless temperature station from TFA.
BEFORE YOU USE IT
Please be sure to read the instruction manual carefully.
This information will help you to familiarise yourself with your new device, learn all of its
functions and parts, find out important details about its first use and how to operate it, and get
advice in the event of faults.
Following the instruction manual for use will prevent damage to the device and loss of your
statutory rights arising from defects due to incorrect use.
We shall not be liable for any damage occurring as a result of not following these
instructions.
32
Advertisement
Table of Contents

Related Manuals for TFA 30.3016.01.IT


Summary of Contents for TFA 30.3016.01.IT
- Page 1 WIRELESS 868 MHz TEMPERATURE STATION Instruction Manual Cat. No. 30.3016.01.IT / 30.3016.13.IT Thank you for choosing this wireless temperature station from TFA. BEFORE YOU USE IT Please be sure to read the instruction manual carefully. This information will help you to familiarise yourself with your new device, learn all of its functions and parts, find out important details about its first use and how to operate it, and get advice in the event of faults.
-
Page 2: Scope Of Supply
Please take particular note of the safety advice! Please look after this manual for future reference. SCOPE OF SUPPLY: Temperature station (basic unit) • • Outdoor transmitter • Instruction manual FIELD OF OPERATION AND ALL OF THE BENEFITS OF YOUR NEW TEMPERATURE STATION AT A GLANCE: Time display (hour, minutes, seconds) •... -
Page 3: For Your Safety
• Indoor and outdoor temperature display with MIN/MAX records All MIN/MAX recordings can be reset • Wireless transmission at 868 MHz • • Signal reception intervals at 4-second • Low battery indicator Table standing or wall mountable • FOR YOUR SAFETY: •... - Page 4 Caution! Risk of injury: Keep this instrument and the batteries out of reach of children. • • Batteries must not be thrown into the fire, short-circuited, taken apart or recharged. Risk of explosion! Batteries contain harmful acids. Low batteries should be changed as soon as possible to •...
- Page 5 ELEMENTS The temperature station Hanging hole Battery display compartment Stand SET key MIN/MAX/+ key...
- Page 6 The outdoor temperature transmitter Remote transmission of outdoor temperature to temperature • station by 868MHz Weather-resistant casing • Wall mounting case • • Mount in a sheltered place. Avoid direct rain and sunshine INSTALL AND REPLACE BATTERIES IN THE TEMPERATURE TRANSMITTER The temperature transmitter uses 2 x AA, IEC LR6, 1.5V battery.
- Page 7 Remove the battery compartment cover at the back of the transmitter. Insert the batteries, observing the correct polarity (see marking). Replace the battery compartment cover on the unit. INSTALL AND REPLACE BATTERIES IN THE TEMPERATURE STATION The temperature station uses 2 x AA, IEC LR6, 1.5V batteries. To install and replace the batteries, please follow the steps below: Remove the cover at the back of the temperature station.
- Page 8 Battery replacement Replace the batteries when the battery symbol of the temperature station appears near • the indoor temperature display. When the batteries of the transmitter are used up, the low battery icon appears near the • outdoor temperature display. Note: In the event of changing batteries in any of the units, all units need to be reset by following the setting up procedures.
- Page 9 Immediately after and within 30 seconds, insert the batteries into temperature station (see “Install and replace batteries in the temperature station”). Once the batteries are in place, all segments of the LCD will light up briefly. Following the time as 0:00 will be displayed and indoor temperature.
-
Page 10: Function Keys
FUNCTION KEYS: Temperature station: There are two easy-to-use function keys in the temperature station: SET key MIN/MAX/+ key SET key Press and hold for about 3 seconds to enter the Manual setting modes: manual time, • year, date, month, weekday, 12/24 hour time format, time zone, and temperature settings. - Page 11 • Press and hold to reset the indoor and outdoor MIN/MAX temperature records MIN/MAX/+ key To make adjustments for various settings in manual setting modes • To toggle between the MIN/MAX readings of indoor/ outdoor temperature •...
-
Page 12: Lcd Screen And Settings
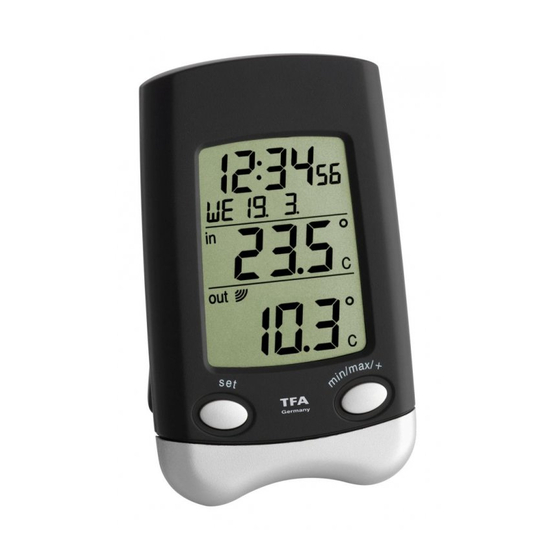
LCD SCREEN AND SETTINGS Time Calendar Low battery icon Indoor temperature (station) Outdoor transmission signal* Low battery icon Outdoor temperature (transmitter) -
Page 13: Manual Setting
* When the signal is successfully received by the temperature station, the outdoor transmission icon will be switched on. (If not successful, the icon will not be shown on LCD). The user can then easily see whether the last reception was successful (icon on) or not (icon off). On the other hand, the short blinking of the icon shows that a reception is currently taking place. -
Page 14: Manual Time Setting
MANUAL TIME SETTING Please proceed the following setting steps at the first time before using the Temperature Station. Hours (flashing) Minutes (flashing) The hour digit in the time section starts flashing. Use the MIN/MAX/+ key to set the hour. Press the SET key to enter the minutes. The minute digits start flashing. Use the MIN/MAX/+ key to set the minute. - Page 15 Weekday (flashing) Year (flashing) Month (flashing) Day (flashing) The year digits will start flashing. Use the MIN/MAX/+ key to set the year (2008 to 2029). Press the SET key to enter the month (the month digit will be flashing). Use MIN/MAX/+ key to adjust the month.
-
Page 16: 12/24 Hour Time Display Setting
12/24 HOUR TIME DISPLAY SETTING To set the time format to 12h or 24h display mode (default 24h): Flashing Use the MIN/MAX/+ key to select the “12h” or “24h” display mode. Press the SET to confirm and to enter the Time zone setting mode. Note: When 24h mode display is selected, the calendar format will be "Weekday. -
Page 17: Time Zone Setting
TIME ZONE SETTING The time zone can be set between ±12 hours (default 0 hour): Time zone (flashing) The time zone starts flashing. Use the MIN/MAX/+ key to change the time zone. The range runs from 0, -1, -2…-12, 12, 11, 10…... -
Page 18: Time Reception On/Off Setting
TIME RECEPTION ON/OFF SETTING Important: The time reception ON/OFF setting in this temperature station will not have any effect in this unit performance. This feature is only available in enhance model with DCF- radio controlled time function. Simply press the SET key to skip this setting and enter the °C/°F Temperature unit setting. - Page 19 Confirm with the SET key and exit the manual setting modes. CHECKING THE MIN/ MAX TEMPERATURES In normal mode display, press the MIN/MAX/+ key to display the outdoor MIN display and the time and date of record. Press the MIN/MAX/+ key a second time to show the outdoor MAX display and the time and date of record.
- Page 20 Press again the MIN/MAX/+ key once to display the indoor MAX display and the time and date of record. Indoor temperature MIN icon Max icon Press the MIN/MAX/+ to return to current indoor and outdoor temperature display. RESETTING THE MIN/ MAX TEMPERATURE Note: The reset of all the indoor and outdoor MIN/MAX records will be at the same time.
-
Page 21: Outdoor Transmitter
Press the MIN/MAX/+ key once in normal mode. Press the SET key. This will reset both the MIN/MAX indoor and outdoor temperature data to the current temperature data. OUTDOOR TRANSMITTER The range of the temperature transmitter may be affected by the temperature. At cold temperatures the transmitting distance may be decreased. - Page 22 Avoid positioning the temperature station onto or in the immediate proximity of metal window frames. Using other electrical products such as headphones or speakers operating on the same signal frequency (868MHz) may prevent correct signal transmission and reception. Neighbors using electrical devices operating on the 868MHz signal frequency can also cause interference.
- Page 23 POSITIONING THE TEMPERATURE STATION: Choose a sheltered place. Avoid direct rain and sunshine. Before wall mounting, please check that the outdoor temperature values can be received from the desired locations. Wall mount Fix a screw (not supplied) into the desired wall, leaving the head extended out the by about 5mm.
- Page 24 POSITIONING OUTDOOR TRANSMITTER: The transmitter is supplied with a holder that may be attached to a wall with the two screws supplied. The transmitter can also be position on a flat surface by securing the stand to the bottom of the transmitter. To wall mount: Secure the bracket onto a desired wall using the screws and plastic anchors.
-
Page 25: Care And Maintenance
Note: Before permanently fixing the transmitter wall base, place all units in the desired locations to check that the outdoor temperature reading is receivable. In event that the signal is not received, relocate the transmitters or move them slightly as this may help the signal reception. CARE AND MAINTENANCE Clean the instrument and the transmitter with a soft damp cloth. - Page 26 Display "---" rechargeable batteries!) • Restart the transmitter and temperature station as per the manual • Choose another place for the transmitter and/or the temperature station • Reduce the distance between the transmitter and the temperature station • Check if there is any source of interference Incorrect display •...
-
Page 27: Waste Disposal
WASTE DISPOSAL This product has been manufactured using high-grade materials and components which can be recycled and reused. Never throw flat batteries and rechargeable batteries in household waste. As a consumer, you are legally required to take them to your retail store or to appropriate collection sites according to national or local regulations in order to protect the environment. -
Page 28: Specifications
SPECIFICATIONS: Temperature measuring range: Indoor -9.9ºC to +59.9ºC with 0.1ºC resolution (14.1°F to +139.8°F with 0.2°F resolution) (“OF.L” displayed if outside this range) Outdoor : -39.9ºC to +59.9ºC with 0.1ºC resolution (-39.8°F to +139.8°F with 0.2°F resolution) (“OF.L” displayed if outside this range) Indoor Temperature checking interval every 16 seconds Outdoor Temperature reception... - Page 29 DECLARATION OF CONFORMITY Herewith we declare, that this wireless transmission device does comply with the essentials requirements of R&TTE Directive 1999/5/EC. A copy of the signed and dated Declaration of Conformity is available on request via info@tfa- dostmann.de. www.tfa-dostmann.de 11/12...
Need help?
Do you have a question about the 30.3016.01.IT and is the answer not in the manual?
Questions and answers