Table of Contents
Advertisement
Quick Links
Advertisement
Table of Contents

Subscribe to Our Youtube Channel
Related Manuals for BabyLove BL620A 2010


Summary of Contents for BabyLove BL620A 2010
- Page 1 INSTRUCTION BOOK INFANT CARRIER Series No. BL620A/2010 IMPORTANT: KEEP THIS BOOKLET IN THE PLACE PROVIDED ON THE CHILD RESTRAINT INFORMATION FOR BUYERS: FOR BABIES UP TO APPROXIMATELY 6 MONTHS THIS INFANT RESTRAINT MUST BE INSTALLED SO THAT THE BABY IS REARWARD FACING AT ALL TIMES.
- Page 2 INDEX INTRODUCTION PAGE To be used only in a rearward-facing position for an infant until their shoulders reach the shoulder height marker (approximately 6 months of age). INTRODUCTION Continue to use this infant restraint until the child reaches this limit. WARNINGS Infants are at risk of serious injury if they face forward too early.
- Page 3 • Use the restraint exactly as shown in the instructions. • Straps may be damaged by unsecured cargo in a collision. Secure or remove hazardous cargo before using this strap. Hatch-back or wagon: Do not use • Fit the restraint firmly to the car seat. the child restraint where this strap may fall into a split in the seat back. •...
-
Page 4: Shoulder Height Markers & A Growing Child
SHOULDER HEIGHT MARKERS & A GROWING CHILD SHOULDER HEIGHT MARKERS & A GROWING CHILD NEW BORN OLDER BABY IMPORTANT: Follow this advice. Maximum shoulder Maximum Shoulder height marker MAXIMUM SHOULDER HEIGHT MARKER Height marker DO NOT MOVE TO THE NEXT RESTRAINT UNTIL SHOULDERS REACH THE SHOULDER HEIGHT MARKER. -
Page 5: The Next Step
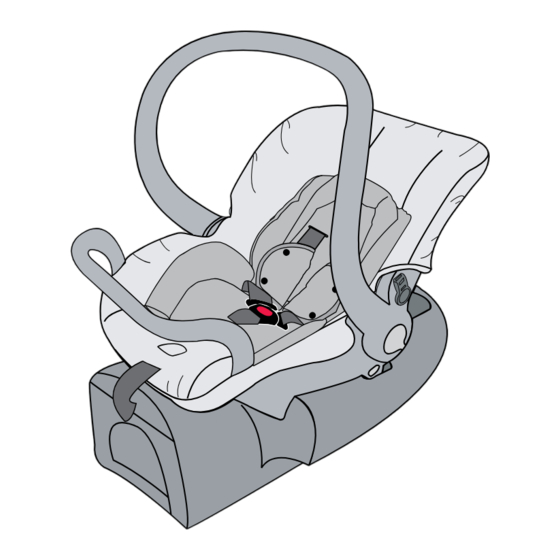
THE NEXT STEP FEATURES: CARRIER PARTS CHOOSE FROM: Carry Handle Shoulder Straps Convertible • Convertible Child Seat, If the Front Stabilising Bar Child Seat convertible seat is suitable for Adjuster and Harness Adjuster cover approximately 12 months then continue Harness Adjuster strap to keep your child Rearward-facing until the shoulders reach the lowest marker. - Page 6 FEATURES: CARRIER PARTS FEATURES: BASE PARTS Instruction Book Storage Pocket Attachment Clip Release Lever For Stroller and Base Upper Anchorage Strap Adjuster Upper Anchorage Strap Upper Anchorage Strap Guides Metal Strap Connector Retaining Strap connected to base Base Latch Adjustable Recline Foot (3 positions) Stroller Latch Recline Foot retaining catch (behind flap) Canopy Attachment Points...
-
Page 7: Suitable For Use
FEATURES: BASE PARTS SUITABLE FOR USE Seat belt Clip TO BE USED WITH A LAP-SASH OR LAP ONLY SEAT BELT IN THE BACK OF MOST CARS WITH FORWARD-FACING SEATS. Carrier Latching Points To be used in a rearward-facing position until the infant’s shoulder’s reach the Rearward-Facing Belt Path Label (shown in blue) shoulder height marker (approximately 6 months of age). -
Page 8: How To Set Up
SUITABLE FOR USE HOW TO SET-UP REMOVING CARRIER FROM BASE A. Press the handle button (on both sides) and THE UPPER ANCHORAGE STRAP MUST ALWAYS BE FITTED WHEN THE CHILD Press rotate the handle to upright “carry” position. RESTRAINT IS USED IN A VEHICLE. Ensure the handle is locked, and it is safe to Do not use the restraint without the Upper Anchorage Strap correctly attached. - Page 9 HOW TO SET-UP HOW TO SET-UP TO REMOVE/FIT CANOPY ADJUSTMENT OF HANDLE POSITION A. To connect, feed the canopy stay into the A. The Carrier features a sturdy carry handle. mounting on the side of the Carrier. At the side of the handle there is a handle release buttons on each side which control B.
- Page 10 HOW TO SET-UP HOW TO SET-UP C. Move the two harness tongues to E. The Carrier is fitted with three shoulder strap positions. As the baby grows, the the outer extents of the Carrier and shoulder straps must be moved to higher slots. connect to the Harness Tongue The shoulder straps must be in holders.
- Page 11 HOW TO SET-UP HOW TO SET-UP F. At the rear of the Carrier, remove one of the I. Ensure there are no twists in the straps. FOR SMALL BABY harness shoulder straps from Metal Strap Connector by slipping strap through open J.
-
Page 12: How To Install
HOW TO INSTALL HOW TO INSTALL Consult the car owner’s handbook for location of anchor fittings or anchorage B. If your car’s seat is contoured then you points. Some vehicle manufacturers recently have an anchor fitting fitted in the car. may need to adjust the angle of the base Pull flap outward so your baby is not too upright. If there is no child restraint anchor fitting or child restraint anchor point refer to page 48 for the installation of the anchor fitting as well as the use of extension straps. The recline angle may be altered using the four position adjustment foot located An anchor fitting is required to attach the upper anchorage strap to fully install the at the stabilising bar end of the base. -
Page 13: How To Use
HOW TO INSTALL HOW TO USE G. then feed the sash belt under the tabs and C. For car’s with flat seats, some Pull seatbelt Press down through the Seatbelt Clip packing (such as firmly rolled up tight firmly on base nappy or towel) may be required Check that the Base is securely held. If it is to get a better angle and to have not secure, readjust, or move to another the stabilising bar contact the car’s seating position in the vehicle. - Page 14 HOW TO USE HOW TO USE J. Some car seats do not provide enough INSTALLING UPPER ANCHORAGE STRAP support to hold the base up at the A. Locate the child restraint anchor fitting Attachment Clip required angle to enable the Carrier to be in the car that is directly behind the connected to the Base. Use the adjustable seat location in the rear seat you foot to achieve the level.
- Page 15 HOW TO USE HOW TO USE PLACING BABY IN CARRIER B. Move the two harness tongues to the outer extents of the Carrier and engage When positioning baby into Carrier make sure baby’s back is fully supported into the Buckle Tongue holders. onto the flat section and the baby’s nappy area (bottom) is resting in the bottom Move the harness buckle towards the curvature as shown.
- Page 16 HOW TO USE HOW TO USE Pull Harness Straps F. Ensure slack is removed from the lap straps by through the buckle in pulling the shoulder harness straps through the direction of arrows D. Place each arm through each shoulder buckle tongues, then pull the Harness Adjustment strap of the harness.
- Page 17 HOW TO USE HOW TO USE PLACING BABY & CARRIER IN BASE D. Engage the upper anchorage strap attachment clip to the car’s anchor fitting, if not already connected. A. Position the Carrier over the top of the base. Make sure the Harness Adjustment Strap is not caught between Carrier and Base then lower the Carrier into position.
- Page 18 HOW TO USE HOW TO USE REMOVING BABY & CARRIER FROM BASE REMOVAL OF BABY FROM CARRIER A. Loosen the upper anchorage strap by fully pressing the adjuster button while A. Rotate the carry handle to either the “access” or “non-rocking” position and pulling the upper anchorage strap.
-
Page 19: Care And Maintenance
CARE AND MAINTENANCE CARE AND MAINTENANCE REGULAR CARE OF THIS RESTRAINT: COVER Please check the following items regularly to ensure the safety of your child: For baby’s comfort and health the Carrier cover is removable for cleaning. Washing instructions are on the care label attached to the liner. Washing the cover prior to A. - Page 20 CARE AND MAINTENANCE CARE AND MAINTENANCE TO REPLACE THE COVER COVER (style may vary) The cover has been designed to protect your child when seated in the Carrier. Care A. Place the cover over the Carrier. should be taken if children either eat or drink while in the Carrier as some products B.
-
Page 21: Travelling Tips
TRAVELLING TIPS CARE AND MAINTENANCE SAFETY TO CLEAN HARNESS BUCKLE: Never hold a baby in arms when riding in a motor vehicle. In this position the baby If sticky liquids such as baby formula, fruit juice, etc. get inside your Harness could be thrown against the dashboard, windscreen or other occupant and suffer Buckle, it may become sluggish. - Page 22 ACCESSORIES TRAVELLING TIPS CLOTHING/BATHING PADDED INSERT (style may differ) Take several changes of clothing and bibs for possible car sickness. Disposable Some models have a separate Padded Insert nappies and liners are very handy while travelling. Since it is often warmer in the inside the Carrier for additional comfort.
- Page 23 TRAVEL SYSTEM-USE WITH STROLLER TRAVEL SYSTEM-USE WITH STROLLER This Carrier is designed to be connected to compatible Babylove strollers. The FITTING THE CARRIER TO THE STROLLER following pages provide a general instructions about using the Carrier with a stroller which may differ slightly for some strollers. Preferably use the attachment NOTE - Ensure that the child is harnessed in the instructions provided with your stroller.
-
Page 24: Installation Of Car Anchor Fitting
TRAVEL SYSTEM-USE WITH STROLLER INSTALLATION OF CAR ANCHOR FITTING REMOVING THE CARRIER FROM THE STROLLER Consult the vehicle owner’s handbook for location of anchorage fittings or anchorage points and the possible use of spacers. Some vehicles may have an anchor fitting fitted by the vehicle manufacturer. If anchorage points cannot be found A. Engage the brakes. refer to car manufacturer or local child restraint fitting station or traffic authority for optimum position of anchorage point and the use of spacers. UPPER ANCHORAGE STRAP B. - Page 25 Locate the anchorage point behind the rear seating position. (consult the car Lock washer Extension Strap distance to be measured. owners handbook for the location of the Length 300mm (Use Babylove part K304 or equivalent) anchorage point). The anchorage point Length 600mm (Use Babylove part K305 or equivalent) Anchor fitting should be directly behind and central to Available from all major child restraint retailers.
- Page 26 INSTALLATION OF CAR ANCHOR FITTING INSTALLATION OF CAR ANCHOR FITTING IF THE CAR IS NOT FITTED WITH Note to Queensland purchasers: The installation of anchorage points must be UPPER ANCHORAGE approved by authorised officers appointed by Queensland Transport. Authorised CHILD RESTRAINT ANCHORAGE FITTINGS FOR SEDANS ONLY officers can be sourced from all Queensland Transport Customer Service and POINTS Fig.2.
-
Page 27: Installation Accessories
K305 (length 600mm). EXTRA BASE There are Babylove Series BL620A/2010 Extra Bases available as a separate purchase for a second car. These bases can mean that the Carrier can be easily and quickly switched between cars. The Extra Base has the same installation... - Page 28 NOTES NOTES...
- Page 29 We reserve the right to alter this product without notice in our constant endeavour for improvement. © 2007 - 2011 Nursery Elegance Pty. Ltd. Trademarks of Babylove and devices are owned by Nursery Elegance Pty. Ltd. This product is covered by Australian patent application. P/No. 2200878/A...
Need help?
Do you have a question about the BL620A 2010 and is the answer not in the manual?
Questions and answers