
Subscribe to Our Youtube Channel
Related Manuals for Polaroid ProPack


Summary of Contents for Polaroid ProPack
- Page 1 Repair Manual ProPack Camera August 1987 Americas Business Center Technical Services 201 Burlington Road Bedford MA 01730 TEL: 1.781.386.5309 FAX: 1.781.386.5988...
-
Page 2: Table Of Contents
Shutter Visual Inspection ..............22 Timing Switch (S2) Adjustment ............24 Bellows Light Leak Check ..............24 TROUBLESHOOTING ................25 Flashcube Problems ................25 Electronic Flash Problems (Camera Related) ........27 Camera/Shutter Problems ..............29 DISASSEMBLY ..................... 30 ProPack Camera... -
Page 3: Date Code
Note that the letter “I” is omitted from the code indicating the month of manufacture. “Line” indicates production line at the place of manufacture and may be omitted from the code. The letter indicating shift may also be omitted from the code. ProPack Camera... -
Page 4: List Of Illustrations
Digital Electronic Timer Film Selector Settings 1-10 ProPack Camera Schematic ProPack Camera on 4-ft Collimator #11431 ProPack Camera on Model B Tester Horn Camera/Electronic Flash Set for Graywall Testing Flash Socket Examination Baseblock Inner Components Checking Flash Switch S3 Checking Hot Shoe Continuity... -
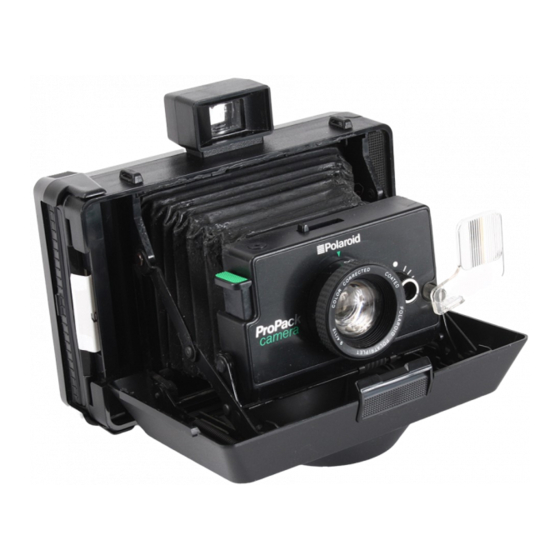
Page 5: Description
I. DESCRIPTION GENERAL: ProPack is the latest model in the family of Reporter and EE100 cameras. It is shown in Figure 1-1 in the closed position and in Figure 1-2, in the picture-taking position. As can be seen in the illustrations, the ProPack looks much like the earlier models. -
Page 6: Similarities To Reporter/Ee100
Reporter and EE100 manuals to gain an in-depth knowledge of these areas which are common among the three camera models. Among the new features in the ProPack are an interface capability with a dedicated electronic strobe called ProFlash, a modified CB103 camera back, and an integral digital electronic timer. -
Page 7: Erecting System
The erecting system works identically to the systems in the Reporter and EE100 cameras. To open the ProPack to the picture-taking configuration, the release button on the top of the cover is pressed. This unlocks the erecting system and allows the cover to drop down. The shutter bellows extend forward and latch into the picture-taking position. -
Page 8: Taking The Picture
Taking The Picture The shutter release in the ProPack works the same as the shutter release in Reporter and EE100 cameras. When the shutter button is pressed, it closes switch S1, initiating the electrical se- quencing. Mechanically, the shutter release pushes down on the capping blade arm and the capping blade swings upward, out of the optical path. - Page 9 Repair Manual.) ProFlash extends the range at which the ProPack camera can make flash exposures. The ranges for the various modes are detailed in “Film/Camera Exposure Characteristics.” Figure 1-4 shows the ProFlash installed on the ProPack camera. The flash is mechanically connected to the camera via a bracket secured to the tripod socket.
-
Page 10: Cb103 Camera Back
FIGURE 1-6 FLASH TO SHUTTER FIVE WIRE CABLE CB103 Camera Back The ProPack employs a modified CB103 camera back. This camera back has a built-in plastic latch instead of the metal bail latch used in the Reporter and the EE100. The back surface of the door has two recesses;... -
Page 11: Electronic Timer
At the end of the sequence, the timer will automatically reset to the pre-selected timeout period. To reset the timer to 0...or, to reset a blank screen... Simply press the start and set buttons simultaneously. The digital display will very briefly read “18:88) and then will step back to “0:00.” ProPack Camera... -
Page 12: Film Selector
9.2 f 18 You can see that the 3000ER setting in ProPack results in an f 18 aperture versus the f 9.2 aper- ture in Reporter and EE100. The f 18 aperture improves the sharpness of pictures taken in this mode. -
Page 13: Hot Shoe Pin Functions
S4 is closed by the shutter capping blade, a voltage is transmitted to the strobe. If the strobe is ON, it will fire. Typical transmitted voltages area: STROBE ON/OFF SWITCH ON - + 0.5V STROBE ON/OFF SWITCH OFF - + 0.1V FIGURE 1-10 PROPACK CAMERA SCHEMATIC ProPack Camera... -
Page 14: Film/Camera Exposure Characteristics
Ambient scene brightness must be within the range of 3.125 cd/ft for black and white. Flashcubes or ProFlash are not recommended at these settings. Setting the Film Selector to “80” with black and white film and ProFlash creates a subject range of 50' to 75' (15.2m to 22.9m). ProPack Camera... -
Page 15: Testing & Adjustments
TIMING SWITCH (S2) ADJUSTMENT BELLOWS LIGHT LEAK CHECK These procedures are intended to isolate possible problems in the ProPack camera. If the proce- dures indicate a need to disassemble the camera to replace parts, refer to the Disassembly section of this manual and to the Parts Catalog. - Page 16 Open the shutter and check camera focus through the lens. Correct focus will allow you to see at least 40 lines per millimeter clearly. FIGURE 2-1 PROPACK CAMERA ON 4 FT COLLIMATOR #11431 IF CORRECT FOCUS IS NOT ACHIEVED IN EITHER TEST, DO THE FOLLOWING: Remove the camera from the collimator.
-
Page 17: Shutter Exposure Tests
Place the camera on the Model B Tester traditional horn as shown in Figure 2-2. Turn ON the tester. NOTE: All of the shutter exposure tests which follow are done with the tester controls and the camera set in the positions noted above. ProPack Camera... -
Page 18: Testing
FIGURE 2-2 PROPACK CAMERA ON MODEL B TESTER HORN Testing: NOTE: If the readings in the following steps do not fall within the noted specifications, you must replace the baseblock. ProPack Camera... -
Page 19: 80/50 Flash
The camera/electronic flash graywall test is done on the Model B or Model B-600 Tester (you may turn the Light Source OFF) with the electronic flash installed on the camera and the camera mounted on the traditional camera horn. The purpose of this test is twofold: ProPack Camera... -
Page 20: Setup
(nominal) setting Set the electronic flash as follows: L/D control to mid-point (nominal) setting ON/OFF switch to ON wait for green LED to light TABLE 2-1 PROPACK EXPOSURE SPECIFICATIONS Film Selector Light Level (cd/ft Reading (Stops) 50 (ambient) -0.35 to -0.55... -
Page 21: Partial Strobe Output
Aim the camera at a graywall about 4.5 feet (1.37m) away. Cover the electronic flash photocell and press the shutter button (after green LED on flash comes on) to make an exposure. The meter reading must be greater than +.30. ProPack Camera... -
Page 22: Flash Socket Check And Adjustment
The keeper must be within .002 to .030 inch (.050 to 7.62 mm) of the poles of the magnet. Adjust the position of the magnet as necessary. ProPack Camera... - Page 23 If it doesn’t, very carefully bend the movable contact so it makes proper contact with each clip on the board as it moves from one position to the other. FIGURE 2-5 BASEBLACK INNER COMPONENTS FIGURE 2-6 CHECKING FLASH SWITCH S3 ProPack Camera...
-
Page 24: Timing Switch (S2) Adjustment
Check the integrity of the bellows by looking for pinholes (usually in the creases). Also be sure the bellows tabs are secure and that the bellows gasket is OK. If you suspect that there might be a light leak, test the camera using 3000 speed film. ProPack Camera... -
Page 25: Troubleshooting
5. Tighten or replace loose or missing. screws. 6. Flashcube contacts 6. Clean contacts and reform dirty or not touching. as needed.* 7. Malfunction in 7. Replace baseblock electrical circuit assembly. (flash contact broken) * use a Q-tip dampened with alcohol. ProPack Camera... - Page 26 Blades won’t open Defective electrical Replace baseblock. when flash fires circuit in baseblock. Strobe exposure Rivet holding S4 Restake rivet. dark; ambient stationary contact exposure ok loose, not making good contact. ProPack Camera...
- Page 27 FIGURE 3-1 CHECKING HOT SHOE CABLE CONTINUITY ProPack Camera...
- Page 28 3. Cell lens dirty or 3. Clean or replace cell broken. lens. 4. Cell lens mount 4. Adjust cell lens mount. improperly installed. 5. Cell wedge 5. Replace cell wedge. defective. 6. Malfunction in 6. Replace baseblock. electrical circuit. ProPack Camera...
-
Page 29: Camera/Shutter Problems
* 4. Battery buss bar 4. Clean or oxidized or replace battery bent. buss bar. * 5. Baseblock component 5. Replace defective component or replace baseblock. * Use a Q-tip dampened with alcohol. ProPack Camera... -
Page 30: Disassembly
This is OK so long as you are certain that the alter- natives do not degrade camera performance or aesthetics. TOOLS REQUIRED: The following list shows the tools needed to disassemble and reassemble the ProPack camera. Special Tools: LINK PIVOT REMOVER... - Page 31 FIGURE 4-2 REMOVING THE BACK CAP & DOOR LATCH FIGURE 4-3 REMOVING THE BATTERY LATCH ProPack Camera...
- Page 32 FIGURE 4-4 REMOVING THE BATTERY CONTACTS FIGURE 4-5 REMOVING THE FRONT COVER AND FLASH DIFFUSER ProPack Camera...
- Page 33 FIGURE 4-6 REMOVING THE SHUTTER FIGURE 4-7 REMOVING THE SHUTTER RELEASE BUTTON AND LIGHT SEAL ProPack Camera...
- Page 34 FIGURE 4-8 RELEASING LOWER ARMS OF ERECTING SYSTEM FIGURE 4-9 REMOVING HOT SHOE CONNECTOR ASSEMBLY ProPack Camera...
- Page 35 FIGURE 4-10 REMOVING THE TRIPOD MOUNT ASSEMBLY FIGURE 4-11 REMOVING THE ERECTING SYSTEM ProPack Camera...
- Page 36 FIGURE 4-12 REMOVING THE BELLOWS FIGURE 4-13 INSTALLING THE BELLOW ProPack Camera...
- Page 37 FIGURE 4-14 REMOVING THE CELL WEDGE AND RETAINER FIGURE 4-15 INSTALLING THE CELL WEDGE AND RETAINER ProPack Camera...
- Page 38 ProPack Camera...
Need help?
Do you have a question about the ProPack and is the answer not in the manual?
Questions and answers