Advertisement
Quick Links
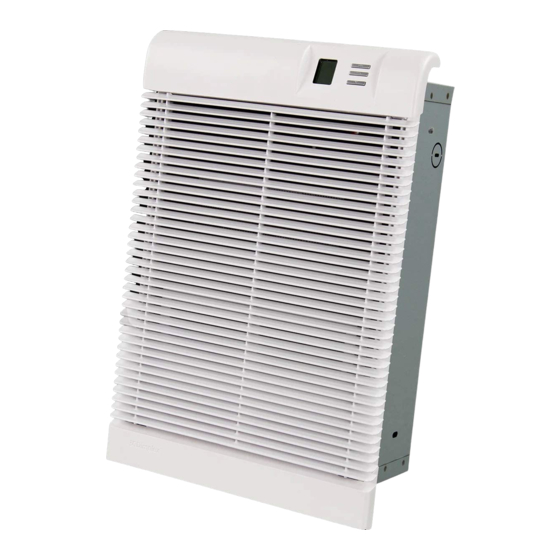
Precision Comfort Heater
PCH2000TCW-TK
IMPORTANT INSTRUCTIONS
When using electrical appliances, basic precautions should
always be followed to reduce the risk of fire, electric shock
and injury to person, including the following:
1. Read all instructions before using this heater.
2. Wiring procedures and connections should be in accor-
dance with the National Electric Code (NEC & CEC) and
local codes.
3. Extreme caution is necessary when any heater is used
by or near children or invalids and whenever the unit is
left operating and unattended.
4. Do not operate any heater after it malfunctions. Discon-
nect power at service panel and have heater inspected
by a certified electrician before reusing.
5. To disconnect heater, turn off power to heater circuit at
main disconnect panel.
6. Use this heater only as described in this manual. Any
other use not recommended by the manufacturer may
cause fire, electric shock, or injury to persons.
7. A heater has hot and arcing or sparking parts inside. Do
not use it in areas where gasoline, paint or flammable
liquids are used or stored.
8. This heater is hot when in use. To avoid burns, do not let
bare skin touch hot surfaces. Keep combustible materials
such as: furniture, pillows, bedding, papers, clothes and
curtains away from heater.
9. To prevent a possible fire, do not block air intakes or
exhaust in any manner. Do not use on soft surfaces like
a bed where openings may become blocked.
10. Do not insert or allow foreign objects to enter any venti-
lation or exhaust opening as this may cause an electric
shock or fire, or damage the heater.
!
NOTE: This equipment has been tested and found to comply with the
limits for a Class B digital device, pursuant to Part 15 of the FCC Rules.
These limits are designed to provide reasonable protection against harmful
interference in a residential installation. This equipment generates, uses
and can radiate radio frequency energy and, if not installed and used in
accordance with the instructions, may cause harmful interference to radio
communications. However, there is no guarantee that interference will
not occur in a particular installation. If this equipment does cause harmful
interference to radio or television reception, which can be determined by
turning the equipment off and on, the user is encouraged to try to correct the
interference by one of the following measures:
•
Reorient or relocate the receiving antenna.
•
Increase the separation between the equipment and receiver.
•
Connect the equipment on a circuit different from that to which the
receiver is connected.
•
Consult the dealer or an experienced radio/TV technician for help.
This device complies with Part 15 of the FCC Rules. Operation is subject
to the following two conditions: (1) This device may not cause harmful
interference, and (2) this device must accept any interference received,
including interference that may cause undesired operation.
FCC CAUTION: Any changes or modifications not expressly approved
by the party responsible for compliance could void the user's authority to
operate this equipment.
This device complies with Industry Canada licence-exempt RSS standard(s).
Operation is subject to the following two conditions: (1) this device may
not cause interference, and (2) this device must accept any interference,
including interference that may cause undesired operation of the device.
SAVE THESE INSTRUCTIONS
Installation Instructions
CAUTION: Place furniture/objects no closer than 3ft
(91cm) in front of the heater. Ensure that the inlet and bottom
of the heater is unobstructed to allow for sufficient air flow
through the unit.
2 x 4 Framing
1. Unpack the heater from the carton.
2. Determine the correct mounting height for the heater.
The bottom of the heater should be mounted a minimum
of 8" (20.3 cm) from the floor. The recess box is designed
so that it can be mounted between two studs within the
wall.
3. The recess box requires an opening in the wall 13.5"
(34.5 cm) high by 8 3/8" (21.5 cm) wide (see Figure
1). The depth of the opening must be 3 3/4" (9.5 cm)
minimum, measured from finished wall surface.
!
NOTE: The sides of the recess box are marked with
guidelines to allow for ½" and ⅝" drywall thickness. When
installing the recess box before installing drywall, use the
depth guidelines to mount the box at the appropriate depth
for drywall thickness, and proper grille installation.
4. Remove appropriate electrical knockout and secure sup-
ply wire using an approved strain relief connector, leav-
ing 6" (15.2 cm) of wire leads in the recess box. (Figure
1)
!
NOTE: It is only necessary to remove the knockout that
will feed the power supply wiring, keeping in mind the heater
mounting location and supply wire location on the wall.
5. The recess box can be secured using the flanges at the
top and bottom or from the inside into surrounding studs.
Ensure that the recess box is oriented so that the knock-
outs are located at the bottom and the flanges are flush
with the finished wall.
6. Proceed to the wiring instructions.
Figure 1
Top Mounting
Holes
Front Mounting
Holes
Electrical
Knockouts
For securing Front Panel
Do not use for mounting!
3
8
"
8
(21.5 cm)
1
13
"
2
(34.5 cm)
Side Mounting
Holes
7213090100R01
Advertisement

Related Manuals for Dimplex PCH2000TCW-TK


Summary of Contents for Dimplex PCH2000TCW-TK
-
Page 1: Important Instructions
Precision Comfort Heater PCH2000TCW-TK IMPORTANT INSTRUCTIONS Installation Instructions CAUTION: Place furniture/objects no closer than 3ft When using electrical appliances, basic precautions should always be followed to reduce the risk of fire, electric shock (91cm) in front of the heater. Ensure that the inlet and bottom... - Page 2 Motor 7. Proceed to the wiring instructions. Supply Wiring and Heater Installation Heater WARNING: Wiring procedures and connections should be in accordance with the National Electric Code (NEC & CEC) and local codes. www.dimplex.com...
- Page 3 Dimplex dealer. To find your local Dimplex dealer, visit www.dimplex.com. F. Lock Icon The PCH has a Lock feature to prevent settings from acci- A - Setting/Temperature Display dentally being changed.
-
Page 4: Replacement Parts
This Warranty is transferable by the original consumer purchaser of the product. Any claims under this Warranty Maintenance must be submitted in writing to the Service Manager, Dimplex North America Ltd., 1367 Industrial Rd., Cambridge, Ontario WARNING: Always disconnect power at the circuit N1R 7G8, Canada.
Need help?
Do you have a question about the PCH2000TCW-TK and is the answer not in the manual?
Questions and answers