
Related Manuals for Oster TSSTVDG01 Series


Summary of Contents for Oster TSSTVDG01 Series
- Page 1 Digital Countertop User Manual Oven Four posable Notice d’emploi numérique MODELS TSSTVDG01 Series/ MODÈLES de la série TSSTVDG01 Visit us at www.oster.ca Visitez au www.oster.ca P.N. 171321 Rev. A...
-
Page 2: Important Safeguards
IMPORTANT SAFEGUARDS When using electrical appliances, basic safety precautions should always be followed, including the following: READ AND SAVE THESE INSTRUCTIONS • READ ALL INSTRUCTIONS, PRODUCT LABELS AND WARNINGS BEFORE USING THE COUNTERTOP OVEN. • Do not touch hot surfaces. Always use oven mitts when handling hot materials and allow metal parts to cool before cleaning. - Page 3 • Do not store any materials, other than manufacturer’s recommended accessories, in this unit when not in use. • Do not place any flammable materials in oven, such as paper, cardboard, plastic or any materials that may catch fire or melt. •...
-
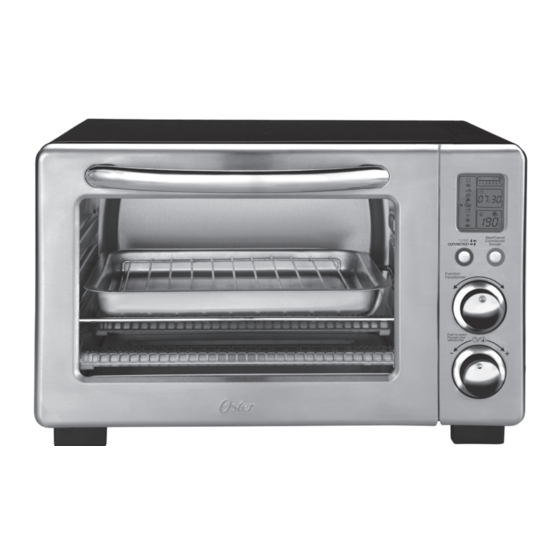
Page 4: Product Diagram
RODUCT IAGRAM 1. LCD Display 2. Turbo Convection Heat Button – Use to activate or cancel turbo convection heat. 3. Start/Cancel Button – Press this button to turn the appliance off. 4. Function Selector Knob – Select cooking function by turning knob to desired setting. - Page 5 LCD Display a. Functions Indicator – Toast ( ), Bagel ( ), Pizza ( ), Bake ( ), Broil ( ), Cookies ( ), Roast ( ), Warm ( ), Defrost ( ), Reheat ( ) b. Function Indicator Arrow c.
- Page 6 . 1) SING OASTER Plug the unit in. The unit will emit two long “beeps” and the LCD screen will illuminate. The function option will appear with an indicator on the preset TOAST ( ) function. The LCD and the Start/Cancel button light will be illuminated for 30 seconds and then go out if no other buttons or knobs are pressed or moved.
- Page 7 . 2) SING THE OAST UNCTION Step 1. Turn the Function Knob to the Toast ( ) function. When you select the Toast function, the 1-7 color shade setting indicator will become visible on the LCD. Both upper and lower heating elements will heat. Default Color Shade Setting is 4.
- Page 8 . 3) SING THE AGEL UNCTION Step 1. Turn the Function Knob to the Bagel ( ) function. When you select the Bagel function, the 1-7 color shade setting indicator will become visible on the LCD. Only upper heating element will heat. Default Color Shade Setting is 4.
- Page 9 SING THE IZZA URBO ONVECTION . 4) UNCTION Step 1. Turn the Function Knob to the Pizza ) function. When you select the Pizza function, the Turbo Convection Heat will automatically activate. Step 2. If you wish to switch to the regular Pizza function, press the Turbo button once to turn off the Turbo Convection Heat default selection.
- Page 10 Step 5. To Start: Press the Start/Cancel Button to start the cooking process. The red Start/Cancel Button light will illuminate. The LCD Display will show the Pizza Function, the countdown time and the selected temperature. The unit will begin to work and the timer will start counting down.
- Page 11 Step 3. To set the temperature: Turn the Temperature/Time Knob if you wish to increase or decrease the temperature setting. The frame around the temperature setting on the LCD display will be blinking. For the Bake Function, the temperature can be set from 65 to 230ºC in 1-degree increments.
- Page 12 . 6) SING THE ROIL UNCTION Step 1. Turn the Function Knob to the Broil ( ) function. When you select the Broil function, the upper heating elements will heat. Default Temperature: 230ºC. Default Time: 10 minutes. Step 2. To set the temperature: Turn the Temperature/Time Knob if you wish to increase or decrease the temperature setting.
- Page 13 SING THE OOKIES URBO ONVECTION . 7) UNCTION Step 1. Turn the Function Knob to the Cookies ) function. When you select the Cookies function, the Turbo Convection Heat will automatically activate. Step 2. If you wish to use the regular Cookies function, press Turbo button once to turn off the Turbo Convection Heat.
- Page 14 Step 5. To Start: Press the Start/Cancel Button to start the cooking process. The red Start/Cancel Button light will illuminate. The LCD Display will show the Cookies Function, the countdown time and the selected temperature. The unit will begin to work and the timer will start counting down.
- Page 15 Step 3. To set the temperature: Turn the Temperature/Time Knob if you wish to increase or decrease the temperature setting. The frame around the temperature setting on the LCD display will be blinking. For the Roast Function, the temperature can be set from 65 to 230ºC in 1-degree increments.
- Page 16 . 9) SING THE UNCTION Step 1. Turn the Function Knob to the Warm ( ) function. Default Temperature: 65ºC. Default Time: 60 minutes. You may manually activate the Turbo Convection Heat by pressing the Turbo button once to turn it on. The blue light of the Turbo button will turn on.
- Page 17 When the Warming cycle is complete, the unit will emit 3 beeps. The LCD and the Start/Cancel Button Light will turn off after 30 seconds. NOTE: You can cancel the warming cycle at any time by pressing the Start/Cancel Button once.
- Page 18 Step 4. To Start: Press the Start/Cancel Button to start the defrosting process. The red Start/Cancel Button light will illuminate. The LCD Display will show the Defrosting function, the countdown time and the selected temperature. The unit will begin to work and the timer will start counting down.
- Page 19 Step 3. To set the time: Turn the Temperature/Time Knob if you wish to increase or decrease the reheating time. The maximum time setting for Reheat is 60 minutes (1 hour). Once you have selected the desired reheating time, press the Start button to initiate the reheating process.
- Page 20 OSITIONING • To accommodate a wide variety of foods the oven has two rack positions. The rack can be inserted in the oven in the upper or lower rack guides. The rack will fit into either of the rack guides inside of the Countertop Oven. (See Figure Below) •...
-
Page 21: Cleaning Your Countertop Oven
LEANING OUNTERTOP DO NOT IMMERSE IN LIQUIDS. Step 1. Press the Start/Cancel Button OFF and remove plug from electrical outlet. Allow to cool. Step 2. Wipe unit down with damp cloth. DO NOT IMMERSE IN WATER. Make sure to only use mild, soapy water. Abrasive cleaners, scrubbing brushes and chemical cleaners will damage the coating on this unit. - Page 22 1 Year Limited Warranty Sunbeam Products, Inc. doing business as Jarden Consumer Solutions or if in Canada, Sunbeam Corporation (Canada) Limited doing business as Jarden Consumer Solutions (collectively “JCS”) warrants that for a period of one year from the date of purchase, this product will be free from defects in material and workmanship.
- Page 23 How To Obtain Warranty Service In the U.S.A. If you have any question regarding this warranty or would like to obtain warranty service, please call 1-800-334-0759 and a convenient service center address will be provided to you. In Canada If you have any question regarding this warranty or would like to obtain warranty service, please call 1-800-667-8623 and a convenient service center address will be provided to you.
- Page 24 For product questions: Sunbeam Consumer Service USA: 1.800.458.8407 Canada: 1.800.667.8623 www.oster.ca © 2013 Sunbeam Products, Inc. doing business as Jarden Consumer Solutions. All rights reserved. In Canada, imported and distributed by Sunbeam Corporation (Canada) Limited doing business as Jarden Consumer Solutions, 20 B Hereford Street, Brampton, Ontario L6Y 0M1.
Need help?
Do you have a question about the TSSTVDG01 Series and is the answer not in the manual?
Questions and answers