
Related Manuals for Amana IC6

Summary of Contents for Amana IC6
- Page 1 ® Keep these instructions for future reference. Be sure this manual stays with refrigerator Part No. 10527053 © 2000 Amana Appliances Printed in U.S.A. 11/00 Amana, Iowa 52204...
-
Page 2: Important Safety Instructions
If parts are missing, contact source from whom kit INSTRUCTIONS was purchased. • If unable to solve a problem during installation, contact an authorized Amana technician. Locate a factory Service Center or independent authorized technician by calling 1-800-628-5782 inside U.S.A. and 1-319-622-5511 outside U.S.A. -
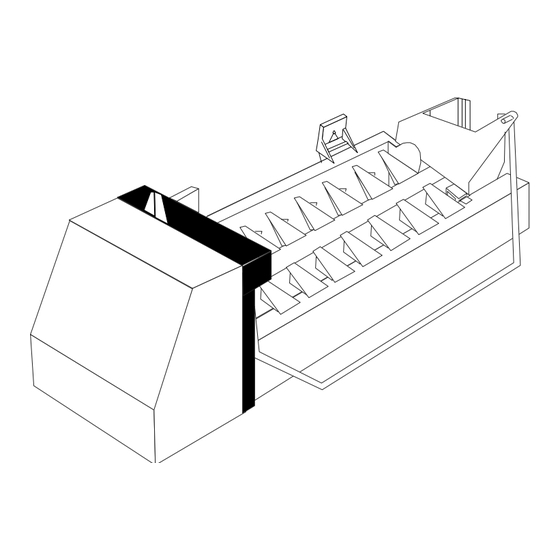
Page 3: How The Icemaker Works
HOW THE ICEMAKER WORKS 1. Water fills the empty cube mold when the 3. The feeler arm senses when the bin is full freezer has cooled to freezing temperature. and signals the icemaker to stop ejecting Cold air is forced directly over the mold. more cubes. -
Page 4: How To Use Your Icemaker
HOW TO USE YOUR ICEMAKER 1. To start the Icemaker, lower the feeler arm to the 7. Ice cubes that have been in the ice storage bin for a considerable length of time may pick up off-flavor ON (down) position. Make sure the ice storage tastes, stick together, and gradually become bin is below the icemaker and pushed back as far as possible. - Page 5 IC-6 ICE MAKER KIT INSTALLATION INSTRUCTIONS • Read these instructions all the way through before starting. • IMPORTANT: OBSERVE ALL GOVERNING CODES AND ORDINANCES. • Installer—Be sure to leave these instructions with the Consumer. IMPORTANT CAUTION • Before connecting ice maker, contact a For your safety, unplug the refrigerator from plumber to connect copper tubing to its electrical outlet to eliminate danger of...
- Page 6 PREPARE THE FREEZER COMPARTMENT 4. INSTALL WATER FILL TUBE THROUGH 1. REMOVE ALL BASKETS AND THE BACK OF THE REFRIGERATOR. SHELVES FROM THE FREEZER. a. Remove the cover for the water tube inlet hole on the back of the refrigerator near the bottom.
- Page 7 c. To prevent the styrofoam insulation beads from entering the water fill tube during installation, temporarily cover the end of the tube with masking tape. Push the water fill tube through the hole. d. From the inside of the freezer, pull the water fill tube through the hole in the back wall.
- Page 8 INSTALL THE WATER VALVE FOR 30" AND 33" WIDE BOTTOM FREEZERS AND ALL TOP FREEZERS e. Attach the water valve to the lower rail INSTALL THE WATER VALVE. (for 36" wide using the hex screws removed from the bottom freezer models, see “Install Water mounting plate.
- Page 9 INSTALL THE WATER VALVE FOR 36" WIDE BOTTOM FREEZER MODELS d. Insert harness and valve through opening FOR 36" WIDE BOTTOM FREEZER in back cover. Mount valve to back cover MODELS and mounting plate with 3 hex head screws retained from cover plate removal. a.
- Page 10 INSTALL THE ICE MAKER The water fill tube fits under the stainelss 4. HANG THE ICEMAKER ON FREEZER WALL steel clip on the water cup. The water fill a. Slip the stainless steel clip over the wall of tube must not be kinked. It should extend the water cup.
- Page 11 CONNECT REFRIGERATOR TO WATER SUPPLY 1. CONNECT COPPER TUBING TO g. Secure the ¼" flexible copper tubing with the REFRIGERATOR. P-clamp at the back horizontal cover, using Before making connection to the the existing cover screw. Create a service refrigerator, be sure refrigerator power loop out of additional 8' of copper tubing.
-
Page 12: Troubleshooting Guide
Amana recommends using a saddle valve. Contact 1-800-843-0304 or an Amana dealer for availability. Do not use self-piercing valve. Amana is not responsible for property damage due to improper installation or water connection. Water pressure is too low. - Page 13 Plastic tubing was used to complete Amana recommends using copper tubing for installation. water connection. Plastic is less durable and can cause leakage. Amana is not responsible for property damage due to imporper installation or water connection. Water pressure is too low.
-
Page 14: Warranty
WARRANTY Ice Maker Full One Year Warranty First Year Amana Appliances will repair or replace, free of charge, any part which is defective due to workmanship or materials. Owner’s Responsibilities Warranty Limitations • Provide proof of purchase (sales receipt). •... - Page 16 Part No. 10527053 © 2000 Amana Appliances Printed in U.S.A. 11/00 Amana, Iowa 52204...
Need help?
Do you have a question about the IC6 and is the answer not in the manual?
Questions and answers