Table of Contents
Advertisement
Available languages
Available languages
Quick Links
Advertisement
Table of Contents

Subscribe to Our Youtube Channel
Related Manuals for 3Com 3CRPCIN175


Summary of Contents for 3Com 3CRPCIN175
-
Page 1: Quick Installation Guide
3Com Wireless 11n PCI Adapter Quick Installation Guide 3CRPCIN175 Antes de usar este equipo por primera vez, lo invitamos a leer detenidamente las siguientes instrucciones. Guarde este manual para consultas futuras. www.3com.com M/N: WL-601 10016657 Rev AA March 2008... - Page 2 3Com Corporation. 3Com Corporation reserves the right to revise this documentation and to make changes in content from time to time without obligation on the part of 3Com Corporation to provide notification of such revision or change.
-
Page 3: Check The Package Contents
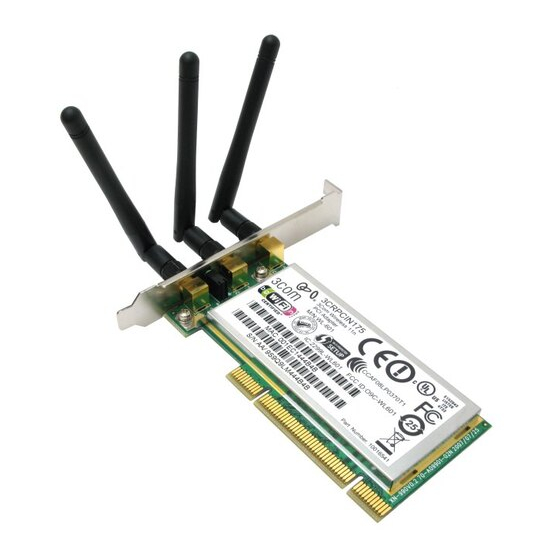
Check the Package Contents Before you start with the installation, verify that your PCI Adapter package includes the following items: One 3Com Wireless 11n PCI Adapter with standard PCI ■ bracket Three remote antennas ■ One low-profile PCI bracket ■... -
Page 4: Check The Pci Bracket
Check the Package Contents 7 MB of free disk space ■ CD-ROM drive ■ Check the PCI Bracket The standard PCI bracket to which the PCI Adapter is attached by default is for standard, full-height desktops. If you are using a low-profile desktop, you need to replace the standard bracket with the low-profile bracket for the PCI Adapter to fit. -
Page 5: Installing The Wireless Pci Adapter
Installing the Wireless PCI Adapter Installing the PCI Adapter is a two-step process: Install the PCI Adapter hardware Install the 3Com PCI Adapter driver Install the PCI Adapter Hardware You will need: A Phillips screwdriver to remove the computer case and slot ■... - Page 6 Installing the Wireless PCI Adapter Figure 1 Inserting the PCI Adapter into a PCI Slot Insert the PCI Adapter into the slot, and then press it down gently until it seats snugly in the slot. See 2 in Figure 1. Secure the PCI Adapter into the slot using the screw that you removed earlier.
-
Page 7: Install The 3Com Wireless Pci Adapter Driver
Cancel. Install the 3Com Wireless PCI Adapter Driver Your PCI Adapter includes a CD that contains the 3Com Wireless Driver. Running the PCI Adapter setup program installs the driver. To install the 3Com PCI Adapter driver, follow the instructions in... -
Page 8: Windows Xp Installation
Install the 3Com Wireless PCI Adapter Driver Windows XP Installation With the computer on and Windows running, insert the 3Com Installation CD into the CD-ROM drive. The 3Com Wireless 11n PCI Adapter Installation Manager setup menu appears. If the setup menu does not appear, click Start > Run, and then... - Page 9 Install the 3Com Wireless PCI Adapter Driver Choose your country and then click Next. Click Install.
- Page 10 Install the 3Com Wireless PCI Adapter Driver When the message appears, InstallShield Wizard Complete click Finish. You have completed installing the 3Com Wireless PCI Adapter driver. On the setup menu, click Exit.
-
Page 11: Windows Vista Installation
Install the 3Com Wireless PCI Adapter Driver Windows Vista Installation With the computer on and Windows running, insert the 3Com Installation CD into the CD-ROM drive. The 3Com Wireless 11n PCI Adapter Installation Manager setup menu appears. If the setup menu does not appear, click >... - Page 12 Install the 3Com Wireless PCI Adapter Driver Choose your country and then click Next.
- Page 13 Install the 3Com Wireless PCI Adapter Driver Click Install. When the message appears, InstallShield Wizard Complete click Finish. You have completed installing the 3Com Wireless PCI Adapter driver. On the setup menu, click Exit.
-
Page 14: What To Do Next
What to Do Next What to Do Next This section first covers connecting on Windows XP and then connecting on the Windows Vista operating system. Connecting on Windows XP By default, the PCI Adapter now scans for access points in range. To connect to a specific access point, you must configure your wireless connection using the Windows Zero Configuration (WZC) tool. - Page 15 What to Do Next Click Refresh network list to reload and search for available wireless devices. Select a wireless network in the list and click Connect to join the selected wireless network. If wireless security is activated for the selected wireless network, the Wireless Network Connection Window appears.
- Page 16 What to Do Next Connecting on Windows Vista Windows Vista WLAN AutoConfig The PC will begin functioning in Station Mode (as a Client) with your Wireless LAN network as soon as the Network Key is set up. If you do not have an existing wireless network, first set up your wireless router before you use your PC in Station Mode.
- Page 17 What to Do Next Select the Wireless Network of your choice by clicking on its name. The entire block is highlighted. Select Connect in the lower right corner. The next Wireless Network Connection dialog box appears, as shown here: Enter the Network Key (WEP Key or WPA Key) for your Wireless Network.
- Page 18 What to Do Next The Wireless Network Connection dialog box appears again as you are being connected. Once successfully connected to Generic1, as shown next, click the check box to Save this network. Verify that Start this connection automatically is also enabled. Click Close.
-
Page 19: Troubleshooting Installation
Troubleshooting Installation Troubleshooting Installation Refer to Table 1 for a list of issues that you may encounter during installation and some suggested solutions. Table 1 Installation Issues and Possible Solutions Problem Possible Solution Installation program Use the Device Manager to resolve resource does not finish or the conflicts that may exist. -
Page 20: Register Your Product For Services And Repair
Telephone Technical Support and Repair 3Com offers telephone, e-mail, and Internet access to technical support and repair services. To access these services for your region, use the appropriate telephone number, URL, or e-mail address from the following URL: http://csoweb4.3com.com/contactus/... -
Page 21: Adaptateur Pci 11N Sans Fil De 3Com
Adaptateur PCI 11n sans fil de 3Com Guide d'installation rapide 3CRPCIN175 www.3com.fr M/N : WL-601 10016657 Rev AA Mars 2008... - Page 22 Tout travail dérivé (tel que traduction, transformation ou adaptation) est prohibé en l'absence d'une autorisation écrite de 3Com Corporation. 3Com Corporation se réserve le droit de revoir cette documentation et d'en modifier le contenu de temps à autre sans préavis.
-
Page 23: Contenu Du Paquet
Contenu du paquet Avant de démarrer l'installation, veuillez vérifier que le paquet de l'adaptateur PCI contient bien ce qui suit: un adaptateur PCI 11n sans fil de 3Com avec bracket PCI ■ standard trois antennes à distance ■ un bracket PCI profil bas ■... -
Page 24: Vérification Du Bracket Pci
Contenu du paquet ™ ™ un processeur Intel Pentium III ou Celeron 733 MHz (ou ■ équivalent) 256 Mo de RAM ■ 7 Mo d'espace libre sur le disque ■ un lecteur CD-ROM ■ Vérification du bracket PCI Le bracket PCI standard auquel est rattaché par défaut l'adaptateur PCI est destiné... - Page 25 Installation de l'adaptateur PSI sans fil L'installation de l'adaptateur PCI se fait en deux étapes: Installation du matériel de l'adaptateur PCI Installation du pilote de l'adaptateur PCI de 3Com Installation du matériel de l'adaptateur PCI Vous aurez besoin : d'un tournevis cruciforme pour enlever le boîtier et le cache ■...
- Page 26 Installation de l'adaptateur PSI sans fil Pour installer l'adaptateur PCI dans un emplacement PCI : Éteignez l'ordinateur et débranchez le cordon de la prise de courant. Au moyen de la protection antistatique, retirez le boîtier. Repérez un emplacement PCI vide et enlevez le cache. Reportez-vous à...
- Page 27 Installation de l'adaptateur PSI sans fil Attachez les 3 antennes aux connecteurs de l'adaptateur PCI puis faites tourner les portions filetées dans le sens des aiguilles d'une montre pour les fixer. Ne serrez pas trop. Pour une réception optimale, positionnez les antennes de sorte à ce que celle du milieu soit à...
- Page 28 3Com. L'exécution du programme de configuration permet d'installer l'adaptateur PCI. Pour installer le pilote de l'adaptateur PCI de 3Com, suivez les consignes figurant dans la section suivante en fonction du système d'exploitation dont vous vous servez.
- Page 29 Installation du pilote de l'adaptateur PCI sans fil de 3Com Dans le menu de configuration, cliquez sur Install/Uninstall Wireless Product. L'assistant se prépare à l'installation. Le contrat de licence logicielle 3Com pour utilisateur final apparaît. Lisez le contrat attentivement, cliquez sur I accept the terms of the license agreement pour accepter les termes et les conditions puis cliquez sur Next.
- Page 30 Installation du pilote de l'adaptateur PCI sans fil de 3Com Choisissez votre pays puis cliquez sur Next. Cliquez sur Install.
- Page 31 Installation du pilote de l'adaptateur PCI sans fil de 3Com Lorsque le message InstallShield Wizard Complete apparaît, cliquez sur Finish. Vous avez terminé l'installation du pilote de l'adaptateur PCI sans fil de 3Com. Sur le menu de configuration, cliquez sur Exit.
-
Page 32: Installation Sur Windows Vista
Installation du pilote de l'adaptateur PCI sans fil de 3Com Installation sur Windows Vista Insérez le CD-ROM d'installation de 3Com dans le lecteur CD-ROM de votre ordinateur (l'ordinateur et Windows doivent être en route). Le menu de configuration du gestionnaire d'installation de l'adaptateur PCI 11n sans fil de 3Com apparaît. - Page 33 Installation du pilote de l'adaptateur PCI sans fil de 3Com Le contrat de licence logicielle 3Com pour utilisateur final apparaît. Lisez le contrat attentivement puis cliquez sur I accept the terms of the license agreement pour accepter les termes et les conditions.
- Page 34 Installation du pilote de l'adaptateur PCI sans fil de 3Com Cliquez sur Install. Lorsque le message apparaît, InstallShield Wizard Complete cliquez sur Finish. Vous avez terminé l'installation du pilote de l'adaptateur PCI sans fil de 3Com. Sur le menu de configuration, cliquez sur Exit.
-
Page 35: Que Faire Ensuite
Que faire ensuite Que faire ensuite Cette section présente tout d'abord la connexion sur le système d'exploitation Windows XP puis celle sur Windows Vista. Connexion sur Windows XP Par défaut, l'adaptateur PCI recherche les points d'accès à proximité. Pour vous connecter à un point d'accès spécifique, vous devez configurer votre connexion sans fil au moyen de l'outil Windows Zero Configuration (WZC). - Page 36 Que faire ensuite Cliquez sur Actualiser la liste des réseaux pour recharger et rechercher les périphériques sans fil disponibles. Sélectionnez un réseau sans fil dans la liste puis cliquez sur Connexion pour rejoindre le réseau sélectionné. Si la sécurité sans fil est activée pour le réseau sélectionné, la fenêtre Connexion réseau sans fil apparaît.
- Page 37 Que faire ensuite Si aucune sécurité n'est activée pour le réseau sans fil sélectionné, une fenêtre d'avertissement apparaît. Cliquez sur Connecter (quand même). Fermez la fenêtre Liste des connexions réseau sans fil.
-
Page 38: Connexion Sur Windows Vista
Que faire ensuite Connexion sur Windows Vista Configuration automatique WLAN dans Windows Vista L'ordinateur commence à fonctionner en mode station (comme un client) avec le réseau local sans fil (WLAN) dès que la clé réseau est configurée. Si vous ne disposez pas d'un réseau sans fil, vos devez tout d'abord configurer votre routeur sans fil avant d'utiliser l'ordinateur en mode station. - Page 39 Que faire ensuite Sélectionnez le réseau sans fil de votre choix en cliquant sur son nom. Le bloc tout entier se met en surbrillance. Sélectionnez Connexion dans l'angle inférieur droit. La boîte de dialogue Connexion réseau sans fil suivante apparaît, comme illustré...
- Page 40 Que faire ensuite Si le réseau utilise un cryptage WEP, un format hexadécimal ou ASCII est alors nécessaire pour saisir la clé réseau : Hexadécimal — 10 caractères en notation hexadécimale ■ pour le cryptage 40 bits ou 26 caractères pour le cryptage 128 bits.
- Page 41 Résolution des problèmes d'installation Résolution des problèmes d'installation Reportez-vous au Tableau 1 pour une liste des problèmes que vous pourrez être amené à rencontrer au cours de l'installation ainsi que leurs solutions possibles. Tableau 1 Problèmes d'installation et solutions possibles Problème Solution possible Le programme...
-
Page 42: Enregistrement Du Produit Pour Le Service Après Vente
à : http://eSupport.3com.com/ Soutien technique et réparation par téléphone 3Com offre un accès aux services d'aide technique et de réparation par téléphone, courriel et Internet. Pour accéder à ces services dans votre région, utilisez le numéro de téléphone, l'URL ou l'adresse électronique corrects depuis l'URL suivante :... -
Page 43: Scheda Pci 3Com Wireless 11N
Scheda PCI 3Com Wireless 11n Guida rapida di installazione 3CRPCIN175 www.3com.it Numero parte: WL-601 10016657 Rev AA Marzo 2008... - Page 44 (come traduzioni, modifiche o adattamenti) senza previa autorizzazione scritta di 3Com Corporation. 3Com Corporation si riserva il diritto di riesaminare la presente documentazione e di apportare modifiche al contenuto di tanto in tanto senza l'obbligo da parte di 3Com Corporation di fornire alcun preavviso per tali revisioni o modifiche.
-
Page 45: Contenuto Della Confezione
Contenuto della confezione Prima di avviare l'installazione, verificare che la confezione della scheda PCI contenga i seguenti componenti: Una scheda PCI 3Com Wireless 11n con supporto standard ■ Tre antenne remote ■ Un supporto PCI a basso profilo ■ Un CD-ROM di installazione 3COM contenente il driver per ■... -
Page 46: Supporto Pci
Contenuto della confezione 7 MB di spazio libero su disco ■ Unità CD-ROM ■ Supporto PCI La scheda PCI è fissata per impostazione predefinita a un supporto PCI standard per desktop ad altezza totale standard. Se si adopera un desktop a basso profilo, è necessario sostituire il supporto standard con il supporto a basso profilo per la scheda PCI. -
Page 47: Installazione Della Scheda Pci Wireless
Installazione della scheda PCI wireless L'installazione della scheda PCI viene effettuata in due passaggi: Installazione dell'hardware della scheda PCI Installazione del driver della scheda PCI 3Com Installazione dell'hardware della scheda PCI Per effettuare l'operazione, è necessario quanto segue: Cacciavite Phillips per rimuovere l'involucro del computer e il ■... - Page 48 Installazione della scheda PCI wireless Figura 1 Inserimento della scheda PCI in uno slot PCI Inserire la scheda PCI nello slot e spingerla con delicatezza verso il basso fino al suo completo alloggiamento nello slot. Vedere 2 nella Figura 1. Fissare la scheda PCI nello slot tramite la vite rimossa in precedenza.
-
Page 49: Installazione Del Driver Della Scheda Pci Wireless 3Com
Se all'avvio di Windows viene visualizzato il messaggio Installazione guidata nuovo hardware, fare clic su Annulla. Installazione del driver della scheda PCI wireless 3Com La scheda PCI include un CD con il driver wireless 3Com. Il driver viene installato eseguendo il programma di installazione della scheda PCI. -
Page 50: Installazione In Windows Xp
Installazione in Windows XP Con il computer acceso e Windows in esecuzione, inserire il CD di installazione 3Com nell'unità CD-ROM. Verrà visualizzato il menu di installazione 3Com Wireless 11n PCI Adapter Installation Manager (Gestore installazione per la scheda PCI 3Com Wireless 11n). - Page 51 Installazione del driver della scheda PCI wireless 3Com Verrà visualizzato il contratto di licenza software con l'utente finale di 3Com. Leggere il contratto attentamente e fare clic su I accept the terms of the license agreement (Accetto i termini del Contratto di licenza) per accettare tutti i termini e le condizioni del contratto, quindi fare clic su Next (Avanti).
- Page 52 Installazione del driver della scheda PCI wireless 3Com Fare clic su Install (Installa). Quando viene visualizzato il messaggio InstallShield Wizard (Installazione guidata InstallShield completata), Complete scegliere Finish (Fine). L'installazione del driver della scheda PCI wireless 3Com è completata. Nel menu di installazione fare clic su Exit (Esci).
-
Page 53: Installazione In Windows Vista
Product (Installa/Disinstalla dispositivo wireless). Verrà avviata l'installazione guidata. Verrà visualizzato il contratto di licenza software con l'utente finale di 3Com. Leggere il contratto attentamente e fare clic su I accept the terms of the license agreement (Accetto i termini del... - Page 54 Installazione del driver della scheda PCI wireless 3Com Contratto di licenza) per accettare tutti i termini e le condizioni del contratto. Fare clic su Next (Avanti). Scegliere il proprio paese e fare clic su Next.
- Page 55 Installazione del driver della scheda PCI wireless 3Com Fare clic su Install (Installa). Quando viene visualizzato il messaggio InstallShield Wizard (Installazione guidata InstallShield completata), Complete scegliere Finish (Fine). L'installazione del driver della scheda PCI wireless 3Com è completata. Nel menu di installazione fare clic su Exit (Esci).
-
Page 56: Successivi Operazioni
Successivi operazioni Successivi operazioni In questa sezione viene illustrato come eseguire la connessione prima nel sistema operativo Windows XP, quindi in Windows Vista. Connessione in Windows XP Per impostazione predefinita la scheda PCI cerca i punti di accesso disponibili nell'intervallo. Per connettere uno specifico punto di accesso, è... - Page 57 Successivi operazioni Fare clic sull'icona della rete nell'area di notifica per visualizzare Reti senza fili. Fare clic su Aggiorna elenco reti per ricaricare e cercare i dispositivi wireless disponibili. Selezionare una rete wireless elencata e fare clic su Connetti per accedere alla stessa. Se per la rete selezionata è...
- Page 58 Successivi operazioni Se non è attiva alcuna protezione per la rete wireless selezionata, viene visualizzato un messaggio di avviso. Fare clic su Connetti comunque. Chiudere la finestra Connessione rete senza fili. Connessione in Windows Vista Configurazione automatica WLAN di Windows Vista Il PC verrà...
- Page 59 Successivi operazioni Selezionare l'opzione Connessione a una rete dal menu della rete wireless. Verrà visualizzata la finestra di dialogo Connessione rete wireless, come mostrato nell'immagine: Selezionare la rete wireless desiderata facendo clic sul nome della stessa. L'intero blocco verrà evidenziato. Selezionare Connetti nell'angolo inferiore destro.
- Page 60 Successivi operazioni Verrà aperta la successiva finestra di dialogo di connessione della rete wireless, come mostrato nell'immagine: Inserire la chiave di rete WEP o WPA per la rete wireless. In caso di reti con crittografia WEP, è necessario immettere la chiave di rete nel formato HEX o ASCII: HEX —...
- Page 61 Successivi operazioni Eseguita la connessione, selezionare la casella di controllo Salva questa rete come mostrato sotto. Verificare che sia abilitata anche l'opzione Avvia questa connessione automaticamente. Scegliere Chiudi.
-
Page 62: Risoluzione Dei Problemi Di Installazione
Risoluzione dei problemi di installazione Risoluzione dei problemi di installazione Per un elenco dei possibili problemi di installazione e dei suggerimenti per risolverli, consultare la Tabella 1. Tabella 1 Problemi di installazione e possibili soluzioni Problema Possibile soluzione Il programma di Utilizzare Gestione periferiche (Gestione dispositivi installazione non in Windows Vista) per risolvere eventuali conflitti... -
Page 63: Registrazione Del Prodotto Per Servizi Di Assistenza E Riparazione
Assistenza tecnica e riparazione telefonica 3Com offre servizi di riparazione e assistenza tecnica per telefono, e-mail e Internet. Per accedere a questi servizi nel proprio paese, reperire il numero di telefono, l'URL o l'indirizzo e-mail appropriato presso:... - Page 64 Registrazione del prodotto per servizi di assistenza e riparazione...
-
Page 65: 3Com Wireless 11N Pci-Adapter
3Com Wireless 11n PCI-Adapter Kurzanleitung zur Installation 3CRPCIN175 www.3com.de M/N: WL-601 10016657 Rev AA März 2008... - Page 66 Copyright © 2005-2008, 3Com Corporation. Alle Rechte vorbehalten. Ohne die schriftliche Genehmigung von 3Com Corporation ist es untersagt, dieses Dokumentation, sei es auch nur teilweise, in welcher Form und mit welchem Verfahren auch immer, zu vervielfältigen oder davon abgeleitete Produkte (wie Übersetzung, Umformung oder Anpassung) anzufertigen.
-
Page 67: Überprüfen Des Verpackungsinhaltes
■ eine PCI-Halterung (niedrige Bauhöhe) ■ eine 3Com-Installations-CD-ROM mit dem Treiber für den ■ PCI-Adapter diese 3Com Wireless 11n PCI-Adapter – Kurzanleitung zur ■ Installation einen Garantieschein ■ Sollte davon etwas fehlen oder beschädigt sein, wenden Sie sich bitte umgehend an Ihren 3Com-Netzwerkanbieter. -
Page 68: Überprüfen Der Pci-Halterung
Überprüfen des Verpackungsinhaltes verfügbarer PCI-Steckplatz ■ 733 MHz Intel ™ Pentium ™ III oder Celeron (oder ■ gleichwertiger) Prozessor 256 MB RAM ■ 7 MB freier Festplattenspeicherplatz ■ CD-ROM-Laufwerk ■ Überprüfen der PCI-Halterung Die PCI-Standardhalterung, an der der PCI-Adapter bei Lieferung befestigt ist, ist für normalgroße Standarddesktop-Computer gedacht. -
Page 69: Installieren Des Wireless Pci-Adapters
Bringen Sie die drei in step 1 entfernten Muttern und Unterlegscheiben wieder an. Installieren des Wireless PCI-Adapters Die Installation des PCI-Adapters erfolgt in zwei Schritten: Installation der PCI-Adapter-Hardware Installation des 3Com PCI-Adapter-Treibers Installieren der PCI-Adapter-Hardware Folgendes wird dazu benötigt: ein Kreuzschlitzschraubendreher, um das Computergehäuse ■... - Page 70 Installieren des Wireless PCI-Adapters Befestigen Sie die Antennen erst dann an den Antennenanschlüssen, nachdem Sie den PCI-Adapter im Steckplatz befestigt haben. So installieren Sie den PCI-Adapter in einem PCI-Steckplatz: Fahren Sie den Computer herunter und ziehen Sie das Netzkabel aus der Steckdose. Entfernen Sie unter Verwendung des ESD-Schutzes die Computerabdeckung.
- Page 71 Installieren des Wireless PCI-Adapters Befestigen Sie den PCI-Adapter mit der zuvor entfernten Schraube im Steckplatz. Bringen Sie die Computerabdeckung wieder an. Verbinden Sie die 3 Antennen mit den Antennenanschlüssen des PCI-Adapters und drehen Sie ihre Gewindeteile zur Befestigung im Uhrzeigersinn. Ziehen Sie die Anschlüsse nicht zu fest an. Richten Sie die Antennen für den besten Empfang so aus, dass die mittlere Antenne senkrecht nach oben zeigt und die beiden seitlichen Antennen in einem 45-Grad-Winkel abstehen (siehe...
-
Page 72: Installieren Des 3Com Pci-Adapter-Treibers
Starten Sie den Computer und das Windows-Betriebssystem und legen Sie die 3COM-Installations-CD in das CD-ROM-Laufwerk ein. Das Setup-Menü mit dem Installationsmanager für den 3Com Wireless 11n PCI-Adapter wird angezeigt. Wird dieses Setup-Menü nicht automatisch angezeigt, klicken Sie auf Start > Ausführen und geben Sie dann ein. - Page 73 Installieren des 3Com PCI-Adapter-Treibers Klicken Sie im Setup-Menü auf Wireless-Produkt installieren/deinstallieren. Der Assistent bereitet die Installation vor. Die 3Com Endbenutzer-Softwarelizenzvereinbarung wird angezeigt. Lesen Sie die Vereinbarung sorgfältig durch, klicken Sie auf Ich akzeptiere die Bedingungen der Lizenzvereinbarung und klicken Sie anschließend auf Weiter.
- Page 74 Installieren des 3Com PCI-Adapter-Treibers Wählen Sie Ihr Land aus und klicken Sie anschließend auf Weiter. Klicken Sie auf Installieren.
- Page 75 Installieren des 3Com PCI-Adapter-Treibers Wenn die Meldung InstallShield-Assistent angezeigt wird, klicken Sie auf Fertig stellen. abgeschlossen Dies schließt die Installation des 3Com Wireless PCI-Adapter-Treibers ab. Klicken Sie im Setup-Menü auf Beenden.
-
Page 76: Installation Unter Windows Vista
Starten Sie den Computer und das Windows-Betriebssystem und legen Sie die 3COM-Installations-CD in das CD-ROM-Laufwerk ein. Das Setup-Menü mit dem Installationsmanager für den 3Com Wireless 11n PCI-Adapter wird angezeigt. Wird dieses Setup-Menü nicht automatisch angezeigt, klicken Sie > Alle Programme > Zubehör > Ausführen und geben Sie dann ein. - Page 77 Installieren des 3Com PCI-Adapter-Treibers Die 3Com Endbenutzer-Softwarelizenzvereinbarung wird angezeigt. Lesen Sie die Vereinbarung sorgfältig durch und klicken Sie auf Ich akzeptiere die Bedingungen der Lizenzvereinbarung. und klicken Sie anschließend auf Weiter. Wählen Sie Ihr Land aus und klicken Sie anschließend auf Weiter.
- Page 78 Installieren des 3Com PCI-Adapter-Treibers Klicken Sie auf Installieren. Wenn die Meldung InstallShield-Assistent abgeschlossen angezeigt wird, klicken Sie auf Fertig stellen. Dies schließt die Installation des 3Com Wireless PCI-Adapter-Treibers ab. Klicken Sie im Setup-Menü auf Beenden.
-
Page 79: Nächste Schritte
Nächste Schritte Nächste Schritte Dieser Abschnitt beschreibt die Verbindungsherstellung unter Windows XP und Windows Vista. Verbindungsherstellung unter Windows XP Der PCI-Adapter sucht standardmäßig nach verfügbaren Zugriffspunkten im Sendebereich des Adapters. Um sich mit einem bestimmten Zugriffspunkt zu verbinden, müssen Sie die WLAN-Verbindung unter Verwendung des Windows-Dienstes Konfigurationsfreie drahtlose Verbindung einrichten. - Page 80 Nächste Schritte Klicken Sie auf das Netzwerksymbol in der Taskleiste, um die Drahtlosen Netzwerke anzuzeigen. Klicken Sie auf Netzwerkliste aktualisieren, um die Suche nach Zugriffspunkten durchzuführen und alle verfügbaren Geräte anzuzeigen. Wählen Sie ein auf der Liste angezeigtes drahtloses Netzwerk und klicken Sie auf Verbinden, um mit dem gewählten WLAN eine Verbindung herzustellen.
- Page 81 Nächste Schritte Sind für das gewählte WLAN keine Sicherheitsfunktionen aktiviert, wird ein Fenster mit einer Warnung angezeigt. Klicken Sie auf Trotzdem verbinden. Schließen Sie das Fenster Drahtlose Netzwerkverbindung.
- Page 82 Nächste Schritte Verbindungsherstellung unter Windows Vista Windows Vista WLAN AutoConfig Sobald der Netzwerkschlüssel eingerichtet ist, beginnt der PC mit Ihrem WLAN im Stationsmodus (d. h. als Client) zu arbeiten. Falls Sie noch nicht über ein vorhandenes drahtloses Netzwerk verfügen, müssen Sie zuerst den drahtlosen Router einrichten, bevor Sie den Computer im Stationsmodus verwenden können.
- Page 83 Nächste Schritte Wählen Sie im daraufhin angezeigten Menü die Option Verbindung mit einem Netzwerk herstellen. Das Dialogfeld Drahtlosverbindung wird angezeigt: Klicken Sie auf den Namen des WLANs, mit dem Sie eine Verbindung herstellen möchten. Der gesamte Block wird hervorgehoben.
- Page 84 Nächste Schritte Klicken Sie auf Verbinden in der rechten unteren Ecke. Das nächste Dialogfeld für die Drahtlosverbindung wird angezeigt: Geben Sie den Netzwerkschlüssel (WEP- oder WPA-Schlüssel) für Ihr drahtloses Netzwerk ein. Wenn Ihr Netzwerk WEP-Verschlüsselung verwendet, müssen Sie den Netzwerkschlüssel im HEX- oder ASCII-Format eingeben: HEX: 10 Hexadezimalzeichen für 40-Bit- oder 26 ■...
- Page 85 Nächste Schritte Klicken Sie auf Verbinden. Das Dialogfeld Drahtlosverbindung wird bei der Verbindungsherstellung erneut angezeigt. Klicken Sie nach erfolgreicher Verbindungsherstellung (siehe unten) auf das Kontrollkästchen Dieses Netzwerk speichern. Achten Sie darauf, dass das Kontrollkästchen Diese Verbindung automatisch starten aktiviert ist. Klicken Sie auf Schließen.
-
Page 86: Beheben Von Installationsproblemen
Beheben von Installationsproblemen Beheben von Installationsproblemen In Table 1 finden Sie eine Liste mit Problemen, die bei der Installation auftreten können, und entsprechende Lösungsvorschläge. Table 1 Probleme bei der Installation und mögliche Lösungen Problem Mögliche Lösung Installationsprogra Stellen Sie unter Verwendung des Geräte-Managers mm wird nicht fest, ob möglicherweise Ressourcenkonflikte vorliegen. -
Page 87: Produktregistrierung Für Wartung Und Reparatur
Wartungsleistungen zu erhalten, müssen Sie Ihr Produkt zuerst online registrieren: http://eSupport.3com.com/ Technischem Support und Reparatur Sie können den technischen Support und den Reparaturdienst von 3Com per Telefon, E-Mail und über das Internet erreichen. Die für Ihre Region geltende Telefonnummer, URL oder E-Mail-Adresse finden Sie unter: http://csoweb4.3com.com/contactus/... - Page 88 Produktregistrierung für Wartung und Reparatur...
-
Page 89: Adaptador Pci Wireless 11G 3Com
Adaptador PCI Wireless 11g 3Com Guia de Instalação Rápida 3CRPCIN175 www.3com.com.br M/N: WL-601 10016657 Rev AA Março de 2008... - Page 90 (como tradução, transformação ou adaptação) sem permissão por escrito da 3Com Corporation. A 3Com Corporation se reserva o direito de revisar esta documentação e de fazer alterações no conteúdo a qualquer momento e sem prévio aviso. A 3Com Corporation fornece esta documentação sem garantias, termos ou condições de qualquer tipo, expressas ou implícitas, incluindo mas não se limitando a garantias, termos ou condições implícitas de...
-
Page 91: Inspeção Do Conteúdo Da Embalagem
Inspeção do conteúdo da embalagem Antes de iniciar a instalação, verifique se a embalagem do adaptador PCI inclui estes itens: um Adaptador PCI Wireless 11n 3Com com suporte de PCI ■ padrão três antenas remotas ■ um suporte de PCI de perfil baixo ■... -
Page 92: Verificação Do Suporte De Pci
Inspeção do conteúdo da embalagem slot PCI disponível ■ processador de 733 MHz Intel ™ Pentium ™ III ou Celeron (ou ■ equivalente) 256 MB de RAM ■ 7 MB de espaço livre no disco ■ unidade de CD-ROM ■ Verificação do suporte de PCI Por padrão, o suporte de PCI normal ao qual o adaptador PCI está... -
Page 93: Instalação Do Adaptador Pci Sem Fio
A instalação do adaptador PCI consiste em um processo de duas etapas: Instalação do hardware do Adaptador PCI Instalação do driver do adaptador PCI 3Com Instalação do hardware do adaptador PCI Itens necessários: uma chave de fenda Phillips, para remover o gabinete do ■... - Page 94 Instalação do adaptador PCI sem fio Para instalar o adaptador PCI em um slot de PCI: Desligue o computador e, em seguida, desconecte o cabo de alimentação da fonte de alimentação. Usando a proteção antiestática, remova a tampa do computador. Localize um slot de PCI vazio e remova a tampa correspondente.
- Page 95 Instalação do adaptador PCI sem fio Acople as 3 antenas aos conectores das antenas do adaptador PCI e gire as partes rosqueadas no sentido horário, para fixá-las. Não aperte demais. Para uma recepção ideal, posicione as antenas de forma que a central fique reta e as duas outras a um ângulo de 45º, como mostra a Figura 2.
-
Page 96: Instalação Do Driver Do Adaptador Pci Wireless 3Com
Instalação do driver do adaptador PCI Wireless 3Com Instalação do driver do adaptador PCI Wireless 3Com O adaptador PCI inclui um CD que contém o 3Com Wireless Driver. A execução do programa de configuração do Adaptador PCI instala o driver. - Page 97 Product (Instalar/Desinstalar produto sem fio). O assistente prepara a instalação. O contrato de licença de software de usuário final da 3Com é exibido. Leia cuidadosamente o contrato e clique em I accept the terms of the license agreement (Aceito os termos do contrato de...
- Page 98 Instalação do driver do adaptador PCI Wireless 3Com Escolha o país e clique em Next (Avançar). Clique em Install (instalar). Quando a mensagem InstallShield Wizard Complete aparecer, clique (Assistente do InstallShield concluído) em Finish (Concluir). A instalação do driver do adaptador PCI...
- Page 99 Instalação do driver do adaptador PCI Wireless 3Com No menu de configuração, clique em Sair.
-
Page 100: Instalação No Windows Vista
Product (Instalar/Desinstalar produto sem fio). O assistente prepara a instalação. O contrato de licença de software de usuário final da 3Com é exibido. Leia cuidadosamente o contrato e clique em I accept the terms of the license agreement (Aceito os termos do contrato de licença) para concordar com todos os termos e condições. - Page 101 Instalação do driver do adaptador PCI Wireless 3Com Escolha o país e clique em Next (Avançar).
- Page 102 Instalação do driver do adaptador PCI Wireless 3Com Clique em Install (instalar). Quando a mensagem InstallShield Wizard Complete aparecer, clique (Assistente do InstallShield concluído) em Finish (Concluir). A instalação do driver do adaptador PCI 3Com Wireless está concluída. No menu de configuração, clique em Sair.
-
Page 103: O Que Fazer Agora
O que fazer agora O que fazer agora Esta seção primeiro descreve a conexão com o Windows XP e a conexão com o sistema operacional Windows Vista. Conexão com o Windows XP Por padrão, o adaptador PCI verifica agora os pontos de acesso no intervalo. - Page 104 O que fazer agora Clique na lista Atualizar rede para recarregar e pesquisar dispositivos sem fio disponíveis. Selecione uma rede sem fio na lista e clique em Conectar para conectar-se à rede sem fio selecionada. Se a segurança sem fio estiver ativada para a rede sem fio selecionada, a janela Conexão de rede sem fio será...
- Page 105 O que fazer agora Feche a janela da lista Conexão de rede sem fio.
- Page 106 O que fazer agora Conexão com o Windows Vista Configuração automática de WLAN no Windows Vista O PC começará a funcionar no modo de estação (como um cliente) com a rede LAN sem fio, assim que a chave da rede for configurada.
- Page 107 O que fazer agora Selecione a rede sem fio desejada, clicando no nome correspondente. O bloco inteiro é realçado. Selecione Conectar no canto inferior direito. A caixa de diálogo Conexão de rede sem fio aparece, como mostrado aqui: Digite a chave da rede (chave WEP ou chave WPA) da rede sem fio.
- Page 108 O que fazer agora Se a sua rede estiver usando criptografia WEP, será necessário usar o formato HEX ou ASCII ao digitar a chave da rede: HEX — 10 caracteres na notação HEX de 40 bits ou 26 ■ caracteres para criptografia de 128 bits. ASCII —...
-
Page 109: Solução De Problemas De Instalação
Solução de problemas de instalação Solução de problemas de instalação Consulte a Tabela 1 para ver uma lista de problemas que podem ser encontrados durante a instalação e algumas soluções sugeridas. Tabela 1 Problemas de instalação e soluções possíveis Problema Solução possível O programa de Use o gerenciador de dispositivos para resolver os... -
Page 110: Registre O Produto Para Serviços E Reparos
Ligue para o apoio técnico e reparos A 3Com oferece contatos via telefone, e-mail e Internet para os serviços de apoio técnico e reparos. Para acessar estes serviços na sua região, use o número de telefone, URL ou e-mail apropriados, informados em: http://csoweb4.3com.com/contactus/... -
Page 111: Adaptador De Pci 3Com Wireless 11N
Adaptador de PCI 3Com Wireless 11n Guía de instalación rápida 3CRPCIN175 Antes de usar este equipo por primera vez, lo invitamos a leer detenidamente las siguientes instrucciones. Guarde este manual para consultas futuras. lat.3com.com/lat M/N: WL-601 10016657 Rev AA Marzo de 2008... - Page 112 Guía de usuario. A menos que se indique de otra manera, las marcas registradas de 3Com han sido registradas en los EE.UU., y pueden estar o no registradas en otros países.
-
Page 113: Revise El Contenido Del Paquete
Revise el contenido del paquete Antes de comenzar la instalación, compruebe que su paquete de Adaptador de PCI incluya los siguientes elementos: Un Adaptador de PCI 3Com Wireless 11n con soporte para ■ PCI estándar Tres antenas remotas ■ Un soporte para PCI bajo ■... -
Page 114: Revise El Soporte De Pci
Revise el contenido del paquete ™ ™ Procesador Celeron o Intel Pentium III de 733 MHz (o ■ equivalente) 256 MB de memoria RAM ■ 7 MB de espacio libre en el disco duro ■ Unidad de CD-ROM ■ Revise el soporte de PCI El soporte para PCI estándar en el cual está... -
Page 115: Instalación Del Adaptador De Pci Inalámbrico
La instalación del Adaptador de PCI es un proceso que se realiza en dos pasos: Instalación del hardware del Adaptador de PCI Instalación del controlador del Adaptador de PCI 3Com Instalación del hardware del Adaptador de PCI Necesitará lo siguiente: Un destornillador Phillips para retirar el gabinete de la ■... - Page 116 Instalación del Adaptador de PCI inalámbrico Para instalar el Adaptador de PCI en una ranura PCI: Apague la computadora y desenchufe el cable de alimentación de la fuente de alimentación. Con la protección antiestática, retire la cubierta de la computadora. Localice una ranura PCI vacía y retire la cubierta de la ranura.
- Page 117 Instalación del Adaptador de PCI inalámbrico Vuelva a colocar la cubierta de la computadora. Conecte las tres antenas al conector de antena del Adaptador de PCI y luego atornille las partes roscadas hacia la derecha para ajustarlas. No apriete demasiado. Para obtener una óptima recepción, ubique las antenas de modo que la antena del centro esté...
-
Page 118: Instalación Del Controlador Del Adaptador De Pci Inalámbrico 3Com
Instalación en Windows XP Mientras la computadora está encendida y Windows se está ejecutando, inserte el CD de instalación de 3Com en la unidad de CD-ROM. Aparece el menú de instalación del Administrador de instalación del Adaptador de PCI 11n 3Com Wireless. - Page 119 Product. El asistente se prepara para la instalación. Aparece el Acuerdo de licencia de software para usuario final de 3Com. Lea el acuerdo atentamente, haga clic en I accept the terms of the license agreement (Acepto los términos del acuerdo de licencia) para aceptar los términos y condiciones y haga clic en...
- Page 120 Instalación del controlador del Adaptador de PCI inalámbrico 3Com Seleccione su país y haga clic en Next (Siguiente). Haga clic en Instalar.
- Page 121 Instalación del controlador del Adaptador de PCI inalámbrico 3Com Cuando aparezca el mensaje InstallShield Wizard Complete (Asistente InstallShield completado), haga clic en Finish (Finalizar). Ha finalizado la instalación del controlador del Adaptador de PCI 3Com Wireless . En el menú de instalación, haga clic en Exit (Salir).
-
Page 122: Instalación En Windows Vista
Instalación del controlador del Adaptador de PCI inalámbrico 3Com Instalación en Windows Vista Mientras la computadora está encendida y Windows se está ejecutando, inserte el CD de instalación de 3Com en la unidad de CD-ROM. Aparece el menú de instalación del Administrador de instalación del Adaptador de PCI 11n 3Com Wireless. - Page 123 Instalación del controlador del Adaptador de PCI inalámbrico 3Com Seleccione su país y haga clic en Next (Siguiente).
- Page 124 Instalación del controlador del Adaptador de PCI inalámbrico 3Com Haga clic en Instalar. Cuando aparezca el mensaje InstallShield Wizard Complete (Asistente InstallShield completado), haga clic en Finish (Finalizar). Ha finalizado la instalación del controlador del Adaptador de PCI 3Com Wireless .
-
Page 125: Qué Hacer A Continuación
Qué hacer a continuación Qué hacer a continuación En esta sección primero se cubre la conexión en Windows XP y luego la conexión en el sistema operativo Windows Vista. Conexión en Windows XP De manera predeterminada, el Adaptador de PCI ahora detecta los puntos de acceso dentro del alcance. - Page 126 Qué hacer a continuación Haga clic en el icono de red en la bandeja del sistema para ver Wireless Networks (Redes inalámbricas). Haga clic en la lista Refresh network (Actualizar redes) para buscar dispositivos inalámbricos disponibles. Seleccione una red inalámbrica de la lista y haga clic en Connect (Conectar) para unirse a la red inalámbrica seleccionada.
- Page 127 Qué hacer a continuación Si la red inalámbrica seleccionada no tiene activada la seguridad, aparece una ventana de advertencia. Haga clic en Connect Anyway (Conectar de cualquier forma). Cierre la ventana de lista Wireless Network Connection (Conexión de red inalámbrica).
- Page 128 Qué hacer a continuación Conexión en Windows Vista Configuración automática de WLAN en Windows Vista La computadora comenzará a funcionar en Modo de estación (como cliente) con su red LAN inalámbrica tan pronto como configure la clave de red. Si no dispone de una red inalámbrica, primero debe configurar su enrutador inalámbrico para que pueda usar su PC en Modo de estación.
- Page 129 Qué hacer a continuación Seleccione la red inalámbrica que prefiera haciendo clic en su nombre. Se resalta el bloque completo. Seleccione Conect (Conectar) en la esquina inferior derecha. Aparece el cuadro de diálogo de Conexión de red inalámbrica que se muestra a continuación: Ingrese la clave de red (WEP o WPA) de su red inalámbrica.
- Page 130 Qué hacer a continuación Si su red usa encriptación WEP, la clave de red debe tener formato HEX o ASCII: HEX: 10 caracteres en notación HEX para encriptación de 40 ■ bits o 26 caracteres para encriptación de 128 bits. ASCII: 5 caracteres para encriptación de 40 bits o 13 ■...
-
Page 131: Solución De Problemas De La Instalación
Solución de problemas de la instalación Solución de problemas de la instalación Consulte Tabla 1 para obtener una lista de problemas que pueden suceder durante la instalación y algunas soluciones sugeridas. Tabla 1Problemas de instalación y posibles soluciones Problema Posible solución El programa de Use el administrador de dispositivos para resolver instalación no... - Page 132 Solución de problemas de la instalación Tabla 1Problemas de instalación y posibles soluciones Problema Posible solución Windows muestra el Compruebe que el Adaptador de PCI esté ■ Adaptador de PCI insertado correctamente en la ranura PCI. como un dispositivo Si el Adaptador de PCI está insertado ■...
-
Page 133: Registre Su Producto Para Servicios Y Reparación
Soporte técnico y reparaciones por teléfono 3Com ofrece acceso telefónico, por Internet y correo electrónico para soporte técnico y servicios de reparación. Para tener acceso a estos servicios en su región, utilice el número de teléfono correspondiente, dirección URL o de correo electrónico de la... - Page 134 Registre su producto para servicios y reparación...
-
Page 135: Regulatory Information
3Com's warranty and all applicable regulatory certifications and approvals. Only antennas specified for your region by 3Com can be used with this product. The use of external amplifiers or non-3Com antennas may invalidate regulatory certifications and approvals. - Page 136 This booklet is available from the U.S. Government Printing Office, Washington, D.C. 20402. Stock No. 004-000-0034504. 3Com is not responsible for any radio or television interference caused by unauthorized modification of the devices included with this 3Com Wireless 11n PCI Adapter (3CRPCIN175, M/N: WL-601), or the substitution or attachment of connecting cables and equipment other than specified by 3Com.
-
Page 137: Canada - Industry Canada (Ic)
– I (IC) ANADA NDUSTRY ANADA This device complies with RSS 210 of Industry Canada. Operation is subject to the following two conditions: (1) this device may not cause interference, and (2) this device must accept any interference, including interference that may cause undesired operation of this device. - Page 138 ANGUAGES OF THE UROPEAN OMMUNITY English Hereby, 3Com Corporation, declares that this RLAN device is in compliance with the essential requirements and other relevant provisions of Directive 1999/5/EC. Finnish 3Com Corporation vakuuttaa täten että RLAN device tyyppinen laite on direktiivin 1999/5/EY oleellisten vaatimusten ja sitä...
- Page 139 1999/5/CE. Spanish Por medio de la presente 3Com Corporation declara que el RLAN device cumple con los requisitos esenciales y cualesquiera otras disposiciones aplicables o exigibles de la Directiva 1999/5/CE Portuguese 3Com Corporation declara que este RLAN device está...
- Page 140 Czech 3Com Corporation tímto prohlašuje, ze tento RLAN device je ve shodě se základními pozadavky a dalšími příslušnými ustanoveními směrnice 1999/5/ES. Slovene Šiuo 3Com Corporation deklaruoja, kad šis RLAN device atitinka esminius reikalavimus ir kitas 1999/5/EB Direktyvos nuostatas. Lithuanian Šiuo 3Com Corporation deklaruoja, kad šis RLAN device atitinka esminius reikalavimus ir kitas 1999/5/EB Direktyvos nuostatas.
- Page 141 TAIWAN UMPRIMENTO DE RASIL Este produto está homologado pela ANATEL, de acordo com os procedimentos regulamentados pela Resolução 242/2000 e atende aos requisitos técnicos aplicados. Este equipamento opera em caráter secundário, isto é, não tem direito a proteção contra interferência prejudicial, mesmo de estações do mesmo tipo, e não pode causar interferência a sistemas operando em caráter primário.
Need help?
Do you have a question about the 3CRPCIN175 and is the answer not in the manual?
Questions and answers