Table of Contents
Advertisement
Advertisement
Table of Contents

Related Manuals for JL Audio Fathom f212


Summary of Contents for JL Audio Fathom f212
- Page 1 f212 Owner’s Manual...
-
Page 2: Important Safety Instructions
DO NOT OPEN CAUTION: TO REDUCE THE RISK OF ELECTRIC SHOCK, DO NOT REMOVE AMP PANEL OR SPEAKER. NO USER SERVICEABLE PARTS INSIDE. REFER SERVICING TO QUALIFIED PERSONNEL. 1) Read the Instructions — All safety and operating instructions should be read before the subwoofer is operated. - Page 3 18) Overloading — Do not overload wall outlets, extension cords, or outlet strips 19) Grounding — Th is subwoofer is supplied with a three-prong, grounded WARNING | Fathom f212 operating instructions. from the outlet when the subwoofer is left unused for long periods of time.
-
Page 4: Table Of Contents
Specifi cations: ............36 INTRODUCTION Congratulations on your purchase of a JL Audio Fathom powered subwoofer system. Th is product has been critically engineered to deliver exceptional performance in your home theater or audio system for many years to come. -
Page 5: Product Overview
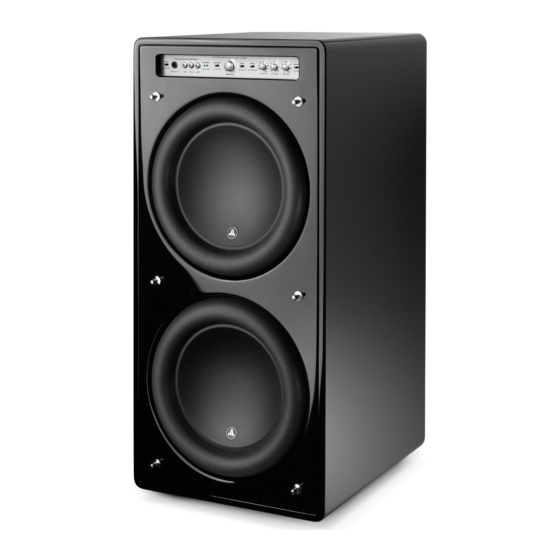
Fathom to reproduce powerful low- frequency events with stunning impact and unprecedented accuracy. Derived from JL Audio’s legendary W7 design platform, the Fathom f212 drivers off er peak-to-peak excursion capabilities well in excess of 3 inches (76 mm), to comfortably handle the dynamics of the most demanding program material. -
Page 6: Placing Your Fathom In Your Listening Room
We recommend that you begin by placing your Fathom in the front of the room, near the front left or right speaker. Placing it directly in the front corner of the room will produce the maximum number of peaks and the minimum number of dips in the bass response. - Page 7 Recommended Subwoofer Placement Options for One Fathom | Fathom f212 Page 7...
- Page 8 Fathom. Pairs of 3 inch (7.5 cm) diameter vents over the full cabinet height (8 vents total, see diagram) will allow cool air to circulate over the amp panel of your Fathom f212 subwoofer system keeping it cool and happy. 4) Your Fathom f212 subwoofer is capable of moving substantial quantities of air.
- Page 9 – the benefi ts can be substantial. High-resolution measurements and professional system calibration are recommended for the best possible results & system performance. | Fathom f212 Recommended Subwoofer Placement Options for Two Fathoms Page 9...
- Page 10 Experimentation with subwoofer and listener placement is recommended to achieve the best results – the benefi ts can be substantial. High-resolution measurements and professional system calibration are recommended for the best possible results & system performance. | Fathom f212...
-
Page 11: Unpacking Your Fathom
CAREFULLY to remove the subwoofer and minimize eff ort. IMPORTANT IMPORTANT | Fathom f212 UNPACKING YOUR FATHOM Now that you have determined your Fathom’s position in the room, you can proceed with unpacking it near its intended location. -
Page 12: Front Control Panel Layout
Front Control Panel Th e labeled Figure below depicts the front control panel of a Fathom f212 subwoofer. A.R.O. Level Mode Lights LP freq. (Hz) phase (deg.) page 14-15 page 15 page 16 page 16 page 17 Power Input Mode... -
Page 13: Rear Control And Connector Panel Layout
Rear Controls and Connectors Th e labeled Figure below depicts the rear panel of a Fathom f212 subwoofer. Unbalanced Output to Inputs Slave Connector page 19 page 21 IEC-Style AC Input Mode Connector Balanced Inputs Switches page 18 page 21... -
Page 14: Front Panel Controls In Detail
A.R.O. setup procedure, refer to pages 29-30. Calibration Mic. Input Th is input is for connecting the supplied JL Audio calibration microphone to the Fathom subwoofer. Connect one end of the supplied cable to the microphone and the other end to this jack prior to using the A.R.O. system. Th e A.R.O. system is specifi cally calibrated to this microphone and its connection scheme is specifi c to the supplied microphone. -
Page 15: Demo Button
No other front panel controls will alter the A.R.O. Defeat state. Calibrate Button will not start unless the supplied JL Audio test microphone is plugged into the Fathom subwoofer. Once the calibration routine is complete, the green light in the center of the “Calibrate”... - Page 16 LP Filter switch is set to “Off ”. 80 Hz is a commonly used fi lter frequency and usually serves as a good starting point for adjustments. Page 16 IMPORTANT | Fathom f212...
- Page 17 Using familiar source material with good mid and upper bass content, adjust the Phase control and listen for better defi ned mid-bass and a smoother transition between the subwoofer and satellite speaker systems. If no single setting sounds better than another, leave the Phase control at 0 degrees.
-
Page 18: Connecting Your Fathom(S)
Separate left and right input jacks are provided for systems without a dedicated mono subwoofer connection. Th is typically applies to two-channel audio equipment. Appropriate balanced cables are available from your JL Audio dealer and are not included with the Fathom. Technical Notes: •... -
Page 19: Unbalanced Inputs
Th is typically applies to two-channel audio equipment. Technical Notes: IMPORTANT | Fathom f212 Th e Fathom subwoofer features individual left and right unbalanced RCA- For systems with a mono subwoofer or “LFE” channel connection, only • When balanced outputs are not available on the signal source, you must use the RCA-type unbalanced inputs. - Page 20 Fathom in “Slave” mode. If you are utilizing outboard signal processing and level-matching controls, activating the “Slave” mode will prevent anyone from aff ecting system parameters with the manual controls on the Fathom. Page 20 IMPORTANT | Fathom f212...
- Page 21 “Slave” Fathom’s “Left or Mono” XLR balanced input. Etc, etc. (up to ten Fathoms may be connected in this confi guration).Appropriate balanced cables with XLR terminations are available from your JL Audio dealer and are not included with the Fathom.
- Page 22 In the connection diagram at left , balanced connections are shown as solid lines, unbalanced connections are shown dotted. You will only use one of these input connection methods (not both). WARNING | Fathom f212...
- Page 23 IMPORTANT Connections between the “Master” and “Slave” Fathoms and between “Slave” Fathoms are via balanced XLR cables ONLY. WARNING | Fathom f212 PROCESSOR OUTPUTS FATHOM REAR CONTROLS (MASTER) FATHOM REAR CONTROLS (SLAVE) WARNING! TURN OFF THE FATHOM(S) AND ALL OTHER EQUIPMENT IN...
- Page 24 (not both). NOTE: If desired, additional Fathoms can be connected in “Slave” mode to the Fathom connected as shown on this diagram. See “Connection Diagram 2” on page 23 for slave connection explanation. WARNING | Fathom f212...
- Page 25 “Slave” mode to each Fathom connected as shown on this diagram. See “Connection Diagram 2” on page 23 for slave connection explanation. WARNING | Fathom f212 STEREO ACTIVE CROSSOVER (BALANCED OUTPUTS) LOW OUT (SUB OUT) FATHOM REAR CONTROLS (MASTER)
-
Page 26: Recommended Setup Procedure
1. Speaker Size In the speaker setup menu of your receiver or preamp/processor, set up all of your high-frequency speakers as “small” with a crossover point of 80 Hz. Th is will send ALL bass to the Fathom(s). - Page 27 Flip the “Polarity” switch to “0”. 8. “phase (deg.)” Knob Rotate the “phase” knob to “0” degrees 9. A.R.O. Defeat Switch Press the A.R.O. defeat switch so that the red light in the switch remains lit. | Fathom f212 Page 27...
- Page 28 For each new position, start with the polarity and phase controls at “0” and repeat the setup process beginnng with Step 1. IMPORTANT! WRITE DOWN ALL SETTINGS PERFORMED IN STEPS 1-3 FOR FUTURE REFERENCE. Page 28 IMPORTANT | Fathom f212...
- Page 29 CAN CREATE MODERATE LEVELS OF 15 – 20 HZ NOISE THAT MAY INTERFERE WITH CALIBRATION. DO NOT TALK, COUGH OR SNEEZE DURING CALIBRATION AS THIS MAY CORRUPT THE CALIBRATION MEASUREMENTS. You are now ready to apply the power of JL Audio’s exclusive Automatic Room Page 29...
- Page 30 Feel free to experiment and listen to a variety of demanding material until you fi nd the best match for your room and your tastes. Your Fathom is now optimized for maximum bass performance at your listening seat. Congratulations! Page 30 IMPORTANT | Fathom f212...
-
Page 31: Frequently Asked Questions
/ video components. If you are going to be away from home for several days, it is also a good idea to unplug your home theater components to prevent damage from unexpected storms or power line conditions. | Fathom f212 Page 31... -
Page 32: Cleaning Your Fathom
Fathom. Never use solvents or aggressive cleaning agents on your Fathom. When in doubt, test the cleaning product on the underside of the cabinet and let it sit for several days before committing to its use on visible portions of the cabinet. Page 32 | Fathom f212... -
Page 33: Troubleshooting
4. If your other speakers play, but the Fathom does not, try changing the cable that connects the Fathom to the system. 5. If the problem persists, call your dealer or JL Audio Technical Support for assistance. Th e bass level has changed. - Page 34 Page 34 | Fathom f212...
-
Page 35: Limited Warranty / Service Information
JL Audio for service. Cosmetic damage due to accident or normal wear and tear is not covered under warranty. -
Page 36: Specifications
HOME AUDIO | MOBILE AUDIO | MARINE AUDIO “JL Audio”, “Fathom” and the JL Audio logo are registered trademarks of JL Audio, Inc., “Ahead of the Curve” is a trademark of JL Audio, Inc. Due to continuous product development, all specifications are subject to change without notice.
Need help?
Do you have a question about the Fathom f212 and is the answer not in the manual?
Questions and answers