Table of Contents
Advertisement
Quick Links
Thank you for purchasing the ProMaster
performance, please read this instruction manual carefully before using.
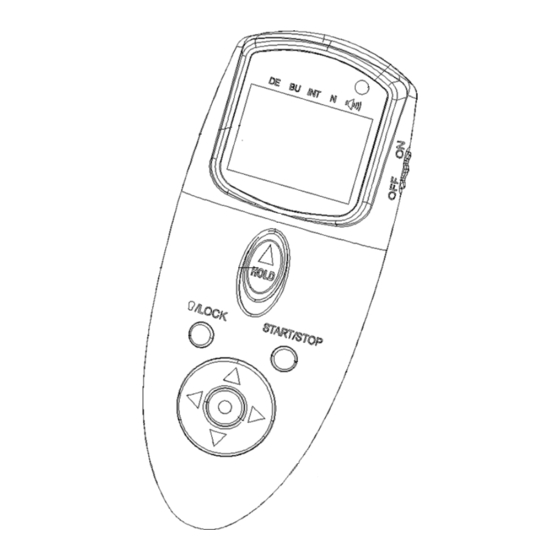
Parts Identification
®
Multi-Function Infrared Timer Remote. For the best
1.
Control Panel
2.
Shutter Release Button
3.
Background Light / Lock Button
4.
Arrow Button
5.
Indicator Light
6.
Timer Start/Stop Button
7.
SET Button
8.
Infrared Signal Output
9.
Wired Remote Cord Socket
10. Power Button
Advertisement
Table of Contents

Summary of Contents for pro master Timer Remote
-
Page 1: Parts Identification
® Thank you for purchasing the ProMaster Multi-Function Infrared Timer Remote. For the best performance, please read this instruction manual carefully before using. Parts Identification Control Panel Shutter Release Button Background Light / Lock Button Arrow Button Indicator Light Timer Start/Stop Button... -
Page 2: Included In The Package
17. SET indicator 18. Release indicator 19. Number of shots 20. Multi-Exposure indicator 21. Infrared Signal indicator Included in the package The following items included in the package: IR Timer Remote Control Instruction Manual 2 pcs. - AAA 1.5V Battery... -
Page 3: Installing And Replacing The Batteries
Installing and replacing the batteries... - Page 4 Using the remote in the wireless infrared mode Setting the infrared channel Use the arrow button to select the correct infrared signal for your camera. Press the left or right button to move the selection cursor until it disappears. Press the SET button to go into the infrared signal section. When the infrared signal number is flashing, press the up or down button to edit.
- Page 5 Using the remote in the wired mode OPTIONAL ProMaster Camera Release Cable Required Turn the camera and remote off. Remove the remote socket cover from the camera. Insert the shutter release plug into the remote socket of camera. ...
- Page 6 Adjust the following settings: Option Description Supported Setting Just like the self-timer on your camera, the timer remote switch allows you to set any delay (in 1 second increments) 0s to 99hrs 59min 59s up to 99 hours, 99 minutes and 99 seconds.
-
Page 7: Setting The Timer
Setting the Timer Use the arrow buttons on the remote to adjust the settings on the timer. Press left or right to select, up or down to change. The current selection is indicated by the selection cursor. Press the SET button at any time to complete the operation and display the new setting for the selected item. - Page 8 5. Speaker To ensure correct operation, be sure to choose an interval of at least two seconds longer than the exposure time. When using autofocus, set the delay to two seconds or more and choose an interval at least two seconds longer than the exposure time to ensure that the camera has time to focus. When using long exposure noise reduction, the interval should be at least twice the exposure time.
-
Page 9: Starting The Timer
Starting the Timer Press the START/STOP button. The timer will start and “TIMER ACTIVE” will flash in the control panel. Between shots, the control panel will show the time remaining until the next photograph is taken. If the speaker is ON, a beep will sound three times at ONE-SECOND intervals before the shutter opens. -
Page 10: Manual Function
Intervalometer function To take photographs at the shutter speed selected with the camera, adjust the settings as follows: Exposure mode M (manual) or S (shutter-priority auto) Shutter speed CAMERA Interval timer Focus mode AF-C or M Shooting mode S (single frame) Exposure time Remote Interval... - Page 11 (-9-)⑨.To view other settings, press the ARROW button left or right. The current selection is indicated by the selection cursor. Press the SET button to edit the current setting as described above. Option Description Supported Setting Multi-Exposure 1 group - 9 groups Multi-Exposure Time (HDR) ①...
-
Page 12: Specifications
Sleep mode To conserve the life of your batteries, the ProMaster Wireless Multifunction Timer Remote has a power save mode. After 1 minute of inactivity, the remote will automatically go into the sleep mode to conserve battery life. To wake the remote press either the shutter or the start button. - Page 13 If for any reason, this ProMaster product fails within ONE YEAR of the date of purchase, return this product to your ProMaster dealer and it will be exchanged for you at no charge. ProMaster products are guaranteed for ONE FULL YEAR against defects in workmanship and materials. If at any time after one year, your ProMaster product fails under normal use, we invite you to return it to ProMaster for evaluation.
Need help?
Do you have a question about the Timer Remote and is the answer not in the manual?
Questions and answers