Table of Contents
Advertisement
Advertisement
Chapters
Table of Contents

Related Manuals for Cuisinart CBT700U


Summary of Contents for Cuisinart CBT700U
- Page 1 Power Blender CBT700U...
- Page 3 Congratulations on your purchase of the Cuisinart Power Blender. For over 30 years Cuisinart’s aim has been to produce the very fi nest kitchen equipment so that cooks at home as well as professional chefs have the tools to express their creativity.
-
Page 4: Table Of Contents
Contents Product Description ....... . . 5 Safety Cautions ........6 Instructions for Use . -
Page 5: Product Description
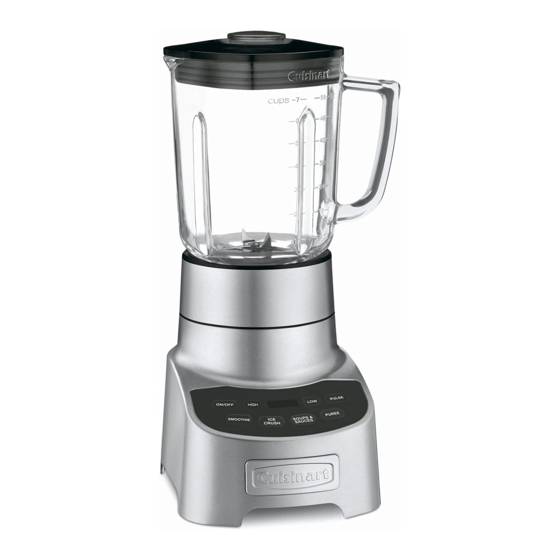
Product Description Lid with removable measuring cap 1.75L toughened glass jar Heavy duty stainless steel blade Locking collar Digital count up timer Non-slip rubber feet... -
Page 6: Safety Cautions
Always inspect the appliance before use for noticeable signs of damage. Do not use if damaged, or if the appliance has been dropped. In the event of damage, or if the appliance develops a fault, contact the Cuisinart Customer Care Line (see “UK After Sales Service” section). - Page 7 To protect against fire, electric shock or personal injury, do not immerse cord, plug or unit in water or other liquids. Do not leave the lead hanging over the edge of a kitchen table or worktop. Avoid contact between the lead and hot surfaces.
- Page 8 The symbol on the product or on its packaging indicates that this product may not be treated as household waste. Instead it should be handed over to the applicable collection point for the recycling of electrical and electronic equipment. By ensuring this product is disposed of correctly, you will help prevent potential negative consequences for the environment and human health, which could otherwise be caused by inappropriate waste handling of this product.
-
Page 9: Instructions For Use
Instructions for Use Fitting the Jar & Blade Assembly Turn the glass jar (A) upside down, and place on a fl at, dry, sturdy surface. Position the rubber seal (B) on the round opening on the bottom of the glass jar. Turn the blade assembly (C) upside down, and place the blade end in the glass jar opening. - Page 10 Fit the lid and cap. N.B. The lid should always be in place while the unit is switched on. Place the housing base on a fl at, dry, sturdy surface and position the complete jar unit on the motor housing so that the jar markings are facing you and the handle is positioned to one side.
-
Page 11: B Removing The Jar & Blade Assembly
Removing the Jar & Blade Assembly Switch the appliance off and unplug from the mains outlet. Lift the complete jar unit up and away from the housing base. N.B. Never twist the lock collar from the jar unit when removing it from the housing. Lift the whole jar unit directly upwards. -
Page 12: C Control Panel
Control Panels High/Low Speed Setting Press the ‘ON/OFF’ button, a fl ashing light will illuminate to indicate the appliance is in ‘standby’ mode. Select the desired speed High or Low and press once to activate. The corresponding red light will illuminate whilst the blender is in operation. -
Page 13: Pulse
Pulse The pulse mode allows you to create a burst of power for quick, effi cient blending. To use the pulse function, push the ‘ON/OFF’ button and the corresponding red light will illuminate to indicate the appliance is in ‘stand-by’ mode. Push the ‘Pulse’ button, and the ‘Pulse’ light will fl ash to indicate that the function has been activated. -
Page 14: Smoothie
Smoothie This is a preset programme for automatically preparing the perfect smoothie. To use the smoothie function, press the ON/OFF button. The corresponding red LED indicator will fl ash to indicate the appliance is in ‘stand-by’ mode. Press the ‘Smoothie’ button and a 30 second count up programme will begin. If it isn’t smooth enough for your liking, once the cycle stops, return to ‘stand-by’... - Page 15 The following table provides a quick reference guide for using the different functions on the appliance. Quick Reference Guide To activate blender Press ‘ON/OFF’ button Blender is in ‘stand-by’ To begin blending Press desired speed button ‘High’ or ‘Low’ To change speeds whilst blending Press desired speed button ‘High’...
-
Page 16: D Using The Blender
Using the Blender Place the housing base onto a clean, fl at, sturdy surface. Assemble the blender (see ‘Instructions for Use’ section A,B&C) and plug into a suitable mains socket. Add all necessary ingredients to the glass jar and replace the lid. You may add more ingredients during blen- ding by lifting the measuring cap in the lid and dropping ingredients through the opening in the lid. -
Page 17: Blending Techniques
IMPORTANT: Do not twist the locking collar from the blender jar when removing jar from the housing base. Simply lift blender jar from housing base. Do not store food or liquid in the glass jar. Empty and clean thoroughly after use. The blender has an advanced thermal resettable fuse feature. - Page 18 The following table provides a guide for which speeds are appropriate for blending different types of food and the results that can be achieved. Speed Selection Guide Ingredients/Recipe Speed Result Mayonnaise Soups & Sauces Thick & creamy Salad dressings Low or Purée Completely blended and emulsifi ed Nuts...
-
Page 19: B For Best Results
For Best Results Chopping nuts: Place 100g shelled nuts into the blender jar, replace lid fi rmly and pulse on ‘High’ until chopped as desired. For best results chop small amounts, e.g. 100g or less. Bread, cookie or cracker crumbs: Break or cut bread, cookies or crackers into pieces, 1.5cm or less in size. -
Page 20: Grinding Spices
Grind hard cheese: Cut cheese into 1.5cm pieces. Remove any hard rind it may have and place in the jar. Replace lid fi rmly and pulse on ‘High’ to chop cheese then blend until desired grind is achieved. For best results, do not process more than 75g cheese at a time. -
Page 21: Cleaning & Maintenance
Cleaning & Maintenance CAUTION: Handle the blade assembly carefully as the blades are VERY SHARP. Do not attempt to re- move blades from blade assembly. Always unplug the appliance from the mains outlet before cleaning. Before fi rst use, and after every use, clean each part thoroughly. Periodically check all parts before reassembly. -
Page 22: Uk Guarantee
UK Guarantee This Cuisinart appliance is guaranteed for domestic consumer use for 5 years. The guarantee covers defects under normal use from date of purchase and ceases to be valid in the event of alteration or repair by unauthorized persons. -
Page 23: Uk After Sales Service
For further advice on using your Cuisinart Power Blender and other products in the Cuisinart range, contact the Cuisinart Customer Care Line on 0870 240 6902 (09:00 to 17:00 hrs Monday to Friday) or, alternatively, email your enquiry to support@cuisinart.co.uk. -
Page 24: Recipes
Recipes Smoothies, Shakes and Frozen Beverages Berry Protein Smoothie ..........25 Summertime Cooler . -
Page 25: Berry Protein Smoothie
Berry Protein Smoothie Serves 6 125ml soy milk 1kg mixed berries (fresh and/or frozen, thawed) 2 tablespoons fl ax seed meal 3 tablespoons protein powder 1 banana, cut into 2.5cm pieces • Place all ingredients in the order listed, in the glass jar of the blender. •... -
Page 26: Summertime Cooler
Summertime Cooler Serves 5 55ml fresh lime juice 1 cucumber, peeled and seeded, cut into 2cm pieces 800g seedless watermelon, cut into 2.5cm pieces 15g fresh mint leaves • Place all the ingredients in the glass jar in the order listed. •... -
Page 27: Frozen Margarita
Frozen Margarita Serves 7 55ml fresh lime juice 300ml tequila 250ml Triple Sec 60ml simple syrup* 7-10 ice cubes • Place all the ingredients in the glass jar in the order listed. • Cover and run on the Ice Crush function for 35 seconds. •... -
Page 28: Frozen Daiquiri
Frozen Daiquiri Serves 4 Juice ½ lime 250ml rum 4 tsp sugar 6-10 ice cubes • Place all the ingredients in the glass jar in the order listed. • Fit the lid and run on the Ice Crush function for 25 seconds. •... -
Page 29: Mint Chocolate Chip Ice Cream Shake
Mint Chocolate Chip Ice Cream Shake Serves 4 250ml whole milk 900g mint chocolate chip ice cream 3 tablespoons chocolate sauce • Place all the ingredients in the glass jar in the order listed. • Fit the lid and run on ‘Low’ for 30 seconds. •... -
Page 30: Fresh Tomato And Corn Salsa
Fresh Tomato and Corn Salsa 4 cloves of garlic 1 medium onion, cut into 2.5cm pieces 2 small jalapenos, seeded and cut into 2cm pieces 4 spring onions, cut into 2.5cm pieces 200g fresh coriander 2 tablespoons fresh lime juice, divided 1 teaspoon sea salt, divided ½... -
Page 31: Sun-Dried Tomato, Garlic And Herb Cheese Spread
Sun-Dried Tomato, Garlic and Herb Cheese Spread 3 sun-dried tomatoes 2 cloves of garlic, peeled 125ml boiling water 3 spring onions, trimmed and cut into 1.5cm pieces 200g low fat cream cheese 125g cottage cheese 2 tsp herb de Provence •... -
Page 32: Chilled Gazpacho
Chilled Gazpacho Serves 8 1-2 cloves of garlic, peeled 750ml tomato juice 1 large stick celery, cut into 2.5cm pieces 1 cucumber peeled, halved lenthways, deseeded and cut into 2.5cm pieces ½ medium green pepper, cored, deseeded and cut into 2.5cm pieces ½... -
Page 33: Roasted Red Pepper Soup
• Carefully take the skins off the roasted peppers; cut into quarters. • Place in the jar of the Cuisinart Power Blender. • Add the broth mixture and the remaining ingredients. Run on the Soup & Sauces function for 1 ½ minutes,... -
Page 34: Creamy Potato And Leek Soup
Creamy Potato and Leek Soup Serves 6 25g unsalted butter 2 medium leeks, washed, sliced horizontally and cut into 1.5cm pieces 1 small onion, peeled and cut into 1.5 pieces ½ tsp thyme 2 medium russet potatoes, peeled and cut into 1.5cm pieces 300ml chicken stock 175ml water Salt and freshly ground black pepper... -
Page 35: Two Pepper Houmous
Two Pepper Houmous 2-3 cloves of garlic, peeled 2-3 dried red chillies Zest of ½ lemon, pith removed 2 tsp ground cumin 1 tsp thyme 4 tbsp fresh lemon juice 2 tbsp water 2 roasted red peppers, cut into 2.5cm 225g canned chick peas, drained, rinsed and drained again 2 tbsp Tahini ¼... -
Page 36: Sun-Dried Tomato And Basil Pesto
Sun-Dried Tomato and Basil Pesto 470ml extra virgin olive oil 6 garlic cloves 450g sun-dried tomatoes (packed in oil) 230g fresh basil leaves ¼ teaspoon freshly ground black pepper 60g grated Pecorino Romano ¼ teaspoon sea salt 2 tablespoons white vinegar •... -
Page 37: Cracked Pepper Parmesan Dressing
Cracked Pepper Parmesan Dressing 2 tsp whole black peppercorns 25g parmesan, cut into 1.5cm pieces 1 shallot, peeled and cut into 1.5cm pieces 1 clove of garlic, peeled and crushed Pinch of salt 1 tbsp Dijon-style mustard ¼ tsp Worcestershire sauce 2 tbsp mayonnaise 4 tbsp wine vinegar 4 tbsp extra virgin olive oil... -
Page 38: Raspberry-Orange Sauce
Raspberry-Orange Sauce 1 tablespoon orange juice 1 tablespoon water 900g fresh or frozen raspberries, thawed 3 tablespoons plus 1 teaspoon granulated sugar 1 teaspoon orange zest Pinch of salt Place all the ingredients in the order listed, in the jar of the blender. Run on Purée function for 1 ½ minutes. Strain through a fi ne mesh strainer. -
Page 39: Chocolate Sauce
Chocolate Sauce 100g dark chocolate, broken into 1.5cm pieces 100g milk chocolate, broken into 1.5cm pieces 2 tbsp sugar 125ml skimmed milk, heated until just bubbling at the edges ½ tsp vanilla essence • Place the chocolate in the glass jar, fi t lid and pulse for 10 seconds to chop the chocolate. Add the sugar and blend to mix, approximately 20 seconds. - Page 40 G IB-9/336...
- Page 41 Waterbase varnishing on both side for whole book Color (Front): 1C(BK) (Back): 1C(BK) Date: Aug-28-2009 Co-ordinator : / Hugo Description PDF version : CBT700U IB-9/336 (0,0) Book Hugo Code : SMT0013IB-1-1 Color Series: Operator : HAI Remark : Quality request(1)
Need help?
Do you have a question about the CBT700U and is the answer not in the manual?
Questions and answers