Nortec MH Series Installation Manual
Evaporative humidifier/cooler
Hide thumbs
Also See for MH Series:
- Installation manual (40 pages) ,
- Brochure (8 pages) ,
- Engineering manual (48 pages)
Table of Contents
Advertisement
Quick Links
Download this manual
See also:
Engineering Manual
Advertisement
Table of Contents
Troubleshooting

Related Manuals for Nortec MH Series


Summary of Contents for Nortec MH Series
- Page 1 Series EVAPORATIVE HUMIDIFIER/COOLER Installation Manual 2544832-A...
- Page 2 WALTER MEIER LTD., except to the extent required for installation or maintenance of recipient’s equipment. All references to the NORTEC name should be taken as referring to WALTER MEIER LTD.
-
Page 3: Table Of Contents
TABLE OF CONTENTS Subject Page 10-00 INTRODUCTION INTRODUCTION............... . . 2 1.1 GENERAL 1.2 NOTES ON THE INSTALLATION AND OPERATING INSTRUCTIONS . - Page 4 TAKING OUT OF SERVICE / DISPOSAL ........... .52 3.1 TAKING OUT OF SERVICE .
- Page 5 10-00 INTRODUCTION 10-00 Page 1 2008-12-03...
-
Page 6: Introduction
The Nortec MH Adiabatic Air Humidifier incorporates the latest technical advances and is designed to meet all recognized safety standards. Nevertheless, improper use of the Nortec MH Adiabatic Air Humidifier may result in danger to the user or third parties and/or damage of material assets. - Page 7 If the equipment changes hands, the documentation must be passed on to the new operator. If the documentation gets misplaced, please contact your Nortec representative. Copyright protection The present installation and operating instructions is protected under the Copyright Act.
-
Page 8: Safety Overview
For safety and warranty reasons any action beyond the scope of this manual must be carried out only by qualified personnel authorized by the manufacturer. It is assumed that all persons working with the Nortec MH are familiar and comply with the appropriate regulations on work safety and the prevention of accidents. - Page 9 Prevention: Before carrying out any work set the Nortec MH out of operation (switch off the unit, disconnect it from the mains and stop the water supply) and secure the unit against inadvertent power-up.
-
Page 10: Product Overview
• if connections and/or piping are not sealed • if electrical cables are defective All persons working with the Nortec MH must report any alterations to the unit that may affect safety to the owner without delay. Prohibited modifications to the unit No modifications must be undertaken on the Nortec MH without the express written consent of the manufacturer. -
Page 11: Product Designation
PRODUCT DESIGNATION The product designation and the most important unit data are found on the rating plate: TYPE KEY 10-00 Page 7 2008-12-03... -
Page 12: Mhb Flow Model
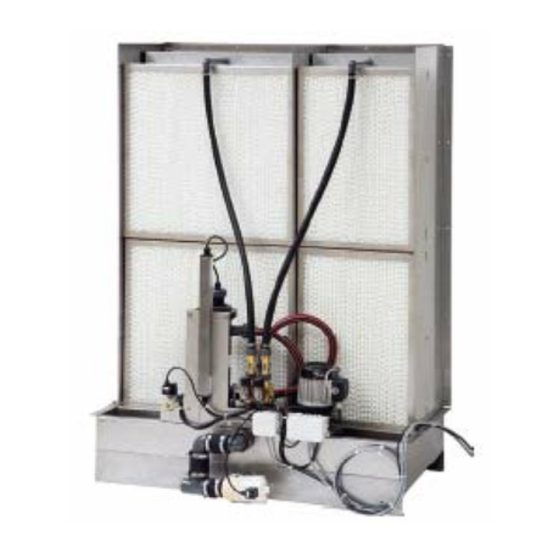
MHB Flow Model 3.4.1. MHB Flow Construction Model 1 Water connection on unit R 3/4 " (outside thread) 2 Volume controlling valves (adjustable manually) 3 Water tub 4 Open drain 1.5” PVC (1.66” (42 mm) OD) 5 Water hoses 6 Spray bar cap with distribution pipes 7 Humidification boxes 8 Mist eliminator (for air speed above humidification boxes >3.8 m/s) (750 fpm) 9 Control unit on/off... - Page 13 3.4.2. MHB Flow System Overview Figure 2. System Overview – MHB Flow Functional description The MHB Flow model provides On/Off control by means of the MHB control unit and an external On/Off humidistat. In case of a humidification/cooling request the supply valve opens and the water flows via the pressure reducing valve (accessory), the water filter (accessory) and the manually adjustable volume controlling valves to the distribution pipes above the humidification boxes.
-
Page 14: Mhtc Flow Model
MHTC Flow Model 3.5.1. MHTC Flow Construction Model 1 Water connection on unit R 3/4 " (outside thread) 2 Volume controlling valves (adjustable manually) 3 Step valves (1 to 3) 4 Water tub 5 Open drain (outside diameter 1.5" PVC (1.66" (42 mm) OD) 6 Water hoses 7 Spray bar cap with distribution pipes 8 Humidification boxes... - Page 15 3.5.2. MHTC Flow System Overview Figure 4. System Overview – MHTC Flow Functional description The MHTC Flow model provides multistep control by means of the MHTC Total Control unit and the step valves (1, 2 or 3 step valves depending on the humidifier capacity). The MHTC Total Control unit (for wall mounting) processes analog sensor/control signals and uses them to control the step valves.
-
Page 16: Mhb Reflow Model
MHB Reflow Model 3.6.1. MHB Reflow Construction Model 1 Water connection on unit R 3/4 " (outside thread) 2 Level-controlled supply valve 3 Circulation pump 4 Overflow 5 Drain 6 Drain valve 7 Volume controlling valves (adjustable manually) 8 Water tub 9 Water hoses 10 Spray bar caps with distribution pipes 11 Humidification boxes... - Page 17 3.6.2. MHB Reflow System Overview Figure 6. System Overview – MHB Reflow Functional description The water tub is filled up to a preset upper level via the level-controlled supply valve. When the water level in the tub drops below a certain limit, the level-controlled supply valve opens until the upper limit is reached again.
-
Page 18: Mhtc Reflow Model
MHTC Reflow Model 3.7.1. MHTC Reflow Construction Model 1 Water connection on unit R 3/4 " (outside thread) 2 Level-controlled supply valve 3 Circulation pump 4 Overflow 5 Drain 6 Drain valve 7 Step valves (1 to 3) 8 Volume controlling valves (adjustable manually) 9 Water tub 10 Water hoses 11 Spray bar cap with distribution pipes... - Page 19 3.7.2. MHTC Reflow System Overview Figure 8. System Overview – MHTC Reflow Functional description The water tub is filled up to a preset upper level via the level-controlled supply valve. When the water level in the tub drops below a certain limit, the level-controlled supply valve opens until the upper limit is reached again.
-
Page 20: Standard Delivery
Packaging Keep the original packaging of the Nortec MH for later use. In case you wish to dispose of the packaging, observe the local regulations on waste disposal. Never dispose of the packaging to the environment. - Page 21 10-10 INSTALLATION 10-10 Page 17 2008-12-03...
-
Page 22: Installation
1. INSTALLATION IMPORTANT NOTES ON THE MOUNTING AND INSTALLATION WORK Qualification of personnel All mounting and installation work must be carried out only by well qualified personnel authorized by the owner. It is the owner’s responsibility to verify proper qualification of the personnel. -
Page 23: Unit Mounting
Usually, the design and dimensioning of the ventilation duct/air handler as well as the location of the Nortec MH inside the duct are determined, recorded and specified when planning the entire system. Prior to installation, however, make sure the following criteria have been taken into consideration: •... - Page 24 1.2.2. Mounting Process Figure 1. Mounting Process – Step 1 Align the water tub to the centre of the duct, then use a level check water tub to the duct lengthwise and crosswise. Shim the tank as required until it is level. Note: Install four self-tapping screws 1/4 UNC x 3/4"...
- Page 25 Figure 2. Mounting Process – Step 2 Fix the cross beam “B” to the water tub using four hexagon socket screws 1/4 UNC x 1/2" and washers. 10-10 Page 21 2008-12-03...
- Page 26 Figure 3. Mounting Process – Step 3 Hint: With close space conditions we recommend to install the EPDM sealing profile to the vertical supports before installing the supports. Please refer to step 7 for more information. Carefully mount the left “D” and the right vertical support “E” onto the threaded bolts of the water tank, then fix each support with four 1/4 UNC nuts and washers (do not overtighten the nuts).
- Page 27 Figure 4. Mounting Process – Step 4 Carefully mount the vertical intermediate support(s) “F” (number depending on the unit size) onto the threaded bolts of the water tub, then fix each support with two 1/4 UNC nuts and washers to the water tub (do not overtighten the nuts) and with a hexagon socket screw 1/4 UNC x 1/2" and a washer to the cross beam.
- Page 28 Figure 5. Mounting Process – Step 5 Fix the front bracket “G” to each vertical support using two hexagon socket screws 1/4 UNC x 1/2" and washers. Important! Before tightening the screws make sure all supports are vertically exactly aligned! 10-10 Page 24 2008-12-03...
- Page 29 Figure 6. Mounting Process – Step 6 Fix one mounting bracket “H” to each vertical support and intermediate support using a hexagon socket screw 1/4 UNC x 1/2", a 1/4 UNC nut and a washer (see figure above). Important: With multiple intermediate supports all mounting brackets must be mounted to the supports on the same side.
- Page 30 Figure 7. Mounting Process – Step 7 The air gap between the outermost vertical supports and the duct walls as well as between the front bracket and the duct ceiling must be sealed using EPDM sealing profile (accessory). Cut the EPDM sealing profiles to the desired length (channel height and channel width plus cm allowance).
- Page 31 Figure 8. Mounting Process – Step 8 Fix hydraulic unit to the water tub and the cross beam using four hexagon socket screws 1/4 UNC x 1/2" and washers. Important: Remove the closing plug “H” from the circulation pump inlet before mounting the hydraulic units MHB Reflow or MHTC Reflow.
- Page 32 Figure 9. Mounting Process – Step 9 Assemble the drains according to the corresponding figure above (the drains can be assembled for draining to the right or to the left) and fix it to the water tank using the mounting bracket provided. 10-10 Page 28 2008-12-03...
- Page 33 Figure 10. Mounting Process – Step 10 Starting from the bottom, install the humidification boxes in each row: Hook the mounting clips of the boxes into the corresponding openings of the supports, then push the humidification box downwards until it comes to a stop (arrangement of the humidification boxes according to the installation drawing included in the delivery).
- Page 34 Figure 11. Mounting Process – Step 11 Only for units with mist eliminator: Hook the mounting brackets into corresponding openings of the vertical supports, then push the brackets downwards until it comes to a stop (if necessary use a rubber mallet). Note: arrangement of the mounting brackets according to the detail figures above and the installation drawing included in the delivery.
- Page 35 Figure 12. Mounting Process – Step 12 Only for units with mist eliminator: Starting from the bottom, install the mist eliminator in each row: Hook the mounting clips of the mist eliminator into the corresponding openings of the mounting brackets, then push the mist eliminator downwards until it comes to a stop. Note: arrangement of the mist eliminator according to the installation drawing included in the delivery.
- Page 36 Figure 13. Mounting Process – Step 13 Mounting the spray cap bars: Push the two tongues on the back side of the trickling hood underneath the frame sheet of the humidification box (see detail above), then pivot the spray cap bars downwards.
-
Page 37: Plumbing And Electrical Installation
10-20 PLUMBING & ELECTRICAL INSTALLATION 10-20 Page 33 2008-12-03... -
Page 38: Water Installation
1.0 WATER INSTALLATION OVERVIEW WATER INSTALLATION Figure 1. MHB Flow – Water Installation Figure 2. MHTC Flow – Water Installation 10-20 Page 34 2008-12-03... -
Page 39: Notes On Water Installation
Notes on water quality: • For the water supply of the Nortec MH, use exclusively untreated drinking water, Reverse Osmosis Water, fully demineralised water or partly softened water. • The use of additives such as corrosion inhibitors, disinfectants, etc., is not allowed, since these additives may endanger health and affect proper operation. -
Page 40: Electrical Installation
ELECTRICAL INSTALLATION 1.3.1 Leading the electrical cables out of the duct Note: The electric installation of the unit models for the Nortec MH “Flow” and “Reflow” is the clients responsibility. Figure 4. Leading the electrical cables out of the duct •... - Page 41 1.3.2 Mounting the MH Control Unit Figure 5. Mounting the MH Control Unit 1. Fix the control panel to the wall using 4 x ¼” screws (not provided). 2. Connect the multi conductor control cables from the hydraulic unit to the corresponding terminals in the control unit according the appropriate wiring diagram.
- Page 42 1.3.3 Wiring Diagram Nortec MH Flow Figure 7. Wiring Diagram MH Flow 10-20 Page 38 2008-12-03...
- Page 43 1.3.4 Wiring Diagram Nortec MH Reflow Figure 8. Wiring Diagram MH Reflow 10-20 Page 39 2008-12-03...
- Page 44 THIS PAGE INTENTIONALLY LEFT BLANK 10-20 Page 40 2008-12-03...
- Page 45 10-30 OPERATION 10-30 Page 41 2008-12-03...
-
Page 46: Operation
ADJUST THE VOLUME CONTROLLING VALVES Figure 1. Adjusting the Volume Control Valves After first time commissioning of the Nortec MH, the volume controlling valves must be adjusted to the local operating conditions according to the separate instructions. 10-30... -
Page 47: Notes On Operation
Note: if the Nortec MH is not be used for a longer period of time the MHB Flow model should be taken out of operation as described above. However, the MHTC Flow, MHB Reflow, and MHTC Reflow should stay operable to keep the hygiene functions active. - Page 48 THIS PAGE INTENTIONALLY LEFT BLANK 10-30 Page 44 2008-12-03...
-
Page 49: Maintenance & Troubleshooting
10-40 MAINTENANCE & TROUBLESHOOTING 10-40 Page 45 2008-12-03... -
Page 50: Maintenance
Only use original Nortec spare parts to replace faulty parts. Safety Before carrying out any maintenance work take the Nortec MH out of operation as described in this manual and secure the unit against inadvertent power-up. In addition, take the ventilation system out of operation as described in the operation instructions of the ventilation system and secure the ventilation system against inadvertent power-up. -
Page 51: Maintenance Work
In any case the Nortec MH is to be maintained at least twice annually. On units equipped with a MH control unit (MHTC Flow, and MHTC Reflow) the maintenance interval can be programmed. As soon as the maintenance time has elapsed, a maintenance message is displayed to draw your attention to the pending maintenance. - Page 52 disinfectant. Water installation Check water the water hoses of the humidifier for cracks and correct fastening, replace defective hoses. Carefully clean the hoses with a combined detergent and disinfectant. Check water supply line for sealing and seal if necessary. Dismantle water filter (if present) and clean Spray Bar Cap Dismantle the spray bar cap and check the holes in the water distribution pipes for mineral deposit.
-
Page 53: Dismantling And Installation Works
DISMANTLING AND INSTALLATION WORKS 1.4.1 Dismantle and install the mist eliminator and humidification boxes. 1. Undo the hose clamps, then pull off the hoses from the connections on the spray bar caps. 2. Lift the spray bar caps on the water connection side and remove them to the front. - Page 54 1.4.2 Dismantle and install the UV lamp (option) 1. Pull the retaining clip out to release the UV light plug. 2. Carefully lift the plug and pull the UV lamp out of the housing. 3. Remove glass tube to the top. 4.
-
Page 55: Resetting The Maintenance Indication
Water drain is leaking. Check/seal water drain. Humidity/Cooling Shut-off valve in the water Open shut-off valve. demand present however supply line closed. the Nortec MH does not humidify. Reflow Models: Circulation Replace circulation pump. pump defective. Maximum System incorrectly Contact your Nortec... -
Page 56: Notes On Fault Elimination
3.0 TAKING OUT OF SERVICE / DISPOSAL TAKING OUT OF SERVICE If the Nortec MH must be replaced or if the humidification system is not needed any more, proceed as follows: 1. Take the unit out of operation as described in this manual. -
Page 57: Product Specifications
Room humidistat Duct humidity sensor Room humidity sensor Remote indication PCB On/Error/Maintenance/Humidification Options UV water treatment 24VAC Drain valve ( Conductivity monitoring Nortec Links BMS Interface Nortec OnLine Web Control S = Standard Equipment = Option 10-40 Page 53 2008-12-03... -
Page 58: Unit Dimensions
UNIT DIMENSIONS 25.4…120.0 (645…3045) (Increments of 2.95”) 23.8…118.3 (604…3004) (Increments of 3.94”) Max. humidification Depth Humidification Depth Mist Depth UD efficiency eliminator 8” (200 mm) ---- 22.5” (573 mm) 8” (200 mm) 4” (100 mm) 22.5” (573 mm) 8” (200 mm) 26.5 (673 mm) 12”... -
Page 59: Warranty
WARRANTY (1) WALTER MEIER INC. and/or WALTER MEIER LTD. (hereinafter collectively referred to as THE COMPANY), warrant for a period of two years after installation or 30 months from manufacturer’s ship date, whichever date is earlier, that THE COMPANY’s manufactured and assembled products, not otherwise expressly warranted (with the exception of the cylinder), are free from defects in material and workmanship. - Page 60 U.S.A. CANADA Authorized Agent: Walter Meier (Climate USA) Inc. Walter Meier (Climate Canada) Ltd. 826 Proctor Avenue 2740 Fenton Road Ogdensburg, NY 13669 Ottawa, ON K1T 3T7 TEL: 1-866-NORTEC-1 TEL: 1-866-NORTEC-1 EMAIL: northamerica.climate@waltermeier.com FAX: (613) 822-7964 WEBSITE: www.humidity.com...
Need help?
Do you have a question about the MH Series and is the answer not in the manual?
Questions and answers