Table of Contents
Advertisement
Service
Manual
STANDBY
STANDBY
POWER ON/OFF
POWER ON/OFF
SECTION
1. TECH NI CAL SPEC I FI CA TIONS ........................................................................................... 1
2. ALIGNMENTS....................................................................................................................... 2
3. SERVICE MODE................................................................................................................... 4
4. WRITING MAIN MICROPROCESSOR (Q201) PROCEDURE............................................ 5
5. WIRING DIAGRAM ............................................................................................................. 23
6. BLOCK DIAGRAM .............................................................................................................. 25
7. SCHEMATIC DIAGRAM...................................................................................................... 27
8. PARTS LOCATION.............................................................................................................. 35
9. MICROPROCESSOR AND IC DATA................................................................................... 46
10. EXPLODED VIEW AND PARTS LIST ................................................................................. 49
11. ELECTRICAL PARTS LIST ................................................................................................. 52
Please use this service manual with referring to the user guide ( D.F.U. ) without fail.
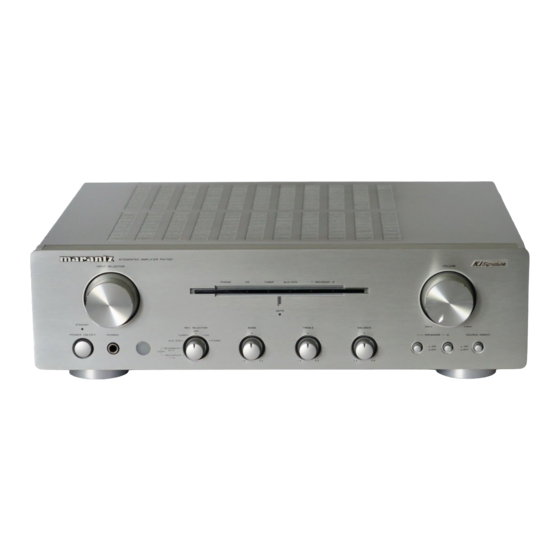
INTEGRATED AMPLIFIER PM7001
INTEGRATED AMPLIFIER PM7001
INPUT SELECTOR
INPUT SELECTOR
PHONO
PHONO
CD
CD
REC SELECTOR
REC SELECTOR
BASS
BASS
OFF
OFF
TUNER
TUNER
CD
CD
PHONES
PHONES
AUX/DVD
AUX/DVD
PHONO
PHONO
RECORDER
RECORDER
2
2
1
1
COPY
COPY
RECORDER2
RECORDER2
1
1
2
2
- -
+ +
TABLE OF CONTENTS
PM7001KI
Integrated Amplifier
TUNER
TUNER
AUX/DVD
AUX/DVD
1 1
RECORDER
RECORDER
2 2
MUTE
MUTE
TREBLE
TREBLE
BALANCE
BALANCE
MIN
MIN
1 1
SPEAKERS
SPEAKERS
- -
+ +
L L
R R
PM7001KI /
N1B/N1S
VOLUME
VOLUME
MAX
MAX
2 2
SOURCE DIRECT
SOURCE DIRECT
ON
ON
ON
ON
OFF
OFF
OFF
OFF
PAGE
Part no. 90M15AJ855010
First Issue 2005.09
MZ
Advertisement
Table of Contents

Related Manuals for Marantz PM7001KI


Summary of Contents for Marantz PM7001KI
-
Page 1: Table Of Contents
Service PM7001KI / N1B/N1S Manual Integrated Amplifier INTEGRATED AMPLIFIER PM7001 INTEGRATED AMPLIFIER PM7001 INPUT SELECTOR INPUT SELECTOR VOLUME VOLUME PHONO PHONO TUNER TUNER AUX/DVD AUX/DVD RECORDER RECORDER MUTE MUTE STANDBY STANDBY REC SELECTOR REC SELECTOR BASS BASS TREBLE TREBLE BALANCE... - Page 2 Parts for your MARANTZ equipment are generally available to our National Marantz Subsidiary or Agent. ORDERING PARTS : Parts can be ordered either by mail or by Fax.. In both cases, the correct part number has to be specifi ed.
-
Page 3: Technical Specifications
1. TECHNICAL SPECIFICATIONS Power output (20 Hz ~ 20 kHz simultaneous drive of both channels) Accessories ............... 70 W x 2 (8 Ω load) Remote controller..............1 ............. 100 W x 2 (4 Ω load) AA batteries ................2 Total harmonic distortion (20 Hz ~ 2 0 kHz simultaneous drive of both Detachable AC power cable ............ -
Page 4: Alignments
2. ALIGNMENTS Idling Current Adjustment Digital Voltmeter Digital Voltmeter L ch R ch T.P. T.P. J759 R753 R754 J760 P701 Adjustment Procedure Set the power voltage to rated voltage for this adjustment. Adjust the Idling Current with the variable resistor R753 P701 R753 R754... - Page 5 Adjustment is completed. Remove connection cable, attach the top cover. (Idling current decreases with the temperature rise inside the unit, and it is set to 10 mV (50 mA) of setting value in about 30 minutes after turn on the power.) "10 mV 50 mA "...
-
Page 6: Service Mode
3. SERVICE MODE Microprocessor (Q201) version check Microprocessor (Q201) VERSION Operate by using [Remote controller RC4001PM] RC4001PM Press the POWER button to turn on the unit. 1) POWER Press RECORDER 2 (TAPE) button and press 7, 6, 0, 0 RECORDER 2 (TAPE) button on the remote controller. -
Page 7: Writing Main Microprocessor (Q201) Procedure
4. WRITING MAIN MICROPROCESSOR (Q201) PROCEDURE Q201 Q201 Microprocessor needs writing software, when a microprocessor (Q201) is replaced. NECESSARY EQUIPMENT • Windows PC (OS : Windows2000 or WindowsXP) with Serial Port • Windows PC (OS : Windows2000 WindowsXP) • RS-232C Cable straight type Serial (9 Pin female - 9 Pin female) •... - Page 8 Double click the TM86FH47pass folder. TM86FH47pass FlashProg.exe Double click FlashProg.exe.
- Page 9 Click Device. Device Click Apply. Apply...
- Page 10 TMP86FH47 appear in Chosen Device. Chosen Device TMP86FH47 Click Object File, and click Browse... Object File Browse...
- Page 11 Choose iHEX Fomat[*.h16,*.h20] in Files of type. Files of type iHEX Fomat[*.h16,*.h20] Choose writing data, and click Open. Open Communication Click Communication.
- Page 12 Choose COM port number in COM port. COM Port COM Port Choose 9600 in Data Rate. Data Rate 9600 Click OK. When Setup window is closed, the tmp folder and TMP86FH47pass FlashProg.ini file are created simultaneously. FlashProg.ini REMARK : These are the original set-up configuration files Windows PC for that PC.
- Page 13 The Flash Programmer is launched. setup Flash Programmer setup Click setup icon. Click Browse..Browse...
- Page 14 Choose FlashProg.ini in TM86FH47pass folder, and click TM86FH47pass FlashProg.ini Open Open. Click OK.
- Page 15 Press the POWER ON/OFF button, and turn on the unit. Status indication at lower left in Flash Programming window Flash Programming is changed to "Connected" from "Connecting". Connecting Connected Connected When it did not changed, check the connection of FPC or RS-232C cable.
- Page 16 Select Password in Setup. Setup Password...
- Page 17 Setup Password opens. Setup Password • When writing in a blank microprocessor • Refer to 16 pege • • When writing (update) in the already written-in microcomputer Refer to 17 pege...
- Page 18 [When writing in a blank microprocessor] Check Single Boot Mode in Address Mode. Address Mode Single Boot Mode Setting in Device Password Device Password Check Device is BLANK. Device is BLANK Check Hex in input type. input type Password are inputted automatically, please do not Password Password Character Number Address change text box of "Password", "Password Character...
- Page 19 [When writing (update) in the already written-in microcomputer] Address Mode Single Boot Mode Check Single Boot Mode in Address Mode. Setting in Device Password Device Password Do not check Device is BLANK. Device is BLANK Check Hex in input type. Type 0102030405060708 into Password.
- Page 20 Auto Programming opens. Auto Programming...
- Page 21 Check All Erase, Programming, Verify with SUM and File Flash Memory Programming All Erase Compare in Flash Memory Programming. Programming Verify with SUM File Compare Check Manual in Recover Process by Programming Error. Click Start. Recover Process by Programming Error Manual Start...
- Page 22 Writing data is written into the microprocessor (Q201). Microprocessor ( Q201) Click Yes, when writing is successful.
- Page 23 Click Cancel. Cancel Cancel Click Cancel.
- Page 24 Select the Exit in File, and finish. File Exit Press the POWER ON/OFF button, and turn off the unit. Disconnect each cable. Software Version "3. SERVICE MODE" Check the software version. Refer to "3. SERVICE MODE" on page 4.
-
Page 25: Wiring Diagram
5. WIRING DIAGRAM 5204 0310100220018 PB01 VOLUME PWB J920 W901 JB02 JB01 5103 0310100070028 P971 J917 SPEAKER TERMINAL W007 WA01 J910 W701 J755 J757 J971 5203 0310100210088 P401 PHONO AMP PWB J972 WA02 J915 5101 0310100020078 W702 J756 P101 MAIN PWB W801 WA01 5102... -
Page 26: Block Diagram
6. BLOCK DIAGRAM PHONO PRE OUT RIAA TONE ON/OFF MAIN IN CD DIRECT SEPARATE ON/OFF DIRECT BUFFER TUNER SPEAKER-1 AUX DVD VOLUME SPEAKER-1 LINE BUFFER RECORDER-1 MUTE SPEAKER-2 RECORDER-2 TREBLE SPEAKER-2 BALANCE RECORDER-1 BASS HEADPHONE RECORDER-2 PROTECION CIRCUIT R-CH MAIN TRANSF. STANDBY RELAY ±48V... -
Page 27: Schematic Diagram
7. SCHEMATIC DIAGRAM TPF277 TPF275 48.5V SPK TERMINAL PWB J974 TPF309 TPF278 FROM MAIN POWER TRANSFORMER J801 48.5V G801 TPF282 Q729 36.8V SPK_A(L) R761 1.8V 2SC2837 TPF310 TPF283 0.47/6.8 0.6V TPF284 48.5V 36.8V R767 P-GND TPF279 1.8V TPF276 1.2V 48.5V TPF267 TPF311 TPF293... - Page 28 TO U-PRO/TONE PWB TO U-PRO/TONE PWB W601 W602 TO PHONO AMP PWB TO VOLUME PWB J501 W402 To PHONO AMP PWB TPF101 W401 +18V +18V J917 J913 J914 TPF102 J915 -18V -18V TPF159 TPF103 PH_L R723 R757 16.5V PH-OUT-L TPF104 3.3K 2W A-GND 1/4W...
- Page 29 5207 0310100150038 5209 0310100170098 5201 0310100090088 INPUT SEL PWB STANDBY LED PWB P291 P261 P201 U-PRO/TONE PWB S291 PM7001/PM7001KI only TPF705 C292 STANDBY TPF901 TPF704 R277 C291 LT308B 0.01 D258 1.8V 0.01 TPF701 TPF702 TPF902 TPF903 TPF703 J291 Q201 PIN26...
- Page 30 EX21 C258 14.9V EX22 EX23 15.5V TPF209 15.5V 5202 0310100100088 EX24 EX25 P851 STANDBY PWB A-GND J855 J960 PM7001KI ONLY 16.5V JA81 TPF305 RA85 EARTH TPF306 FOR SOFT UPDATE PRE OUT WA02 TPF307 RA86 TPF317 PRE-OUT-R TPF318 A-GND TPF308 RA87...
-
Page 31: Parts Location
8. PARTS LOCATION P201 C201 D4 D257 D5 R222 B4 R603 C12 U525 D4 U571 D8 C202 D4 D259 B2 R223 B4 R604 B12 U526 D1 U572 D7 C203 E6 D260 D7 R224 C3 R605 A9 U527 D4 U573 C7 C204 C9 J201 E10 R225 D4... - Page 32 P101 (Sn-Ag-Cu) Lead-free Solder When soldering, use the Lead-free Solder (Sn-Ag-Cu).
- Page 33 P291 C291 B2 P101 C292 B2 C301 D803 Q907 R533 R904 U178 J291 A3 C302 D804 Q908 R534 R905 U179 S291 A2 C303 D805 Q909 R535 R906 C304 D806 Q910 R536 R908 U180 C305 D901 Q911 R537 R909 U181 C306 D902 Q912 R538...
- Page 34 PB01 P701 C719 D4 J753 A1 R750 C10 R801 A7 U213 C3 U244 B8 C720 D9 J754 A10 R751 C2 R802 A7 U214 B3 U245 C9 C751 B2 J755 C3 R752 C10 R951 B4 U215 B3 U246 B9 C752 B10 J756 C8 R753 D2 R952 B8...
- Page 35 P851 P891 C891 B2 J891 C2 S891 A3 U200 A3 U201 B3 P971 C971 C3 C972 C4 C973 C5 C975 C3 C976 C4 J971 C4 J973 C5 J974 A2 J975 A5 L971 C3 L972 C4 L973 C5 R971 B6 R972 B5 U281 B3 U282 B3 U283 B4...
-
Page 36: Microprocessor And Ic Data
9. MICROPROCESSOR AND IC DATA Q201 : TMP86FH47UG P991 Port Setting Port name I/O use Note Name Act. Init. STBY 1 VSS 2 XIN 8M Clock in 3 XOUT 8M Clock out 4 TEST L->H : PROM Mode 5 VDD 6 P21 (XTIN) PROTECT_1 DC Vol/Over Current... - Page 37 Q201 : TMP86FH47UG...
-
Page 38: Exploded View And Parts List
10. EXPLODED VIEW AND PARTS LIST 5126 Ø 3X8(M) x2 W001 5128 Ø 3X8(M) x2 J001 5127 Ø 3X8(M) x5 901G 5127 Ø 3X8(M) 5110 5127 5128 Ø 3X6(M) 5110 Ø 3X8(M) Ø 3X8(M) x2 Ø 3X6(M) 5128 5405 5127 Ø... - Page 39 PACKING CASE PM7001 002S 00M14AJ809010 CUSHION CUSHION(L/R) 001D /N1B 00M14AJ257010 LID TOP COVER SLIT TYPE (BL) 001D /N1S 00M14AJ257210 LID TOP COVER SLIT TYPE (SL) NOTE : "nsp" PART IS LISTED FOR REFERENCE ONLY, MARANTZ WILL NOT SUPPLY THESE PARTS.
-
Page 40: Electrical Parts List
11. ELECTRICAL PARTS LIST NOTE ON SAFETY FOR FUSIBLE RESISTOR : PARTS INFORMATION RESISTORS The suppliers and their type numbers of fusible resistors 1) 00MGD05 × × × 140, Carbon film fixed resistor, ±5% 1/4W are as follows; 2) 00MGD05 × × × 160, Carbon film fixed resistor, ±5% 1/6W 1. - Page 41 1SS133T77 (TAPE) P101 D902 00D2760401905 DIODE 1SS133T77 (TAPE) P101 J301 0460100020090 0460100020090 TERMINAL YKC21-3446 P101 J302 0460100080070 0460100080070 TERMINAL YKC21-3441 P101 J303 0460100080070 0460100080070 TERMINAL YKC21-3441 NOTE : "nsp" PART IS LISTED FOR REFERENCE ONLY, MARANTZ WILL NOT SUPPLY THESE PARTS.
- Page 42 2130500020050 TRS. KTC3200 RANK=GR P101 Q742 2130500020050 2130500020050 TRS. KTC3200 RANK=GR P101 Q743 2110500020090 2110500020090 TRS. KTA1268 RANK=GR P101 Q744 2110500020090 2110500020090 TRS. KTA1268 RANK=GR NOTE : "nsp" PART IS LISTED FOR REFERENCE ONLY, MARANTZ WILL NOT SUPPLY THESE PARTS.
- Page 43 P201 Q210 00D2690204900 00D2690204900 TRS. KRA102M-AT(10K-10K) P201 Q211 2469100015000 2469100015000 IC AT24C08AN-10SU-2.7 EEPROM P201 Q212 00D2690204900 00D2690204900 TRS. KRA102M-AT(10K-10K) P201 Q213 00D2690204900 00D2690204900 TRS. KRA102M-AT(10K-10K) NOTE : "nsp" PART IS LISTED FOR REFERENCE ONLY, MARANTZ WILL NOT SUPPLY THESE PARTS.
- Page 44 ! LKG1J183MESCZT P701 C951 1340100655010 ELECT. CAP. RA2-50VR47ME3#8-T2 P701 C952 1340100655010 ELECT. CAP. RA2-50VR47ME3#8-T2 P701 C953 1340100445040 ELECT. CAP. RA2-25V470ME3#8-T2 P701 C954 1340100705030 ELECT. CAP. RA2-50V100ME3E#8-T2 NOTE : "nsp" PART IS LISTED FOR REFERENCE ONLY, MARANTZ WILL NOT SUPPLY THESE PARTS.
- Page 45 ! 1D3 1A/200V P851 D863 2030500013020 2030500013020 DIODE ! 1D3 1A/200V P851 D864 2030500013020 2030500013020 DIODE ! 1D3 1A/200V P851 D865 2030500013020 2030500013020 DIODE ! 1D3 1A/200V NOTE : "nsp" PART IS LISTED FOR REFERENCE ONLY, MARANTZ WILL NOT SUPPLY THESE PARTS.
- Page 46 1340100705030 ELECT. CAP. RA2-50V100ME3E#8-T2 PB01 JB01 0450100030090 0450100030090 CONN. 10MQ-ST-L PB01 RB01 0750100040030 0750100040030 VAR. RES. RK27112MC PB01 SB01 0650100010070 0650100010070 SW 4USH12 PUSH SWITCH NOTE : "nsp" PART IS LISTED FOR REFERENCE ONLY, MARANTZ WILL NOT SUPPLY THESE PARTS.
Need help?
Do you have a question about the PM7001KI and is the answer not in the manual?
Questions and answers