Table of Contents
Advertisement
Quick Links
Advertisement
Table of Contents

Related Manuals for MFJ MFJ-991B


Summary of Contents for MFJ MFJ-991B
- Page 1 Model MFJ-991B INSTRUCTION MANUAL CAUTION: Read All Instructions Before Operating Equipment MFJ ENTERPRISES, INC. 300 Industrial Park Road Starkville, MS 39759 USA Tel: 662-323-5869 Fax: 662-323-6551 COPYRIGHT 2005-2012 MFJ ENTERPRISES, INC. VERSION 2B...
- Page 2 Customers using this manual should report errors or omissions, recommendations for improvements, or other comments to MFJ Enterprises, 300 Industrial Park Road, Starkville, MS 39759. Phone: (662) 323-5869; FAX: (662) 323-6551. Business hours:...
-
Page 3: Table Of Contents
MFJ-991B IntelliTuner Automatic Antenna Tuner Instruction Manual Contents THE BASICS Introduction ............................1 Features ............................2 Specifications ........................... 2 Fast Start ............................3 Front Panel ............................4 SWR/Wattmeter ........................4 C-UP and C-DN Buttons ....................4 L-UP and L-DN Buttons ..................... 5 AUTO Button ........................ - Page 4 MFJ-991B IntelliTuner Automatic Antenna Tuner Instruction Manual APPENDICES Firmware Version Number ......................19 Resetting the Tuner ........................19 Factory Defaults ........................ 20 Delete Antenna Memory ....................20 Total Reset ........................20 Self Test ............................21 Power Down Circuit Test ....................... 22 Relay Test ............................
- Page 5 Figure 8. Yaesu Interface Cable (FT-2000/-5000 series) ..............9 Figure 9. SWR/Wattmeter ......................11 Figure 10. Power-On Operations ....................19 Figure 11. MFJ-991B Circuit Block Diagram ................38 TABLES Table 1. Antenna Memory Resolution ..................13 Table 2. Meter Needle Stationary Codes ..................15 Table 3.
- Page 6 MFJ-991B IntelliTuner Automatic Antenna Tuner Instruction Manual THIS PAGE IS LEFT BLANK INTENTIONALLY 2005-2012 MFJ Enterprises, Inc.
-
Page 7: The Basics
When you key your transmitter, MFJ’s InstantRecall checks its memory to see if you have operated on that frequency before. If so, tuning is instantaneous and you’re ready to operate. If not, MFJ’s algorithm (based on MFJ’s famous SWR Analyzer technology) kicks in. It measures the IntelliTune complex impedance of your antenna. -
Page 8: Features
MFJ-991B IntelliTuner Automatic Antenna Tuner Instruction Manual The MFJ-991B tuner enters a “sleep” mode when idle and when no transmit signal is present, turning off the microprocessor clock to avoid the generation of spurious signals. Features • Automatically matches antennas with impedances of 6 to 1600 ohms or 6 to 3200 ohms •... -
Page 9: Fast Start
MFJ-991B (the MFJ-991B will tell you to increase power). When this occurs, simply bypass the MFJ-991B and then initiate a tune. -
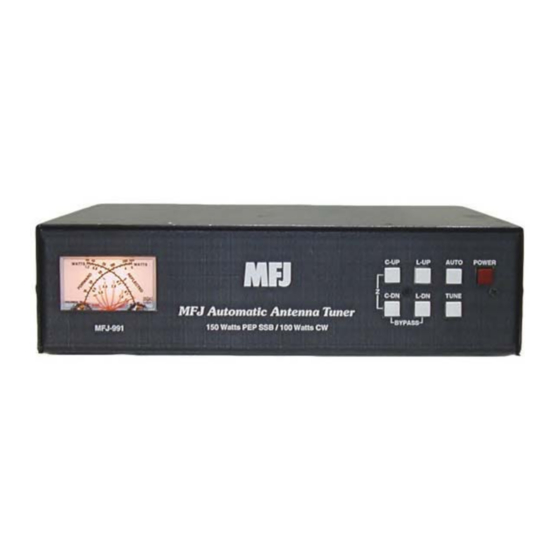
Page 10: Front Panel
SWR/Wattmeter: The cross-needle meter measures forward power, reflected power, and SWR. It operates whenever the MFJ-991B is powered on. Full-scale readings are 300 watts forward and 60 watts reflected. The meter can be set to a low power range of 30 watts forward and 6 watts reflected, or AUTO metering where the meter range is determined by the transmit power. -
Page 11: L-Up And L-Dn Buttons
MFJ-991B IntelliTuner Automatic Antenna Tuner Instruction Manual Note: Pressing [C-UP] and [C-DN] simultaneously toggles the capacitor between the input and output sides of the L-network. Forward needle bounces to the 30-watt mark when the capacitor is on the transmitter side. Reflected needle bounces to the 5-watt mark when the capacitor is on the antenna side. -
Page 12: Figure 3. Button Action
MFJ-991B IntelliTuner Automatic Antenna Tuner Instruction Manual BUTTON ACTION POWER Press in to turn power on, out to turn power off. C-UP Press to increase capacitance. C-DN Press to decrease capacitance. L-UP Press to increase inductance. L-DN Press to decrease inductance. -
Page 13: Back Panel
Most radios provide +13.8 VDC power through the tuner interface connector. If separate power supplies are used to power the MFJ-991B, the MFJ-991B should be powered on first so the radio knows an external tuner is attached. The radio will disable its internal tuner if it has one, and use the MFJ-991B external tuner. -
Page 14: Figure 5. Alinco Interface Cable
MFJ-991B IntelliTuner Automatic Antenna Tuner Instruction Manual The MFJ-5124A interface cable provides power and control signals between an Alinco radio and the MFJ automatic tuner. Supported Alinco radios are DX-70, DX-77, DX-701, DX-801, and any Alinco radio that supports the Alinco EDX-2 tuner. Press the radio’s [TUNE] button to start the tuning process;... -
Page 15: Figure 7. Yaesu Interface Cable (Ft-1000Mp/-9000 Series)
200-watt MKV transceivers during the tune process. If a FH-1 or FH-2 keypad is also used, both the FH-1/FH-2 and the radio control cable may be plugged in parallel using a 3.5-mm headphone splitter (mono or stereo is fine). Refer to “Yaesu Radio Interface/MFJ-5124Y3” on pages 33 to 34 for connections and operation. -
Page 16: Transmitter
MFJ-991B IntelliTuner Automatic Antenna Tuner Instruction Manual • Transmitter: SO-239 connector for coax cable from transceiver or amplifier. • Ground: Wing-nut terminal for RF ground wire connection. • Wire: Binding post for connecting single wire antenna. The WIRE binding post is internally connected to the ANTENNA connector. -
Page 17: Swr/Wattmeter
MFJ-991B IntelliTuner Automatic Antenna Tuner Instruction Manual SWR/Wattmeter The backlit cross-needle meter measures forward power, reflected power, and SWR, and operates whenever the tuner is powered on. Forward power up to 300 watts is displayed on the left-hand FORWARD meter scale. Reflected power up to 60 watts is read on the right-hand REFLECTED meter scale. -
Page 18: Setup
Power Level You can set the maximum power level the MFJ-991B can handle to 300 watts or 150 watts SSB/CW. Power level of 300 watts can match antennas with impedances of 6 to 1600 ohms; power level of 150 watts can match a wider impedance range of 6 to 3200 ohms. -
Page 19: Meter Range
MFJ-991B IntelliTuner Automatic Antenna Tuner Instruction Manual to 7300 kHz) is 7 kHz; if the tuner has memorized a setting for 7050 kHz, it will automatically call up this setting for any frequency from 7047 to 7053 kHz. The memory resolutions for the HF amateur bands 160... -
Page 20: Operation
MFJ-991B IntelliTuner Automatic Antenna Tuner Instruction Manual Operation Manual Tuning Manual tuning may be used to “touch up” the tuner’s settings. For example, if the target SWR is set at the default of 1.5, the tuner will stop when a match of 1.5 is found. In all cases, manual tuning gives the user control of the tuner if desired. -
Page 21: Tuner Status Indicators
MFJ-991B IntelliTuner Automatic Antenna Tuner Instruction Manual Tuner Status Indicators In addition to displaying power and SWR, the meter also indicates tuner status. The meter needles bounce, or rise to one point and stay to provide information. In this mode the meters do not indicate power levels. -
Page 22: Transceiver Foldback
Even with foldback, the tuning process can be hard on your transceiver’s finals. When an amplifier is used, the amplifier must be bypassed during tuning. Note: MFJ recommends that a transceiver-specific interface cable be used between the MFJ-991B and your transceiver to ensure that tuning only occurs at low power. -
Page 23: Antenna System Hints
When the SWR rises, the power handling capability decreases by 1/√SWR and loss also increases. Therefore MFJ recommends that RG-8/U, RG-213, LMR-400 or other high quality coax cables be used between the MFJ-991B output and the antenna. Refer to The Radio Amateurs Handbook and The ARRL Antenna Book for more information. -
Page 24: Matching Problems
MFJ-991B IntelliTuner Automatic Antenna Tuner Instruction Manual Matching Problems Most matching problems occur when the antenna system presents an extremely high impedance to the tuner. When the antenna impedance is much lower than the feedline impedance, an odd quarter- wavelength feedline converts the low antenna impedance to a very high impedance at the tuner. A similar problem occurs if the antenna has an extremely high impedance and the transmission line is a multiple of a half-wavelength. -
Page 25: Appendices
MFJ-991B IntelliTuner Automatic Antenna Tuner Instruction Manual Appendices POWER-ON OPERATIONS (Press and hold buttons while turning on the power.) Press and hold to get the firmware version number. C-UP POWER L-UP POWER Press and hold to start the self test. -
Page 26: Factory Defaults
MFJ-991B IntelliTuner Automatic Antenna Tuner Instruction Manual Factory Defaults The unit is shipped with the following default settings: • Inductance 0 μH • Capacitance 0 pF on transmitter side • Power Level 300 watts • Target SWR • Auto Tune SWR 0.5 above target SWR... -
Page 27: Self Test
30 seconds. This test also can be used to test the MFJ-991RC Remote Control. Make sure to lock in the [AUTO] button on the tuner before starting the self-test, and press the buttons on the MFJ-991RC instead of the front-panel buttons when prompted. -
Page 28: Power Down Circuit Test
MFJ-991B IntelliTuner Automatic Antenna Tuner Instruction Manual Power-Down Circuit Test When the 12 VDC power to the tuner is turned off, the tuner saves all settings to non-volatile memory. The Power-Down Circuit Test checks the power down detection circuitry. It is recommended that this test be done immediately after the regular self-test described above. -
Page 29: Wattmeter Calibration
To calibrate the wattmeter, you will need a Phillips screwdriver and a tuning tool or small flat blade screwdriver. WARNING: Never operate the MFJ-991B with its cover removed; dangerous voltages and currents can be present during operation. Never exceed tuner specifications. -
Page 30: Swr Bridge Calibration
WARNING: Do not touch anything inside the tuner during operation! Serious, painful RF burns can result. WARNING: Never operate the MFJ-991B with its cover removed; dangerous voltages and currents can be present during operation. Never exceed tuner specifications. Note: The trimmers involved in this calibration are located on the main circuit board in front of the TRANSMITTER connector;... -
Page 31: Alinco Radio Interface
5. Push the [POWER] button on the tuner to the in position and then power on the radio. Operation The operation of the MFJ-5124A radio interface is similar to the operation of the EDX-2 described in the Alinco operating manual. -
Page 32: Icom Radio Interface
Push [PWR] to turn power on again. Operation The operation of the MFJ-5124I radio interface is similar to the operation of the AH-3 or AH-4 described in the Icom radio’s operating manual. 1. Push and hold the [TUNER] button on the radio for one or two seconds to initiate automatic tuning process. -
Page 33: Kenwood Radio Interface
Press the [CLR] key to return to normal operation. Operation The operation of the MFJ-5124K radio interface is similar to the operation of the AT-300 described in the Kenwood radio’s operating manual. 1. Press and hold the [AT TUNE] button on the radio for one second to initiate automatic tuning process. -
Page 34: Yaesu Radio Interface/Mfj-5124Y
8. Push the [POWER] button on the tuner to the in position and then power on the radio. Operation for FT-100 The operation of the MFJ-5124Y radio interface is similar to the operation of the FC-20 described in the Yaesu radio’s operating manual. -
Page 35: Connections For Ft-450
8. Push the [POWER] button on the tuner to the in position and then power on the radio. Operation for FT-450 The operation of the MFJ-5124Y radio interface is similar to the operation of the FC-30/-40 described in the Yaesu radio’s operating manual. -
Page 36: Connections For Ft-857 Or Ft-897
7. Push the [POWER] button on the tuner to the in position and then power on the radio. Operation for FT-857 or FT-897 The operation of the MFJ-5124Y radio interface is similar to the operation of the FC-30 described in the Yaesu radio’s operating manual. -
Page 37: Connections For Ft-950
8. Push the [POWER] button on the tuner to the in position and then power on the radio. Operation for FT-950 The operation of the MFJ-5124Y radio interface is similar to the operation of the FC-40 described in the Yaesu radio’s operating manual. -
Page 38: Yaesu Radio Interface/Mfj-5124Y2
MFJ-991B IntelliTuner™ Automatic Antenna Tuner. With this interface, control signals are connected between the radio and the tuner. With this cable the operator can control the tuner and radio with a single push of the [TUNE] button on the front panel of the MFJ-991B. Connections for FT-847 1. -
Page 39: Yaesu Radio Interface/Mfj-5124Y3
With this cable the operator can control the tuner and radio with a single push of the [TUNE] button on the front panel of the MFJ-991B. Connections for FT-1000MP series of radios 1. -
Page 40: Connections For Ft Dx -9000 Series Of Radios
4. Connect a 12V 1000 mA DC source to the MFJ-991B. 5. Push the [POWER] button on the MFJ-991B to the in position. The radio may be powered on either before or after the tuner is powered on. -
Page 41: Yaesu Radio Interface/Mfj-5124Y4
If you press the [MENU] key momentarily, the new setting will not be saved. 2. Insert the 3.5 mm stereo phone plug into the MFJ-991B RADIO INTERFACE jack. 3. Connect the RCA plug on the MFJ-5124Y4 to the TX REQ jack on the rear panel of the transceiver. -
Page 42: Connections For Ft Dx -5000 Series Of Radios
2. Insert the 3.5 mm stereo phone plug into the MFJ-994B RADIO INTERFACE jack. 3. Connect the RCA plug on the MFJ-5124Y4 to the TX REQ jack on the rear panel of the transceiver. 4. Connect a 12V 1000 mA DC source to the MFJ-994B. -
Page 43: In Case Of Difficulty
If you have any problem with this unit first check the appropriate section of this manual. If the manual does not reference your problem or your problem is not solved by reading the manual, you may call MFJ Technical Service at 662-323-0549 or the MFJ Factory at 662-323-5869. You will be best helped if you have your unit, manual and all information on your station handy so you can answer any questions the technicians may ask. -
Page 44: Circuit Block Diagram
MFJ-991B IntelliTuner Automatic Antenna Tuner Instruction Manual 2005-2012 MFJ Enterprises, Inc. - Page 45 MFJ-991B IntelliTuner Automatic Antenna Tuner Instruction Manual Note 2005-2012 MFJ Enterprises, Inc.
- Page 46 MFJ-991B IntelliTuner Automatic Antenna Tuner Instruction Manual Note 2005-2012 MFJ Enterprises, Inc.
- Page 47 MFJ Enterprises, Inc. warrants to the original owner of this product, if manufactured by MFJ Enterprises, Inc. and purchased from an authorized dealer or directly from MFJ Enterprises, Inc. to be free from defects in material and workmanship for a period of 12 months from date of purchase provided the following terms of this warranty are satisfied.
- Page 48 MFJ ENTERPRISES, INC. MFJ-991B Manual 300 Industrial Park Road Version 2B Starkville, MS 39759 Printed In U.S.A. 03/2012...
Need help?
Do you have a question about the MFJ-991B and is the answer not in the manual?
Questions and answers