
Related Manuals for Altocraft 241-9902

Summary of Contents for Altocraft 241-9902
- Page 1 241-9902 18V Cordless Drill & Worklight Kit Operator’s Manual SAVE THIS MANUAL You will need this manual for safety instructions, operating procedures and warranty. Put it and the original sales receipt in a safe dry place for future reference.
-
Page 2: Important Safety Instructions
IMPORTANT SAFETY INSTRUCTIONS WARNING When using electric tools, machines or equipment, basic safety precautions should always be followed to reduce the risk of fire, electric shock, and personal injury. READ INSTRUCTIONS BEFORE USING THIS TOOL 1. KEEP THE WORK AREA CLEAN. Clean areas prevent injuries. 2. -
Page 3: Specifications
PRECAUTIONS FOR BATTERY and CHARGER CHARGE BATTERY AT LEAST 6 HOURS before initial use. 1. CHARGE AT ROOM TEMPERATURE. The temperature must be higher than 32°F and lower than 122°F. 2. DO NOT CHARGE IF THE CHARGER’S CORD OR PLUG IS DAMAGED. Charging with a damaged cord may result in a fire or electrical shock. -
Page 4: Function Description
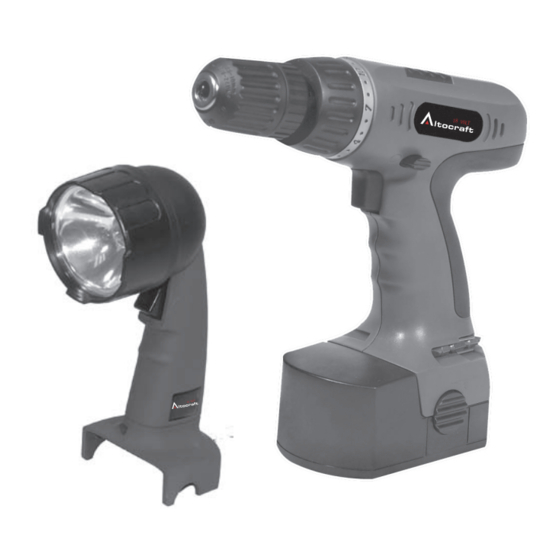
FUNCTION DESCRIPTION Worklight 1. Swivel Head 2. Switch Trigger 3. Handle Coreless Drill 1. 3/8” Keyless Chuck 2. Trigger Switch 3. Battery Pack 4. Battery Release Button 5. Screw Bit 6. Direction Lever(Forward /Stop /Reverse) 7. Torque Adjustment OPERATING PROCEDURES VARIABLE SPEED You can vary the spindle rotation speed by modulating the finger pressure on the trigger. - Page 5 OPERATING PROCEDURES • Release the trigger when a clicking sound indicates the chuck will not turn further. • For drilling, always use the drill setting, indicated by the pictogram of a drill bit. At this setting, the drive will not disengage from the chuck. KEYLESS CHUCK •...
-
Page 6: Maintenance
OPERATING PROCEDURES The battery discharges slowly over time, even when not used, and may require recharging before you use the tool. After many charge/discharge cycles, your battery will lose its ability to hold a charge. It should then be replaced. WARNING! Never charge the battery until it is cooled down, charging the hot battery may cause the battery to explode. -
Page 7: Parts List
PARTS LIST Please refer to the schematic drawing on page 8. PART NO. DESCRIPTION PART NO. DESCRIPTION 241-9902D-1 Chuck retaining screw 241-9902D-28 Screw 241-9902D-2 Chuck 241-9902D-29 Connection clip 241-9902D-3 Heat sink 241-9902D-30 D.C. motor 241-9902D-4 Torque setting ring 241-9902D-31 Screw 241-9902D-5 Forward/reverse button 241-9902D-32... -
Page 8: Schematic Drawing
SCHEMATIC DRAWING 241-9902D 241-9902L WARNING Repairs should be made by an authorized repair center.Do not open or disassemble this power tool. Contact Sharp-Group Enterperise Co., Ltd at 1-866- 915-8626 for questions regarding this power tool.
Need help?
Do you have a question about the 241-9902 and is the answer not in the manual?
Questions and answers