
Related Manuals for CoCo TMT-502


Summary of Contents for CoCo TMT-502
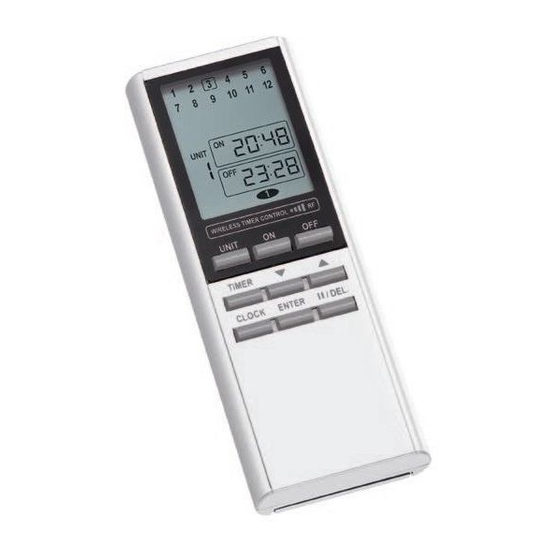
- Page 1 USER’S MANUAL version 1.1 English TMT-502 REMOTE CONTROL WITH TIMER...
- Page 2 TMT-502 REMOTE CONTROL WITH TIMER A: LCD screen D: Letter code selector B: Indicator...
- Page 3 TMT-502 REMOTE CONTROL WITH TIMER 1. M emory locations [1] Slide the battery cover in the direction indicated 2. Clo by the arrow. 3. "On" time 4. " Off" time 5. Da ily setting 6. One- time setting 7. R andom setting 8.
- Page 4 TMT-502 REMOTE CONTROL WITH TIMER [2] Swing the retainer downwards. Install the [3] Install the alkaline battery with the "+" pole to lithium battery (use a small screwdriver if the left. necessary) with the "+" pole face down. Swing the retainer upwards again.
- Page 5 TMT-502 REMOTE CONTROL WITH TIMER [4] Set the selector to the desired letter code. [5] Close the battery cover. The letter code (A through P) is the “house code”. All the devices can be set to the same letter code!
-
Page 6: Setting The Clock
TMT-502 REMOTE CONTROL WITH TIMER SETTING THE CLOCK 3 seconds [6] Press the CLOCK button for 3 seconds. The [7] (1) Press the tu buttons to select the correct hour indicator with begin to flash. hour. (2) Press ENTER. - Page 7 T-502 REM OTE CONTROL WITH TIMER [9] Press ENTER to confirm the clock setting. [8] Press the tu buttons to select the correct minute.
- Page 8 TMT-502 REMOTE CONTROL WITH TIMER OPERATION OF RECEIVERS [10] Press the tu buttons to select the receiver [11] Press ON or OFF to switch the receiver on or off. The indicator on the remote control lights up. that is set to the corresponding code (1 through 16).
-
Page 9: Programming The Timer Function
TMT-502 REMOTE CONTROL WITH TIMER PROGRAMMING THE TIMER FUNCTION 3 seconds [12] Press TIMER for 3 seconds. The program [13] (1) Press the tu buttons to select the screen appears. desired memory location (1 through 12). (2) Press ENTER. The program mode is automatically cancelled... - Page 10 TMT-502 REMOTE CONTROL WITH TIMER [15] The hour of the ON time flashes. (1) Press the [14] The UNIT value flashes. (1) Press the tu buttons until the desired receiver is selected. (2) tu buttons to select the hour of the ON time.
- Page 11 TMT-502 REMOTE CONTROL WITH TIMER [16] The hour of the OFF time flashes. (1) Press [17] (1) Press tu to select the type of switching: Switching is repeated daily; Switching occurs the tu buttons to select the hour of the OFF one time only;...
-
Page 12: Pausing A Program
TMT-502 REMOTE CONTROL WITH TIMER PAUSING A PROGRAM 3 seconds [18] (1)Press TIMER for 3 seconds. (2) Press the [19] (1) Press /DEL. A box appears around the tu buttons to select the program (1 through 12) selection. (2) Press ENTER. Wait approx. 10 that should be paused. -
Page 13: Deleting A Program
TMT-502 REMOTE CONTROL WITH TIMER DELETING A PROGRAM 3 seconds 3 seconds [20] (1)Press TIMER for 3 seconds. (2) Press the [21] (1) Press /DEL for 3 seconds. (2) Press tu buttons to select the program (1 through 12) ENTER. Wait approx. 10 seconds (or press that should be deleted. - Page 14 - Check step for step whether everything is programmed correctly. - Make sure the set "house code" (see [4]) of this product is the same as on the COCO receiver(s) that are to be controlled. The numeric code of the receiver(s) must match the channel (“Unit”) on this product (see [9]).
- Page 15 • Do not attempt to repair this product. If the product is damaged or if you are in doubt about the proper operation, take the product back to the place of purchase. • Never use COCO products for life support systems or other applications in which equipment malfunctions can have life-threatening consequences.
- Page 16 If possible, submit this product for recycling after use. Do not dispose of the product with household trash. Warranty and copyright This device is covered by a 2-year warranty that begins on the day of purchase. Visit www.coco- technology.com/warranty for additional information. Reprinting of (portions of) this manual without...
- Page 17 P.O. BOX 126 4760 AC ZEVENBERGEN THE NETHERLANDS www.coco-technology.com Declaration of Conformity Pan-Trade International BV declares that the COCO product, model: type designation TMT-502 REMOTE CONTROL WITH TIMER item number 74020 is in compliance with the essential requirements and other relevant provisions of directives R&TTE 1999/5/EC, EMC 2004/108/EC and LVD 2006/95/EC and is compatible with the standards EN 300 220- 1/3, EN 55015 and EN 301 489-1/3.
Need help?
Do you have a question about the TMT-502 and is the answer not in the manual?
Questions and answers